1. Introduction
This manual provides essential information for the proper installation, operation, and maintenance of your MOXAC 100W RV Rooftop Air Conditioner indoor evaporator unit. This unit is designed as the internal component of a split-system air conditioning setup for recreational vehicles (RVs), engineering vehicles, or agricultural vehicles. It requires connection to an external compressor/condenser unit to function as a complete air conditioning system.
Please read this manual thoroughly before attempting any installation or operation to ensure safe and efficient use of the product. Keep this manual for future reference.
2. Important Safety Information
- Professional Installation Recommended: Due to the nature of split-system air conditioning, which involves refrigerant handling and complex electrical wiring, professional installation by a qualified technician is strongly recommended. Improper installation can lead to refrigerant leaks, electrical hazards, and damage to the unit or vehicle.
- Electrical Safety: Ensure the power supply matches the unit's voltage requirements (12V/24V DC). Disconnect power before performing any maintenance or installation. Use appropriate wiring gauges and circuit protection.
- Refrigerant Handling: This unit uses R410A refrigerant. Handling refrigerants requires specialized tools and training. Do not attempt to connect or disconnect refrigerant lines without proper knowledge and equipment.
- Mounting: Ensure the mounting surface is structurally sound and can support the weight of the unit. Follow all mounting instructions carefully to prevent the unit from dislodging during vehicle movement.
- Ventilation: Ensure proper airflow around the unit and that air inlets/outlets are not obstructed.
- Children and Pets: Keep children and pets away from the unit during operation and maintenance.
3. Package Contents
Carefully unpack the box and ensure all items are present and undamaged. If any items are missing or damaged, contact your retailer immediately.
- MOXAC RV Rooftop Air Conditioner Indoor Unit (Evaporator)
- Mounting Hardware (bolts, washers, gaskets)
- Refrigerant Line Connectors/Fittings
- Drainage Hose (if included)
- Remote Control (if applicable)
- User Manual (this document)

Figure 3.1: Main components included in the package, showing the indoor unit, various bolts, rubber seals, and refrigerant line fittings. An RV graphic indicates its intended application.
4. Product Overview
The MOXAC RV Rooftop Air Conditioner indoor unit features a compact design with user-friendly controls and adjustable air outlets for optimal comfort.
4.1. Unit Features
- Large Wind Turbine: Designed for efficient air circulation and fast cooling when connected to an external compressor.
- 360° Rotating Air Ports: Four adjustable air outlets allow for directional control of airflow.
- Double Filter Design: Integrated filters help to clean the air entering the cabin.
- 32 Cooling Aluminum Tubes: The evaporator coil is constructed with 32 aluminum tubes for efficient heat exchange.
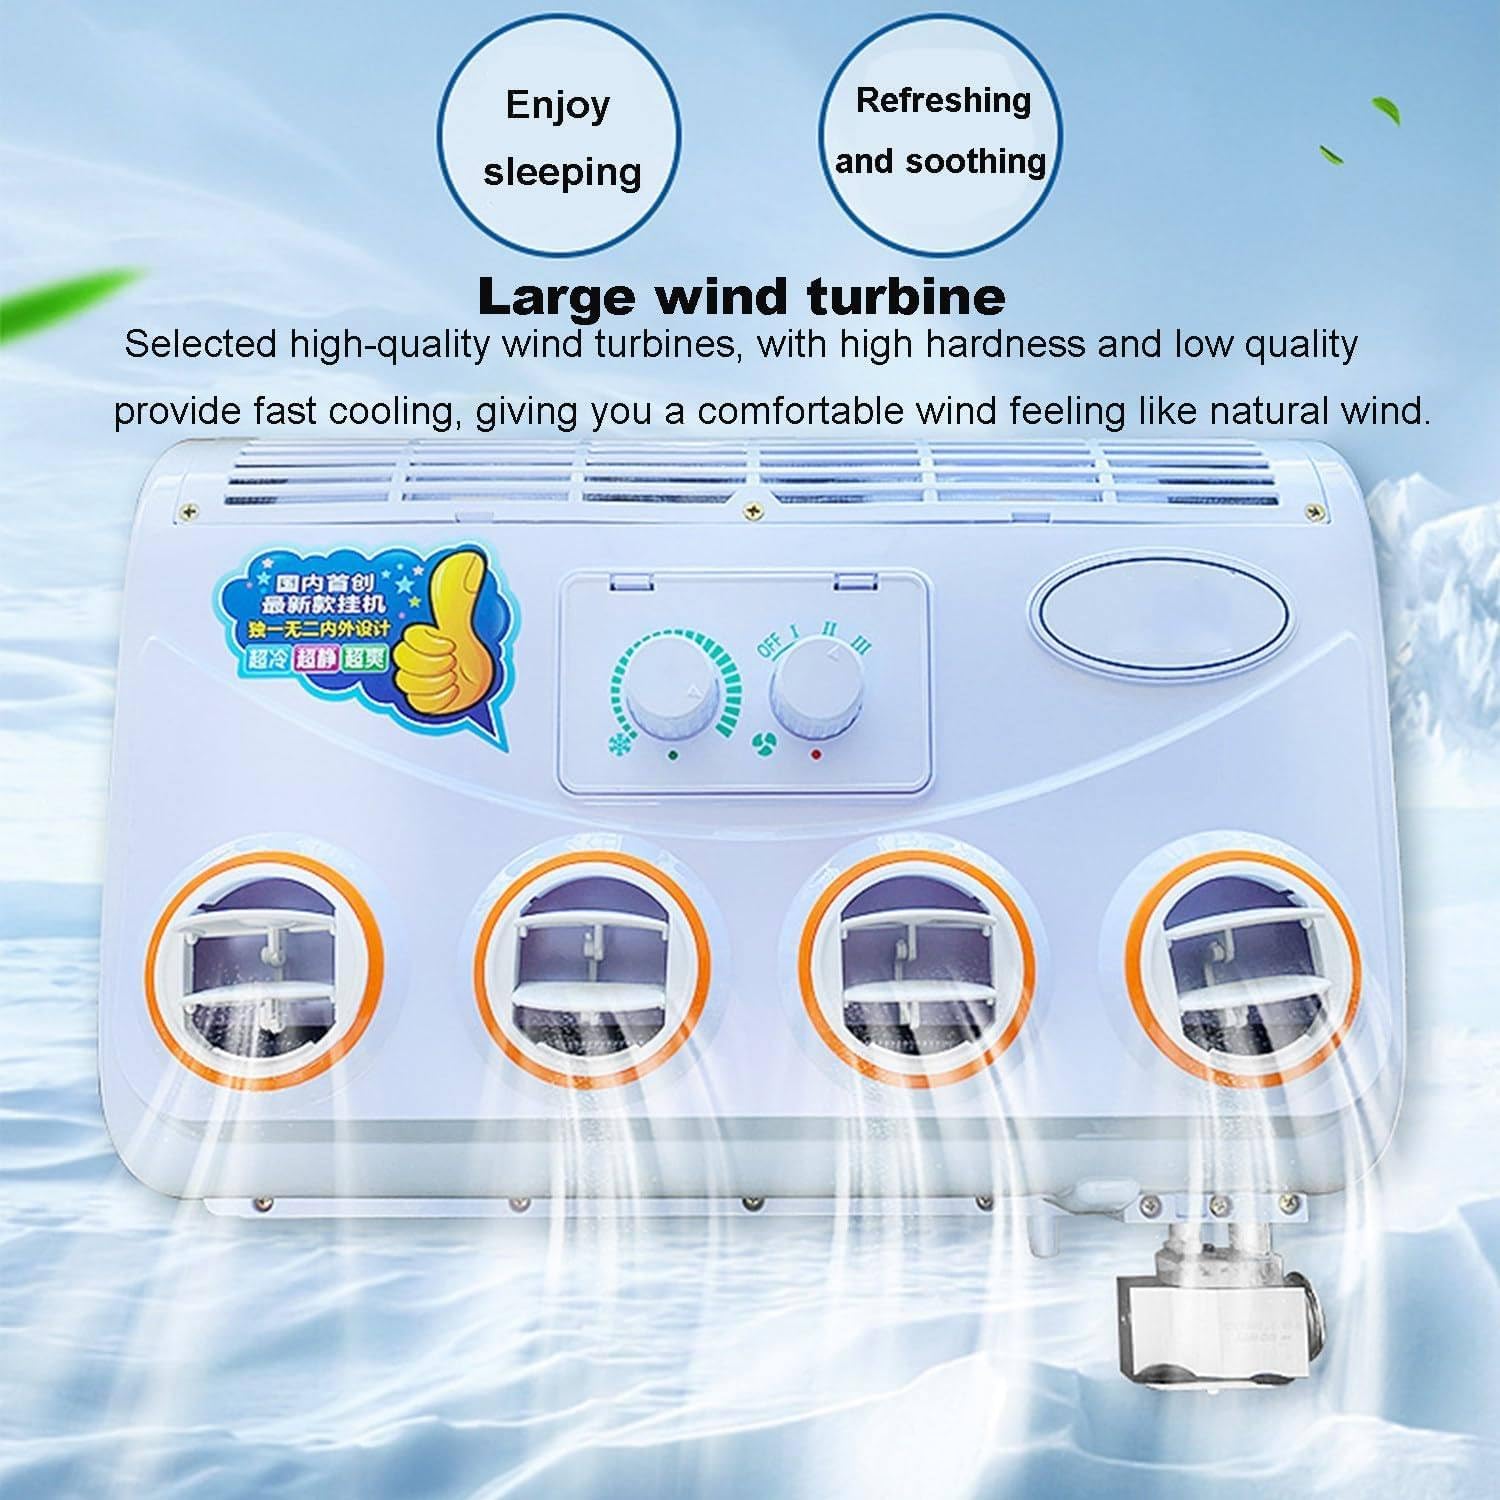
Figure 4.1: The indoor unit's design emphasizes a large wind turbine for effective air distribution, contributing to a comfortable environment.

Figure 4.2: Close-up of the four circular air outlets, each capable of 360-degree rotation for customizable airflow direction.

Figure 4.3: View of the air inlet and outlet grille, illustrating the double filter design intended to provide cleaner air.
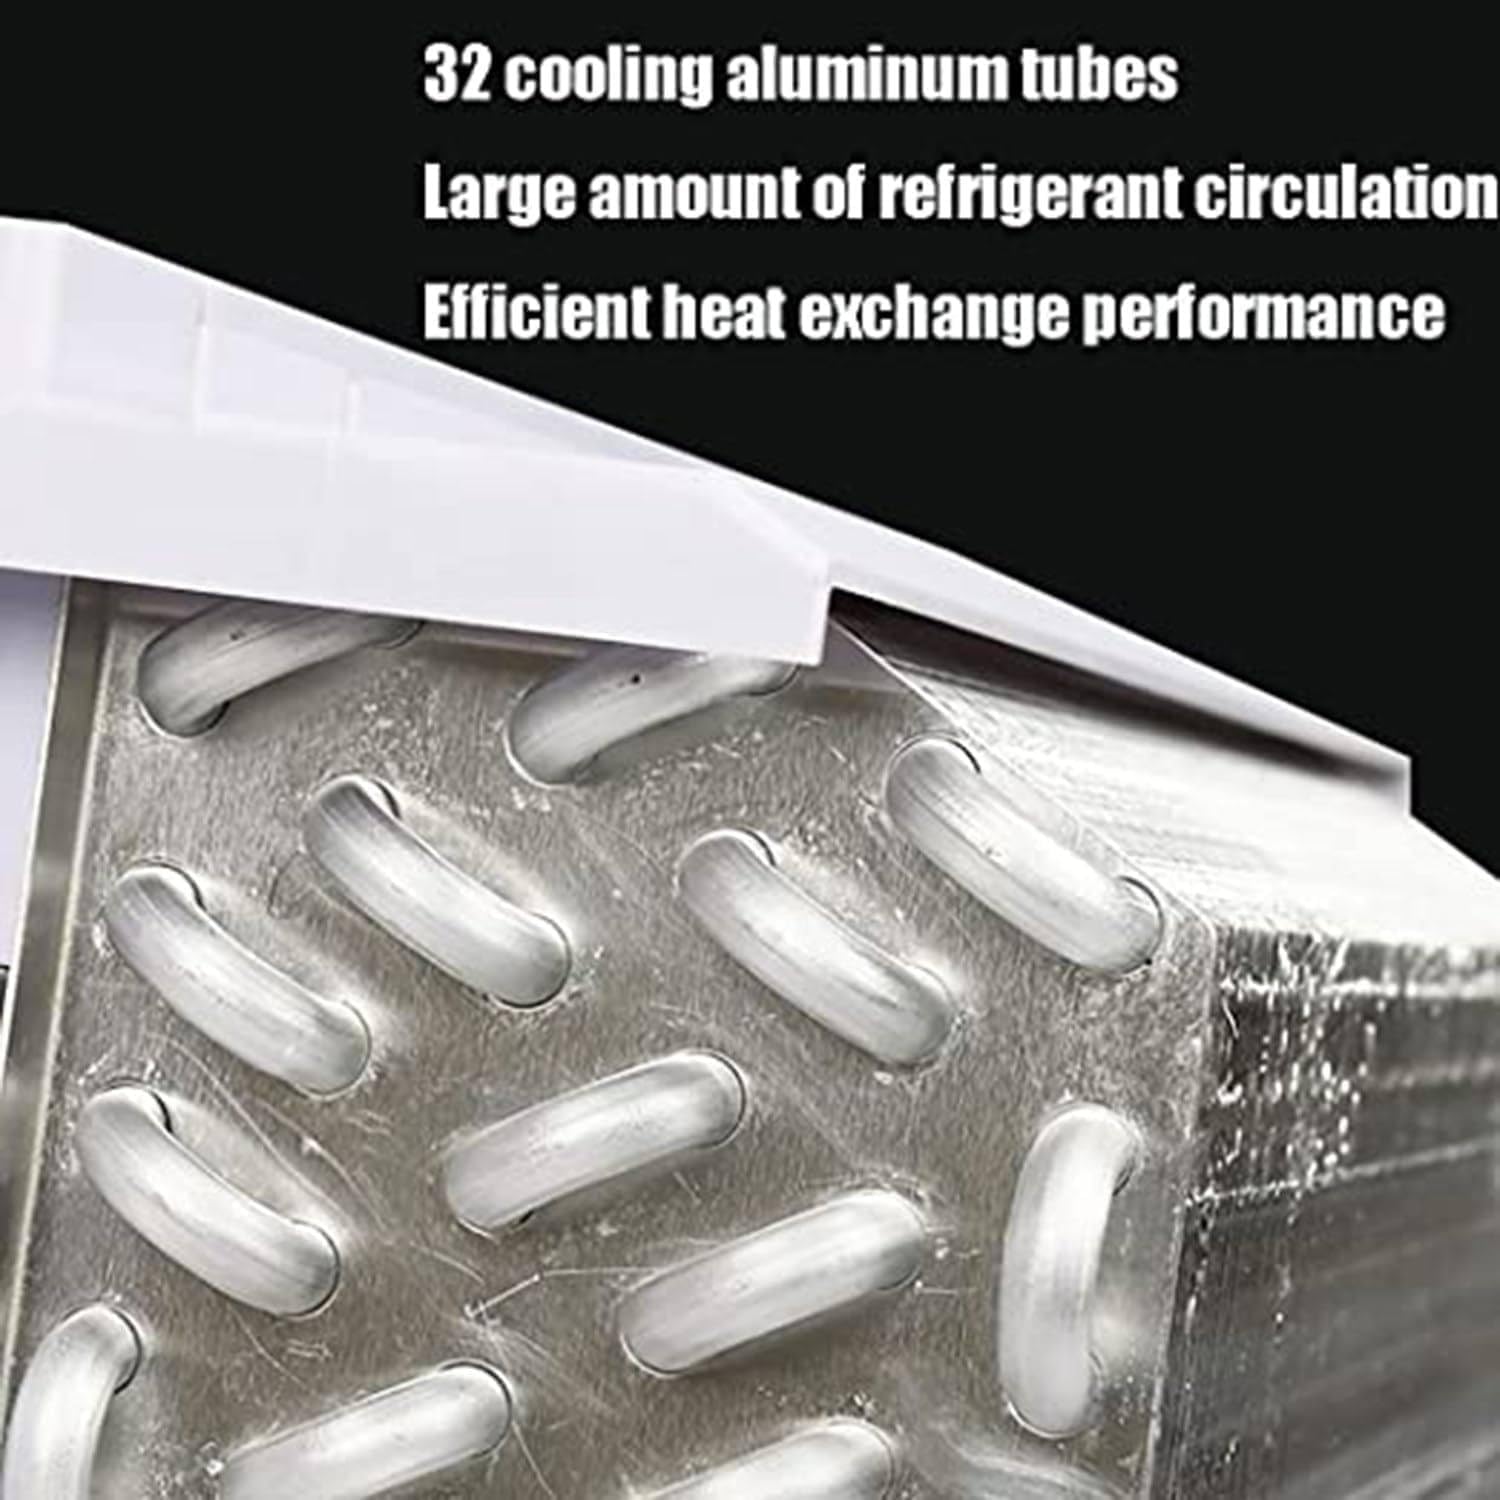
Figure 4.4: Detailed view of the evaporator coil, showcasing the 32 aluminum tubes designed for efficient heat exchange.
4.2. Dimensions
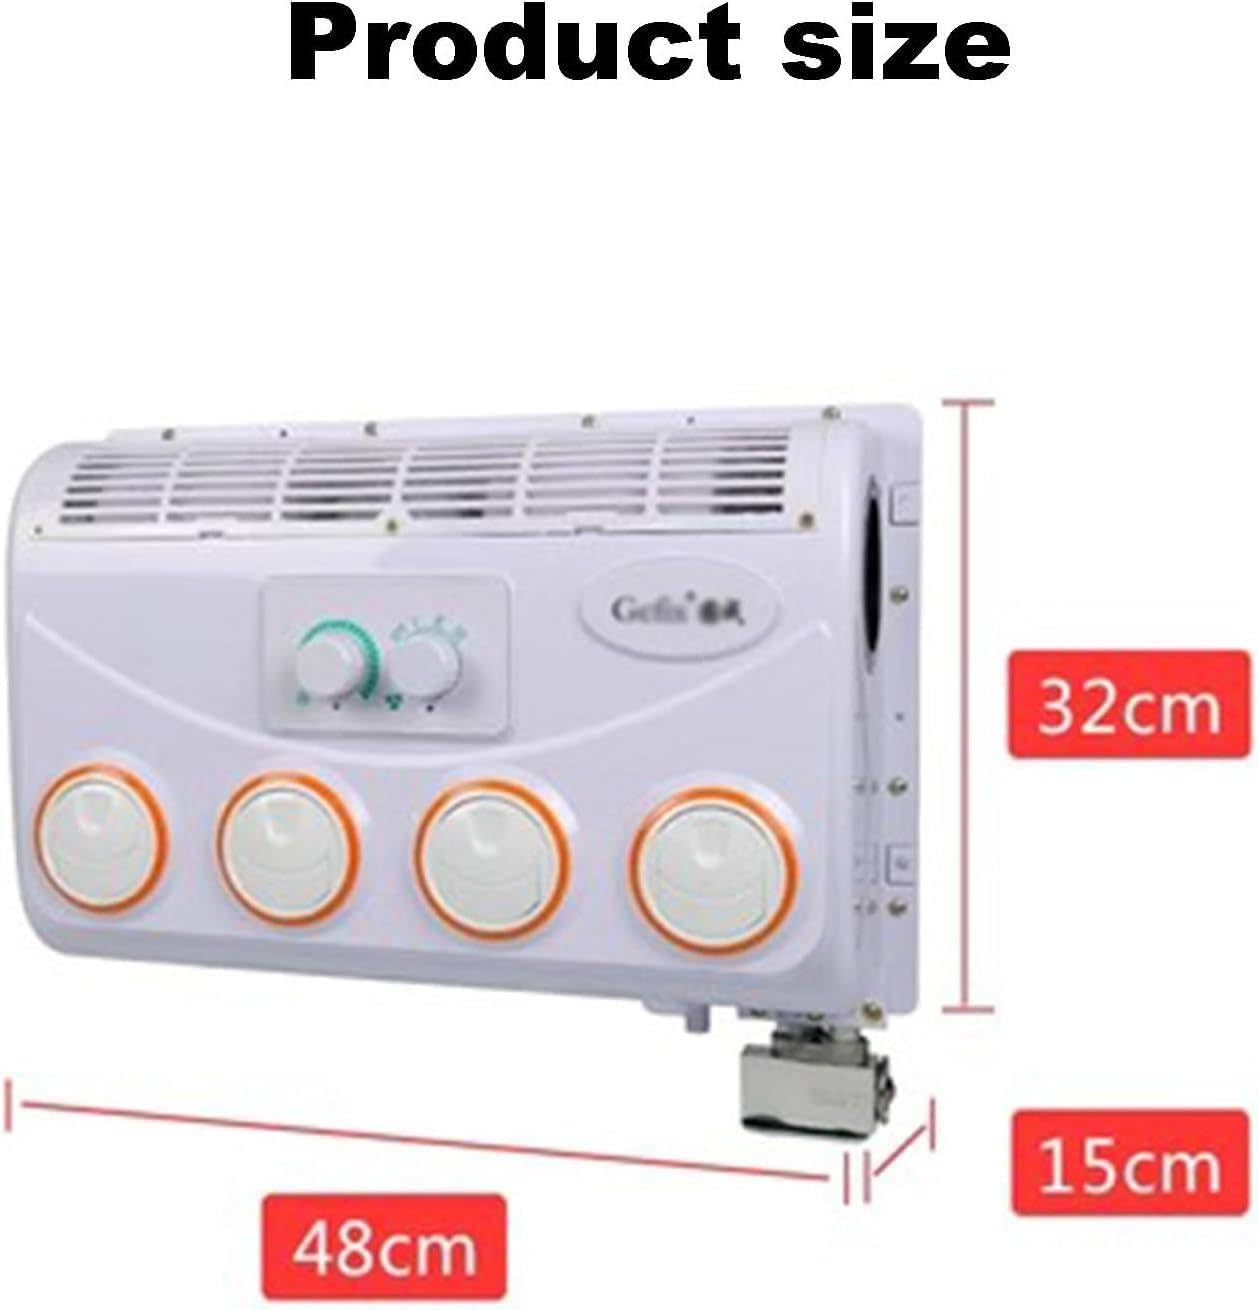
Figure 4.5: Product dimensions: approximately 48 cm (18.9 inches) in width, 32 cm (12.6 inches) in height, and 15 cm (5.9 inches) in depth.
The unit measures approximately 18.9 inches (48 cm) in width, 12.6 inches (32 cm) in height, and 5.9 inches (15 cm) in depth. Refer to Figure 4.5 for a visual representation.
5. Setup and Installation
WARNING: This unit is the indoor evaporator component of a split-system air conditioner. It requires an external compressor/condenser unit, refrigerant lines, and electrical connections to form a complete and functional air conditioning system. Installation should only be performed by qualified personnel due to the handling of refrigerants and high-current electrical systems.
5.1. Pre-Installation Checklist
- Verify vehicle's electrical system can support 12V/24V DC power requirements.
- Ensure adequate space for roof-mount installation and proper air circulation.
- Confirm compatibility with your chosen external compressor/condenser unit and R410A refrigerant.
- Gather necessary tools and safety equipment.
5.2. Mounting the Indoor Unit
- Select Location: Choose a suitable location on the RV roof that is structurally sound and allows for proper air distribution inside the cabin.
- Prepare Opening: Create an opening in the roof according to the unit's dimensions and manufacturer's guidelines for the external compressor unit (if applicable).
- Secure Unit: Use the provided mounting hardware (bolts, gaskets) to securely fasten the indoor unit to the roof. Ensure a watertight seal to prevent leaks.
5.3. Electrical Connections
- Disconnect Power: Before making any electrical connections, ensure the vehicle's battery is disconnected.
- Wiring: Connect the unit's power wires to a dedicated 12V or 24V DC power source, ensuring correct polarity. Refer to the wiring diagram (not provided in product data, assume general knowledge or external documentation).
- Fusing: Install appropriate inline fuses or circuit breakers to protect the unit and vehicle's electrical system.
5.4. Refrigerant Line Connections
This step requires specialized tools and expertise. Improper connection can lead to refrigerant leaks and system malfunction.
- Connect Lines: Connect the refrigerant suction and liquid lines from the external compressor/condenser unit to the corresponding ports on the indoor evaporator unit. Use the provided fittings and ensure tight, leak-free connections.
- Evacuate System: After connecting, the entire refrigerant system must be evacuated using a vacuum pump to remove air and moisture.
- Charge System: Charge the system with the correct amount and type of R410A refrigerant as specified by the external compressor unit manufacturer.
5.5. Drainage
Connect a drainage hose to the unit's condensate drain port and route it to allow condensate water to exit the vehicle without causing damage or pooling.
6. Operating Instructions
Once properly installed and connected to an external compressor unit, your MOXAC RV Air Conditioner indoor unit is ready for operation.
6.1. Control Panel
The unit features a control panel with knobs for fan speed and cooling intensity/mode. (Refer to Figure 3.1 for visual reference of the control panel).
- Power On/Off: Turn the left knob to the "OFF" position to power off the unit. Rotate it clockwise to turn on and select cooling intensity.
- Fan Speed Control: The right knob typically controls the fan speed (e.g., Low, Medium, High, or I, II, III). Adjust to your desired airflow.
- Cooling Intensity/Mode: The left knob, when turned on, likely adjusts the cooling intensity or mode. This knob interacts with the external compressor unit to regulate cooling output.
6.2. Adjusting Airflow
The four circular air ports can be manually rotated 360 degrees to direct the airflow as desired. Adjust them to distribute cool air evenly throughout the cabin or to focus on specific areas.
7. Maintenance
Regular maintenance ensures optimal performance and longevity of your air conditioning unit.
7.1. Filter Cleaning
The unit is equipped with a double filter system to prevent dust and debris from entering the cabin. Clean the filters regularly, especially during periods of frequent use.
- Locate Filters: The filters are typically located behind the air inlet grille.
- Remove Filters: Carefully remove the filters from their slots.
- Clean Filters: Wash the filters with mild soap and water, or vacuum them to remove accumulated dust. Allow them to dry completely before reinstallation.
- Reinstall Filters: Place the clean, dry filters back into their original positions.
Figure 7.1: The air inlet grille, where the double filters are located for easy access and cleaning.
7.2. Exterior Cleaning
Wipe the exterior of the unit with a soft, damp cloth. Do not use abrasive cleaners or solvents, as they may damage the surface.
7.3. Seasonal Checks
- Before and after periods of extended storage, inspect all electrical and refrigerant connections for signs of wear or leaks.
- Ensure the condensate drain is clear and free of obstructions.
8. Troubleshooting
This section addresses common issues you might encounter. For complex problems or issues related to the external compressor unit, consult a qualified technician.
| Problem | Possible Cause | Solution |
|---|---|---|
| Unit does not power on. | No power supply, blown fuse, loose wiring. | Check vehicle's battery connection. Inspect fuses and circuit breakers. Verify all electrical connections are secure. |
| Poor or no cooling. | External compressor not running, low refrigerant, dirty filters, obstructed airflow. | Ensure external compressor unit is operational. Check refrigerant levels (professional service required). Clean air filters. Ensure air inlets/outlets are clear. |
| Unusual noise during operation. | Loose components, fan obstruction, motor issue. | Inspect for loose parts. Check if anything is obstructing the fan blades. If noise persists, contact a technician. |
| Water leaking from unit. | Clogged condensate drain, improper installation. | Clear the condensate drain hose. Verify proper sealing and drainage during installation. |
9. Specifications
The following are the technical specifications for the MOXAC 100W RV Rooftop Air Conditioner indoor evaporator unit:
| Feature | Detail |
|---|---|
| Brand | MOXAC |
| Model Name | 100W RV Rooftop Air Conditioner |
| Type | Indoor Evaporator Unit (Split System Component) |
| Voltage | 12V / 24V DC (as per product title, specifications list 12V) |
| Wattage (Unit Consumption) | 100 Watts |
| Cooling Capacity (System) | Up to 1.2 Tons (when paired with appropriate external compressor unit) |
| Refrigerant | R410A |
| Form Factor | Roof Mount |
| Material | Aluminum (tubes) |
| Product Dimensions (D x W x H) | 11.81" x 18.9" x 5.43" (30 cm x 48 cm x 13.8 cm) |
| Item Weight | 14.3 pounds (6.49 kg) |
| Control Method | Manual Knobs, Remote (if included) |
10. Warranty Information
This MOXAC product comes with a Limited Warranty. Specific terms and conditions of the warranty may vary. Please retain your proof of purchase for warranty claims. For detailed warranty information, please refer to the documentation provided with your purchase or contact MOXAC customer support.
11. Customer Support
If you have any questions, require technical assistance, or need to report an issue with your MOXAC RV Rooftop Air Conditioner indoor unit, please contact the retailer or manufacturer's customer support. Have your product model number and purchase date ready when contacting support.