1. Introduction
Thank you for choosing the Ava Adjustable Stroke Wireless Tattoo Pen. This manual provides essential information for the safe and effective operation, maintenance, and troubleshooting of your new tattoo machine. Please read this manual thoroughly before use and retain it for future reference.

Figure 1.1: The Ava Adjustable Stroke Wireless Tattoo Pen (Gun Metal, EP10 Long).
2. Safety Information
WARNING: Do not immerse the device in water. This product is not water resistant.
- Always ensure the device is clean and sterilized according to professional tattooing standards before each use.
- Use only compatible and genuine Ava or Hildbrandt accessories and replacement parts.
- Keep the device away from children and pets.
- Store the device in a cool, dry place when not in use.
- Avoid dropping or subjecting the device to strong impacts.
- Do not attempt to disassemble or repair the device yourself, as this will void the warranty and may cause damage or injury.
- Ensure proper ventilation during operation.
3. Package Contents
Upon opening your package, please verify that all the following items are included:
- 1 x Ava Adjustable Stroke Wireless Tattoo Machine
- 2 x 18500 Lithium-ion rechargeable batteries
- 1 x Battery Charger
- 1 x Carry Case
- 2 x Grip Tape
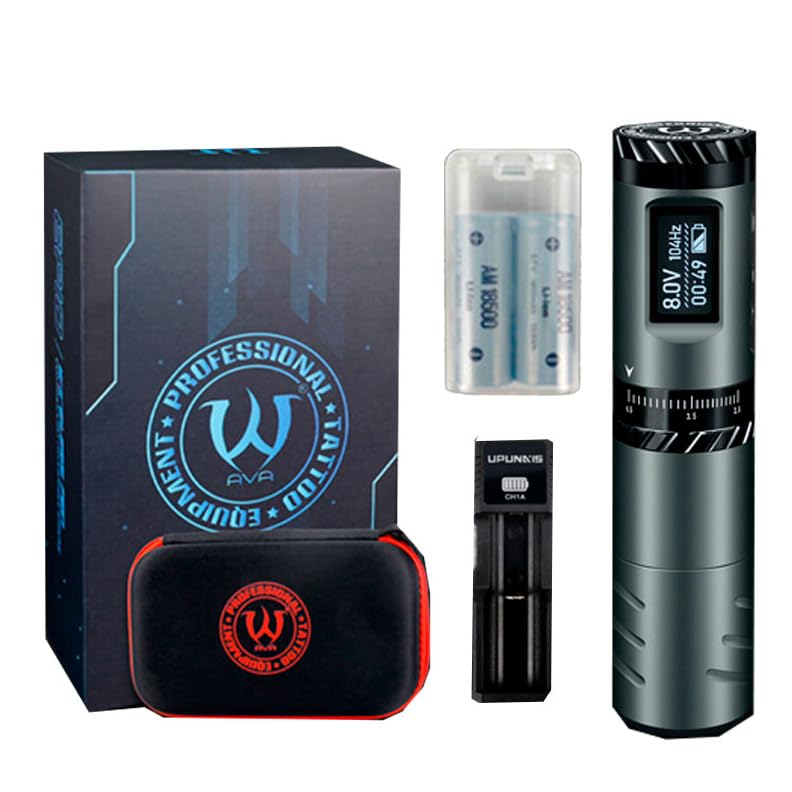
Figure 3.1: Included components in the Ava Tattoo Pen package.
4. Key Features
The Ava Adjustable Stroke Wireless Tattoo Pen is designed with advanced features for professional use:
- Adjustable Stroke: Continuously adjustable stroke from 2.5mm to 4.5mm, offering versatility for various tattooing styles.
- Intuitive OLED Display: High-definition screen displaying voltage, hertz, session timing, and battery power.
- Long-lasting Battery: Equipped with 18500 Lithium-ion batteries with circuit protection for extended use and safety. Comes with two rechargeable batteries.
- Ergonomic Design: Features an anti-slip grip for secure, comfortable, and optimal control during long sessions.
- Precision Motor: Powered by an AVA Metal Brushless DC Motor with a speed of 10500rpm, ensuring steady and accurate movements.
- Needle Protrusion Adjustment: Click-grip mechanism for easy adjustment of needle protrusion from 0-5mm.
- Universal Cartridge Compatibility: Accepts standard size tattoo cartridges.

Figure 4.1: High-definition OLED screen displaying key operational parameters.
5. Setup Guide
5.1 Charging the Batteries
- Insert the provided 18500 Lithium-ion batteries into the battery charger.
- Connect the charger to a suitable power source.
- Allow the batteries to fully charge before first use. The charger's indicator light will show charging status.
5.2 Inserting the Battery into the Pen
- Unscrew the bottom cap of the tattoo pen.
- Insert a charged 18500 Lithium-ion battery into the battery compartment, ensuring correct polarity. The circuit protection feature helps prevent incorrect installation.
- Screw the bottom cap back on securely.
5.3 Attaching a Needle Cartridge
- Ensure the tattoo pen is turned off.
- Carefully insert a standard size tattoo cartridge into the front opening of the pen.
- Twist the cartridge gently until it locks into place.
6. Operating Instructions
6.1 Powering On/Off
- To power on: Press and hold the power button (usually located near the OLED screen) for a few seconds until the screen illuminates.
- To power off: Press and hold the power button again until the screen turns off.
6.2 Adjusting Stroke Length
The Ava Tattoo Pen features a continuously adjustable stroke from 2.5mm to 4.5mm.
- Locate the adjustable grip section of the pen.
- Turn the grip clockwise to decrease the stroke length (minimum 2.5mm).
- Turn the grip anti-clockwise to increase the stroke length (maximum 4.5mm).
- The OLED display may show the current stroke setting or provide visual feedback on the adjustment.
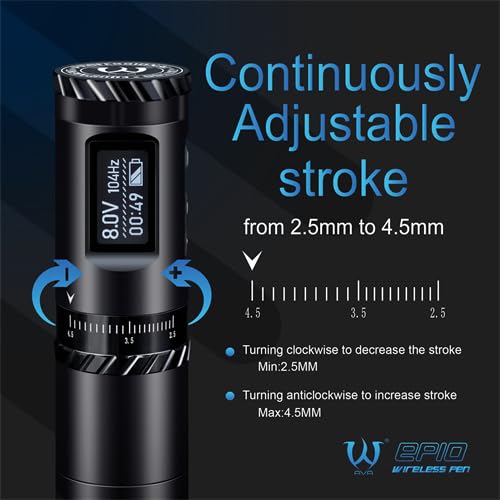
Figure 6.1: Adjusting the stroke length from 2.5mm to 4.5mm.
6.3 Adjusting Voltage and Hertz
Use the control buttons near the OLED screen to adjust the working voltage and hertz. Refer to the on-screen indicators for current settings.
- Press the '+' button to increase voltage/hertz.
- Press the '-' button to decrease voltage/hertz.
- The OLED screen will display the current voltage and hertz.
6.4 Session Timing Function
The OLED screen includes a session timing function to track your working time. This timer starts automatically when the machine is running and pauses when the machine is paused or stopped.
6.5 Adjusting Needle Protrusion
The needle protrusion can be adjusted by rotating the click-grip. Turn the grip to achieve the desired needle depth for your tattooing technique.
6.6 General Usage Steps
- Choose the desired stroke setting on the high-definition OLED screen.
- Load the tattoo cartridge into the pen.
- Adjust voltage and needle protrusion as needed.
- Place the pen on the skin and gently press to apply the tattoo.
- To remove, use alcohol or baby oil to rub the tattoo repeatedly. (Note: This step refers to temporary tattoo or stencil removal. For actual tattoo removal, consult a professional.)
7. Maintenance
7.1 Cleaning
- After each use, thoroughly clean the exterior of the tattoo pen with a suitable disinfectant wipe.
- Do not immerse the device in water or any cleaning solutions.
- Ensure no liquids enter the internal components, especially the motor and battery compartment.
- Regularly clean the grip and any removable parts according to professional hygiene standards.
7.2 Battery Care
- Always use the provided charger for the 18500 Lithium-ion batteries.
- Do not overcharge or completely drain the batteries.
- Store batteries in a cool, dry place away from direct sunlight and extreme temperatures.
- If the pen will not be used for an extended period, remove the battery.
7.3 Storage
- Store the tattoo pen and its accessories in the provided carry case to protect it from dust and damage.
- Keep the device in a dry environment.
8. Troubleshooting
| Problem | Possible Cause | Solution |
|---|---|---|
| Pen does not turn on. | Battery is not charged or incorrectly inserted. | Ensure batteries are fully charged and inserted with correct polarity. |
| Pen stops during operation. | Battery low or depleted. Overheating. | Replace with a charged battery. Allow the pen to cool down if it feels hot. |
| Needle cartridge not seating properly. | Cartridge not fully inserted or incompatible. | Ensure the cartridge is pushed in and twisted until it clicks. Use standard size cartridges. |
| Stroke adjustment is stiff. | Accumulation of ink or debris. | Clean the adjustable grip area thoroughly. Do not force the adjustment. |
If you encounter issues not listed here or if the problem persists, please contact Hildbrandt customer support for assistance.
9. Product Specifications
| Attribute | Detail |
|---|---|
| Model | EP10 Long |
| Material | Aluminum |
| Motor | AVA Metal Brushless DC Motor |
| Power Intake | 5W |
| Motor Speed | 10500rpm |
| Stroke | 2.5-4.5mm adjustable |
| Needle Protrusion | 0-5mm |
| Battery Type | 18500 Lithium-ion |
| Rated Capacity | 1900mAh |
| Size | 32mm*144mm |
| Weight | 198g (without battery) |
| Water Resistance Level | Not Water Resistant |
| Accepts | Standard size cartridges |
10. Warranty and Support
10.1 Warranty Information
For detailed warranty information regarding your Ava Adjustable Stroke Wireless Tattoo Pen, please refer to the manufacturer's official website, the warranty card included with your product, or your original purchase documentation. Warranty terms and conditions may vary by region and retailer.
10.2 Customer Support
If you require technical assistance, have questions about product operation, or need to report a defect, please contact Hildbrandt customer service. Contact information can typically be found on the Hildbrandt website or on your product packaging.
Please have your product model number (EP101XXXX-PARENT) and purchase date ready when contacting support.