1. Important Safety Instructions
Please read and understand all instructions before assembling and using the play tent. Keep this manual for future reference.
- Adult Supervision Required: Always supervise children when they are playing in or around the tent.
- Indoor Use Recommended: While suitable for outdoor use, prolonged exposure to harsh weather (strong winds, heavy rain) is not recommended. Secure the tent properly if used outdoors.
- Fire Hazard: Keep all flame and heat sources away from this tent fabric. The fabric is not fireproof.
- Choking Hazard: Small parts may be present. Ensure all components are securely assembled and kept away from young children who may put objects in their mouths.
- Structural Integrity: Do not allow children to climb on or hang from the tent poles or fabric, as this may cause damage or injury.
- Ventilation: Ensure adequate ventilation when the tent is in use, especially if multiple children are playing inside.
- Cleaning: Clean only with a damp cloth and mild soap. Do not use harsh chemicals or abrasive cleaners.
2. Package Contents
Verify that all components listed below are present before beginning assembly. If any parts are missing or damaged, please contact customer support.
- Tent Fabric (1 pc)
- Support Poles (various lengths, quantity as per design)
- Connectors (various types, quantity as per design)
- Decorative Flags (1 set)
- Decorative Cloud (1 pc)
- Instruction Manual (this document)
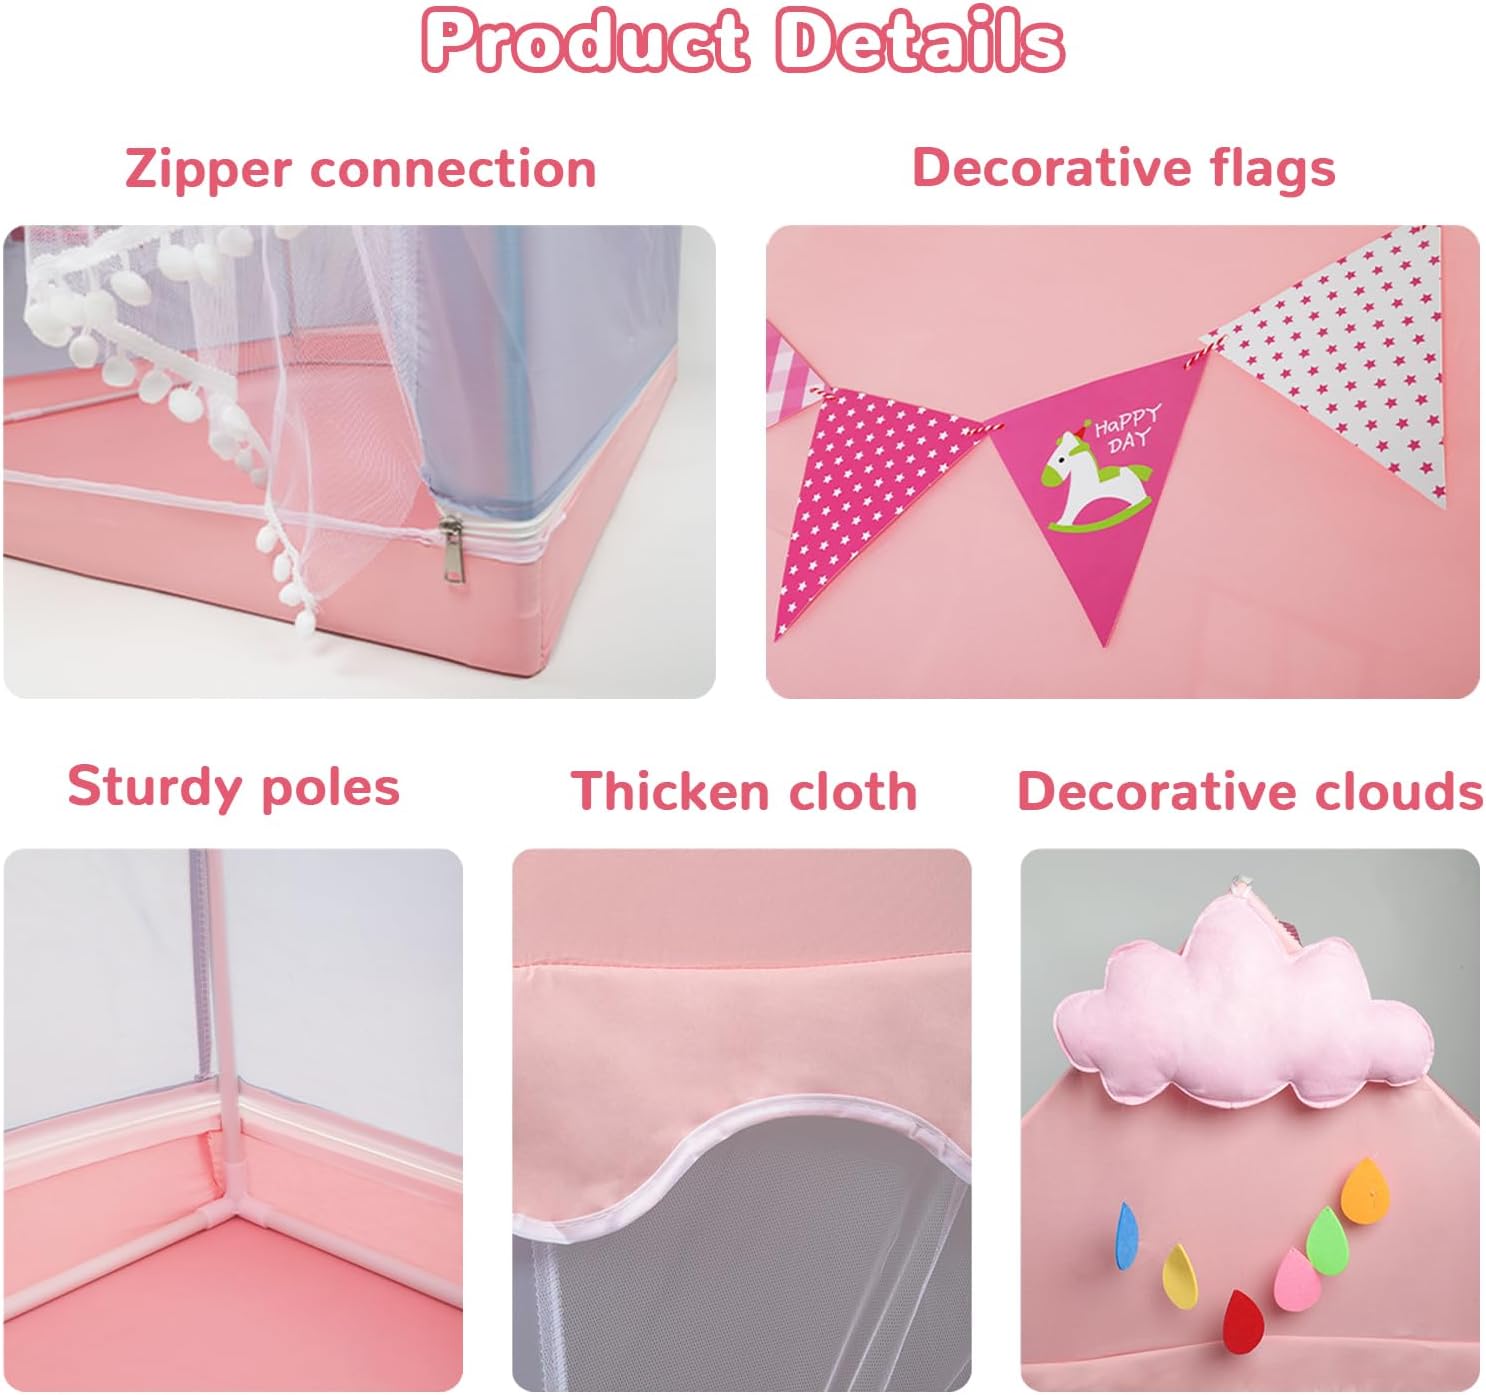
Image 1: Overview of tent components, including the zipper connection, decorative flags, sturdy poles, fabric details, and decorative cloud.
3. Assembly Instructions
Assembly is designed to be quick and easy, requiring no tools. Follow these steps carefully:
- Unpack Components: Carefully remove all parts from the packaging and lay them out on a clean, flat surface.
- Assemble Base Frame: Connect the shortest poles using the appropriate connectors to form the rectangular base of the tent. Ensure all connections are secure.
- Attach Vertical Poles: Insert the longer vertical poles into the connectors at each corner of the base frame.
- Form Roof Structure: Connect the remaining poles and connectors to create the triangular roof frame. This typically involves connecting the tops of the vertical poles and then adding horizontal roof support poles.
- Drape Tent Fabric: Carefully drape the tent fabric over the assembled frame. Ensure the bottom edges of the fabric align with the base frame.
- Secure Fabric to Base: Zip the tent fabric to the base frame using the integrated zipper connection. This secures the tent to the frame.
- Attach Decorative Elements: Affix the decorative flags to the roof of the tent and place the decorative cloud as desired.
- Adjust Curtains: The tent features front tie-rope curtains and mesh windows on the sides. Adjust these as needed for light and ventilation.

Image 2: Detailed view of the tent's features, including the left and right mesh windows and the front tie-rope curtain for access.
4. Operating Instructions
The decalsweet Princess Playhouse Castle Tent is designed for imaginative play and relaxation.
- Entry and Exit: Use the front tie-rope curtain for easy entry and exit. The curtains can be tied back to keep the entrance open.
- Ventilation: The mesh windows on the sides provide airflow. Ensure they are not obstructed for optimal ventilation.
- Indoor Use: Place the tent on a flat, stable surface indoors. It can be used as a reading nook, play area, or quiet space.
- Outdoor Use: If used outdoors, place on a level surface away from sharp objects or uneven terrain. Avoid use during strong winds or heavy rain. Consider placing weights inside the tent if used in breezy conditions.

Image 3: The interior of the play tent, showcasing its spacious design suitable for multiple children or toys.
5. Maintenance
Proper care will extend the life of your play tent.
- Cleaning Fabric: Spot clean the tent fabric with a damp cloth and mild soap. Do not machine wash or tumble dry. Allow to air dry completely before storage.
- Cleaning Poles and Connectors: Wipe poles and connectors with a damp cloth if they become dirty.
- Inspection: Regularly inspect the tent for any signs of wear or damage, especially to the poles, connectors, and fabric seams. Replace damaged parts if necessary.
6. Storage
When not in use, the tent can be disassembled and stored to save space.
- Disassembly: Reverse the assembly steps. Carefully detach the decorative elements, unzip the fabric from the base, and remove the fabric. Then, dismantle the roof frame, vertical poles, and base frame.
- Folding Fabric: Fold the tent fabric neatly to prevent creases and damage.
- Bundling Poles: Gather all poles and connectors.
- Storage Bag: Place all components into the original carry bag (if available) or a suitable storage container. Store in a cool, dry place away from direct sunlight.
7. Troubleshooting
Here are solutions to common issues you might encounter:
| Problem | Possible Cause | Solution |
|---|---|---|
| Tent is unstable or wobbly. | Poles not fully inserted into connectors; connectors not securely fastened; uneven surface. | Ensure all poles are fully seated in their connectors. Check that connectors are not cracked or damaged. Place the tent on a flat, level surface. |
| Fabric does not fit the frame. | Incorrect assembly of poles; fabric oriented incorrectly. | Double-check the pole assembly diagram. Ensure the tent fabric is oriented correctly before zipping it to the base. |
| Missing decorative elements. | Items may have been overlooked in packaging. | Thoroughly check all packaging materials. If still missing, contact customer support. |
8. Specifications
Key dimensions and details for the decalsweet Kids Princess Playhouse Castle Tent:
- Product Dimensions: 39.37 x 47.24 x 51.18 inches (Length x Width x Height)
- Item Weight: 4.14 pounds
- Model Number: WX-A-0083
- Material: High-quality, soft fabric with sturdy support poles.
- Features: Mesh windows, front tie-rope curtain, decorative flags, decorative cloud.

Image 4: Visual representation of the tent's dimensions, indicating its length, width, and height.
9. Warranty and Support
For warranty information or customer support, please refer to the purchase documentation or contact decalsweet directly through their official channels. Keep your proof of purchase for any warranty claims.


