
H-TECH HT-9823CA
H-TECH Multimedia System User Manual
Model: HT-9823CA
1. Introduction
Thank you for purchasing the H-TECH Multimedia System. This universal 1-DIN multimedia unit features a 7-inch IPS full-touch screen, running on Android 13. It offers comprehensive connectivity options including USB, SD, AUX, Bluetooth, and supports wireless Android Auto and Apple CarPlay. This manual provides detailed instructions for installation, operation, and maintenance to ensure optimal performance and longevity of your device.
2. Safety Information
- Professional Installation Recommended: Due to the complexity of car electrical systems, professional installation is highly recommended to prevent damage to the unit or vehicle.
- Power Supply: Ensure the unit is connected to a 12V DC power supply with negative grounding.
- Avoid Water and Moisture: Do not expose the unit to water or excessive moisture.
- Temperature: Operate the unit within specified temperature ranges. Avoid extreme heat or cold.
- Ventilation: Ensure proper ventilation around the unit to prevent overheating.
- Driving Safety: Do not operate the unit in a way that distracts you from driving. Always prioritize road safety.
- Fuse Replacement: Replace fuses only with those of the specified rating.
3. Package Contents
Verify that all items listed below are included in your package:
- H-TECH Multimedia System Unit
- Power Harness
- RCA Cables
- USB Cables
- GPS Antenna
- Instruction Manual
- Mounting Brackets and Screws (if applicable)

Image: Contents of the H-TECH Multimedia System package, showing the main unit, various wiring harnesses, a GPS antenna, and the instruction manual.
4. Product Overview
The H-TECH Multimedia System features a sleek design with a responsive touch screen and intuitive controls.
4.1 Front Panel

Image: Front view of the multimedia system, showing the 7-inch IPS full-touch display with various application icons, including Phone, Music, Maps, Messages, Spotify, and Waze. Control buttons are visible on the left side of the screen.
- 7-inch IPS Full-Touch Screen: High-resolution display for clear visuals and responsive touch control.
- Microphone (MIC): For hands-free calling and voice commands.
- Reset Button (RST): Small pinhole button to reset the unit.
- Power Button: Press and hold to turn on/off, short press for screen on/off.
- Home Button: Returns to the main menu.
- Back Button: Navigates back in menus or applications.
- Volume Up/Down: Adjusts audio volume.
4.2 Rear Panel and Connections

Image: Rear view of the multimedia system, displaying the heat sink and various connection ports for power, speakers, USB, AUX, and video outputs. The model number HT-9823CA is visible on a sticker.
- Power Connector: For connecting the main power harness.
- RCA Audio/Video Outputs: For connecting external amplifiers, subwoofers, or additional screens.
- USB Ports: For connecting USB drives, charging devices, or wired Android Auto/CarPlay.
- GPS Antenna Input: For connecting the external GPS antenna.
- Radio Antenna Input: For connecting the vehicle's radio antenna.
- Reverse Camera Input: For connecting a rear-view camera.
5. Setup and Installation
This section provides general guidelines for installation. Consult a professional installer if you are unsure about any steps.
5.1 Pre-Installation Checklist
- Disconnect the vehicle's negative battery terminal before starting installation.
- Ensure you have the correct wiring harness for your vehicle model.
- Prepare necessary tools (screwdrivers, wire strippers, electrical tape, etc.).
5.2 Wiring Diagram
Refer to the included wiring diagram for specific connections. Below is a general overview of common connections:
| Wire Color | Function | Description |
|---|---|---|
| Yellow | Battery (+12V Constant) | Connect to constant 12V power source. |
| Red | Accessory (+12V Switched) | Connect to ignition switched 12V power source. |
| Black | Ground | Connect to vehicle chassis ground. |
| Blue | Antenna/Amp Remote | Connect to power antenna or amplifier remote turn-on. |
| Orange/White | Illumination | Connect to vehicle's illumination wire. |
| Brown | Reverse Gear Signal | Connect to reverse light signal for automatic camera display. |
| Green/Purple | Steering Wheel Control (SWC) | Connect to vehicle's steering wheel control wires (may require adapter). |
| Speaker Wires | Speaker Outputs | Connect to vehicle's speakers (e.g., White/White-Black for Front Left). |
5.3 Mounting the Unit
- Carefully remove the existing car stereo or blank panel from the dashboard.
- Connect all necessary wiring harnesses (power, speakers, antenna, GPS, etc.) to the multimedia unit.
- Slide the multimedia unit into the 1-DIN opening in your dashboard. Ensure it is securely fastened using the provided mounting brackets and screws.
- Reconnect the vehicle's negative battery terminal.
- Test the unit's functions before fully reassembling the dashboard.
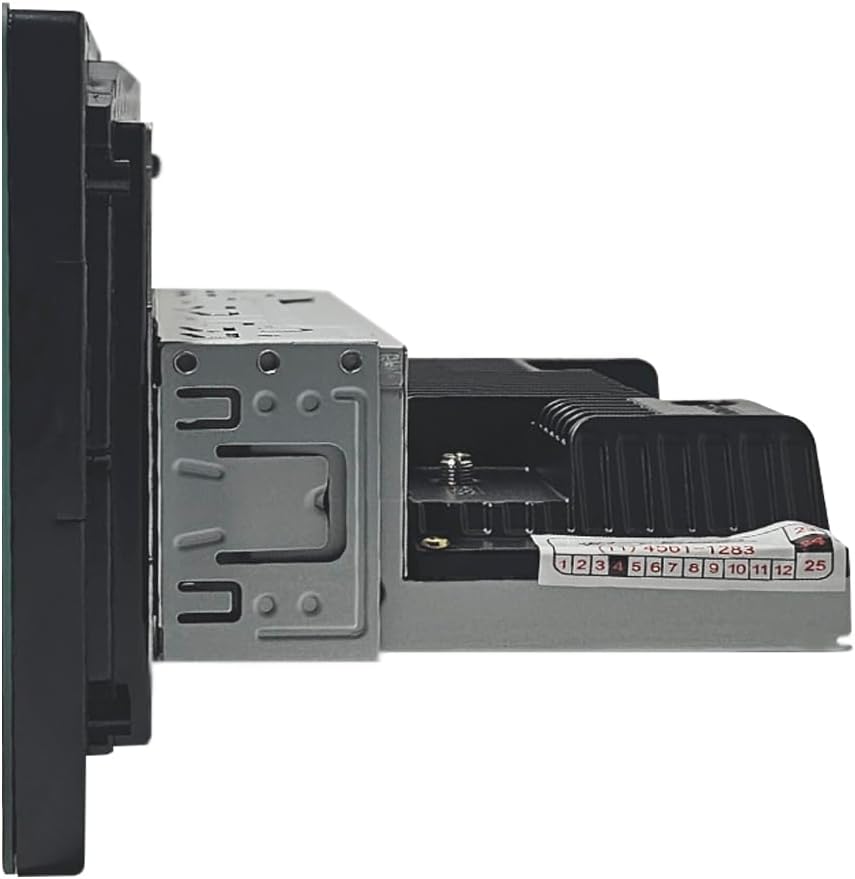

Image: Side views of the H-TECH Multimedia System, illustrating the 1-DIN chassis design and the integrated mounting brackets for secure installation in a vehicle's dashboard.
6. Operating Instructions
This section covers the basic operation of your H-TECH Multimedia System.
6.1 Power On/Off
- To Power On: Turn the vehicle's ignition to ACC or ON. The unit will power on automatically. If not, press and hold the Power button on the front panel.
- To Power Off: Turn the vehicle's ignition to OFF. The unit will power off. Alternatively, press and hold the Power button until the unit shuts down.
- Screen On/Off: Short press the Power button to turn the screen off/on while the unit remains powered.
6.2 Main Interface Navigation
The unit runs on Android 13, providing a familiar smartphone-like interface. Swipe left/right to navigate between home screens. Tap app icons to launch applications.
6.3 Bluetooth Connectivity
- Go to the "Bluetooth" application on the main screen.
- Enable Bluetooth on your mobile device and search for available devices.
- Select "H-TECH" (or similar name) from the list on your phone.
- Confirm the pairing code on both devices.
- Once paired, you can make/receive calls and stream audio.
6.4 Android Auto & Apple CarPlay
The unit supports both wired and wireless Android Auto and Apple CarPlay for seamless smartphone integration.
- Wired Connection: Connect your smartphone to the unit's USB port using a high-quality USB cable. The respective Android Auto or CarPlay app will launch automatically.
- Wireless Connection: Ensure Bluetooth and Wi-Fi are enabled on your smartphone. Pair your phone via Bluetooth first. The unit will then prompt you to connect wirelessly for Android Auto/CarPlay. Follow the on-screen instructions.
6.5 Radio (FM/AM)
- Tap the "Radio" icon on the main screen.
- Use the touch controls to scan for stations, save presets, or manually tune.
6.6 USB/SD Playback
- Insert a USB drive into the USB port or an SD card into the SD card slot.
- Navigate to the "File Manager" or "Music/Video Player" app.
- Select the desired media file for playback.
6.7 GPS Navigation
The unit supports GPS navigation. You can download and install your preferred navigation apps from the Google Play Store (requires Wi-Fi connection).
- Ensure the GPS antenna is properly connected and positioned for optimal signal reception.
- Launch your chosen navigation app (e.g., Google Maps, Waze).
- Follow the app's instructions for route planning and guidance.
7. Maintenance
- Screen Cleaning: Use a soft, lint-free cloth to wipe the screen. For stubborn marks, slightly dampen the cloth with water or a screen cleaner. Do not use abrasive cleaners or solvents.
- General Cleaning: Wipe the unit's exterior with a soft, dry cloth.
- Software Updates: Periodically check for software updates from the manufacturer's website or through the unit's system settings (if available) to ensure optimal performance and new features.
- Avoid Extreme Temperatures: Do not leave the unit exposed to direct sunlight or in extremely cold conditions for prolonged periods.
8. Troubleshooting
If you encounter issues, refer to the following common problems and solutions:
| Problem | Possible Cause | Solution |
|---|---|---|
| Unit does not power on. | No power connection; Blown fuse; Incorrect wiring. | Check power and ground connections. Verify vehicle's fuse box and unit's fuse. Ensure red (ACC) and yellow (B+) wires are correctly connected. |
| No sound. | Volume too low; Mute activated; Incorrect speaker wiring; Amplifier issues. | Increase volume. Check if mute is on. Verify speaker connections. If external amp, check its power. |
| Bluetooth not connecting. | Bluetooth off on phone/unit; Pairing issue. | Ensure Bluetooth is enabled on both devices. Delete previous pairings and re-pair. Try restarting both devices. |
| Android Auto/CarPlay not launching. | Faulty USB cable; App not installed/updated; Phone settings. | Use a high-quality, data-capable USB cable. Ensure Android Auto/CarPlay app is installed and updated on your phone. Check phone's USB connection settings. For wireless, ensure Wi-Fi is on and Bluetooth is paired. |
| GPS signal weak/lost. | Antenna placement; Obstruction. | Ensure GPS antenna is mounted in a clear location (e.g., dashboard, not under metal). Avoid tall buildings or tunnels. |
| Touch screen unresponsive. | Temporary software glitch. | Press the RST (Reset) button with a thin object (e.g., paperclip). If issue persists, contact support. |
9. Specifications
| Feature | Detail |
|---|---|
| Model Name | HT-9823CA |
| Operating System | Android 13 |
| Processor | Quad-core |
| RAM | 2GB |
| Internal Storage | 32GB |
| Display | 7-inch IPS Full Touch Screen |
| Chassis Type | 1-DIN Universal |
| Connectivity | USB, SD, AUX, Bluetooth, Wi-Fi |
| Smartphone Integration | Wireless/Wired Android Auto, Wireless/Wired Apple CarPlay, Mirroring (Android & iOS) |
| Navigation | Built-in GPS (requires app download) |
| Radio Tuner | FM/AM |
| Power Supply | 12V DC (Negative Ground) |
| Dimensions (Product) | 21 x 20 x 29 cm (approximate, as per product data) |
| Weight | 1.35 kg (approximate, as per product data) |
10. Warranty and Support
H-TECH products are designed for reliability and performance. For warranty information, please refer to the warranty card included with your product or visit the official H-TECH website. Keep your purchase receipt as proof of purchase.
If you require technical assistance or have questions not covered in this manual, please contact H-TECH customer support through the contact information provided on our website or your retailer's support channels.
- Online Support: Visit the H-TECH official website for FAQs, software updates, and contact forms.
- Email Support: Refer to your warranty documentation for email contact.
- Phone Support: Refer to your warranty documentation for phone contact.
Related documentsHT-9823CA


Ask a question about this manual
Ask about setup, troubleshooting, compatibility, parts, safety, or missing instructions. Manuals+ will review the question and use this page’s manual context to help answer it.