1. Introduction
This manual provides detailed instructions for the setup, operation, and maintenance of your Meidase P200 Trail Camera. Please read this manual thoroughly before using the camera to ensure proper function and to maximize its performance. The Meidase P200 is designed for capturing high-quality images and videos of wildlife and for security monitoring in outdoor environments.
2. Product Overview
2.1. Package Contents
Upon unboxing, please verify that all items listed below are present:
- 1 x Meidase P200 Trail Camera
- 1 x External Antenna
- 1 x Mounting Strap
- 1 x Mini-USB Cord
- 1 x Instruction Manual (this document)
2.2. Camera Components

Figure 2.2.1: Front view of the P200 Trail Camera, showing the lens, IR LEDs, PIR sensors, and external antenna. A smartphone displaying a captured image of a squirrel is also shown, indicating the camera's connectivity features.

Figure 2.2.2: Rear view of the P200 Trail Camera, displaying the Meidase brand logo and compliance markings.

Figure 2.2.3: Side view of the P200 Trail Camera, illustrating the robust hinge and latch design for secure closure.

Figure 2.2.4: Bottom view of the P200 Trail Camera, highlighting the 12V DC power input port and the standard tripod mounting thread.
2.3. Key Features
- High-Resolution Imaging: Equipped with a Sony Starvis sensor for clear 48MP still images and H.264 1296p video recording.
- Wireless Connectivity: Easy connection to your cell phone via WiFi and Bluetooth, featuring an external antenna for stable signal transmission.
- Advanced Night Vision: Provides clear 100ft night vision using no-glow infrared technology for discreet observation.
- Rapid Trigger Speed: Features a 0.1s trigger speed and motion detection up to 100ft to ensure no movement is missed.
- Durable and Versatile: Designed for outdoor use, perfect as a game camera, deer camera, wildlife camera, or general trail camera.
3. Setup Guide
3.1. Battery Installation
- Open the camera housing by releasing the side latches.
- Locate the battery compartments. The P200 requires 8 AA batteries.
- Insert the batteries according to the polarity indicators (+/-) inside the compartments. Ensure all batteries are inserted correctly for proper operation.
- Close the battery compartments securely.
3.2. SD Card Insertion
- The camera supports standard SD cards. A 32GB micro SD card with an adapter is recommended for optimal performance.
- With the camera housing open, locate the SD card slot.
- Insert the SD card with the metal contacts facing down until it clicks into place.
- To remove, press the card gently until it springs out.
3.3. Antenna Attachment
- Screw the external antenna onto the designated port on the top of the camera until it is finger-tight. This antenna is crucial for stable WiFi and Bluetooth connectivity.
3.4. Mounting the Camera
The P200 Trail Camera can be mounted using the included strap or a standard tripod mount.
- Strap Mounting: Thread the provided mounting strap through the slots on the back of the camera and secure it around a tree or pole. Ensure the camera is stable and pointed towards the desired monitoring area.
- Tripod/Wall Mounting: Use the 1/4-20 threaded insert on the bottom of the camera to attach it to a tripod or a compatible wall mount (sold separately).

Figure 3.4.1: The P200 Trail Camera securely mounted on a tree, demonstrating its outdoor application. A smartphone in the foreground shows a live view or captured image of a deer, highlighting the camera's remote monitoring capability.
3.5. Initial Power On and Settings
- After installing batteries and SD card, switch the camera from OFF to SET mode.
- The internal screen will power on, allowing you to access the menu.
- Navigate through the menu to set the date, time, and other basic parameters. Refer to the on-screen prompts for guidance.
4. Operating Instructions
4.1. Camera Modes
- OFF: Powers off the camera. Always switch to OFF before installing/removing batteries or SD card.
- SET: Allows access to the camera's menu for configuration, viewing images/videos, and connecting to the mobile app.
- ON: Activates the camera for motion-triggered recording. The screen will turn off after a few seconds, and the camera will enter monitoring mode.
4.2. Mobile App Connection (WiFi & Bluetooth)
The Meidase P200 can be controlled and monitored via a dedicated mobile application (iOS and Android).
- Download the official Meidase app from your device's app store.
- Switch the camera to SET mode.
- Open the app on your smartphone and follow the instructions to connect via Bluetooth. Bluetooth is used to initiate the WiFi connection.
- Once connected, the app allows you to view live feed, change settings, browse captured media, and download files directly to your phone.

Figure 4.2.1: The P200 camera with a WiFi signal icon, indicating active wireless connectivity. A smartphone displays a clear image of a hawk, demonstrating the camera's ability to capture detailed wildlife photos and the convenience of app-based viewing.

Figure 4.2.2: The P200 camera mounted on a tree, showing a strong signal strength icon. This illustrates the camera's reliable connectivity even when deployed in a residential or semi-urban outdoor setting.
4.3. Photo and Video Capture
- The camera automatically captures images or videos when motion is detected within its PIR sensor range.
- Configure capture settings (photo resolution, video resolution, video length, photo burst, delay, etc.) via the camera's internal menu or the mobile app.

Figure 4.3.1: A split image demonstrating the camera's capture capabilities: a 48MP high-resolution photo of a deer and an HD video frame of a heron, showcasing the clarity and detail in both formats.

Figure 4.3.2: An image capturing a cat in mid-air, with a motion detection icon overlay. This illustrates the camera's fast trigger speed and ability to capture dynamic moments.

Figure 4.3.3: A black and white image of a fox cub captured at night, with a night vision icon. This demonstrates the camera's effective infrared illumination for clear nighttime recording without disturbing wildlife.
5. Maintenance
5.1. Battery Management
- Regularly check battery levels, especially before deploying the camera for extended periods.
- Replace all batteries simultaneously to ensure consistent power. Low battery levels can affect camera performance, particularly in cold temperatures.
- When not in use for long periods, remove batteries to prevent leakage.
5.2. SD Card Management
- Periodically format the SD card using the camera's menu or a computer to maintain optimal performance and prevent data corruption.
- Ensure the SD card is not full to avoid missed recordings.
5.3. Cleaning and Care
- Gently clean the camera lens and PIR sensors with a soft, lint-free cloth to ensure clear images and accurate motion detection.
- Keep the camera housing free from dirt, debris, and moisture.
- The camera has an IP66 international protection rating, indicating it is dust-tight and protected against powerful water jets. However, avoid submerging the camera in water.
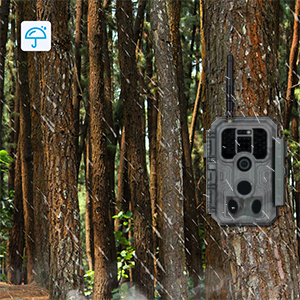
Figure 5.3.1: The P200 Trail Camera deployed in a forest setting during rainfall, accompanied by a waterproof icon. This image highlights the camera's robust design and IP66 rating, ensuring reliable operation in various weather conditions.
6. Troubleshooting
If you encounter issues with your Meidase P200 Trail Camera, please refer to the following common problems and solutions:
| Problem | Possible Cause / Solution |
|---|---|
| Camera not powering on | Ensure batteries are inserted correctly with correct polarity. Check battery charge level and replace if low. |
| No images/videos recorded | Verify the SD card is inserted correctly and not full. Format the SD card. Check camera mode (must be ON). Adjust PIR sensitivity. |
| Poor image/video quality at night | Ensure the lens and IR sensors are clean. Check battery level, as low power can affect IR performance. Ensure objects are within the 100ft night vision range. |
| Camera locks up or freezes | Remove and reinsert batteries to reset the camera. Ensure you are using a high-quality, recommended SD card. |
| Difficulty connecting to mobile app | Ensure camera is in SET mode. Check that Bluetooth and WiFi are enabled on your smartphone. Ensure the camera's external antenna is securely attached. Try restarting both the camera and the app. |
| Short battery life | Battery life is affected by temperature (colder reduces life) and frequency of recordings (especially night vision). Use high-quality alkaline or lithium batteries. Reduce video length or photo burst settings if excessive. |
7. Specifications
| Feature | Detail |
|---|---|
| Model | P200 |
| Image Resolution | 48 Megapixels |
| Video Resolution | 1296p (H.264), 1080p |
| Night Vision Range | 100 Feet (No-Glow IR) |
| Trigger Speed | 0.1 seconds |
| Motion Detection Range | Up to 100 Feet |
| Connectivity | Wi-Fi, Bluetooth (for app connection) |
| Compatible Devices | iOS and Android Cell Phones |
| Power Source | Battery Powered (8 x AA batteries) or 12V DC external |
| Storage | SD Card (not included) |
| Waterproof Rating | IP66 |
| Dimensions (L x W x H) | 4.2 x 2.86 x 5.6 inches |
| Weight | 10.9 ounces |
| Color | Camo |
| Mounting Type | Tree Mount, Wall Mount |
| Included Components | Trail Camera, Antenna, Mounting Strap, Mini-USB Cord, Instruction Manual |
8. Warranty and Support
Meidase is committed to providing high-quality products and customer satisfaction. While specific warranty details are not provided in this manual, Meidase offers responsive customer support to assist with any inquiries or issues you may encounter with your P200 Trail Camera.
For technical assistance, troubleshooting, or product-related questions, please refer to the contact information provided on the official Meidase website or the product packaging. When contacting support, please have your product model (P200) and purchase details ready.


