Omana Y3000 (op90)
Omana Mini Digital Camera Keychain Model Y3000 User Manual
Introduction
This user manual provides detailed instructions for the Omana Mini Digital Camera Keychain, Model Y3000. Please read this manual thoroughly before using the product to ensure proper operation and to maximize its features. This compact device is designed for portable video recording and photography.
Important Safety Information
- Do not expose the device to extreme temperatures, direct sunlight, or high humidity.
- Avoid dropping or subjecting the device to strong impacts.
- Keep out of reach of children.
- Use only the provided USB cable for charging.
- Do not attempt to disassemble or modify the device. This will void the warranty.
- Ensure the device is fully charged before first use.
Package Contents
Verify that all items are present in the package:
- 1 x Omana Mini Digital Camera (Model Y3000)
- 1 x Hanging Rope
- 1 x Keychain
- 1 x User Manual
- 1 x USB Data Cable
- 1 x 32GB SD/TF Card (pre-inserted)
- 1 x Colorful Pouch (Random Color)

Image: Contents of the Omana Mini Digital Camera Keychain package, showing the camera, USB cable, hanging rope, keychain, user manual, and a 32GB SD card.
Product Overview
The Omana Mini Digital Camera Keychain is a compact device designed for ease of use. Familiarize yourself with its main components:

Image: Front and back views of the Omana Mini Digital Camera Keychain, highlighting the lens, screen, and buttons.
- Lens: The primary component for capturing images and videos.
- LCD Screen: 0.96-inch color display for real-time viewing and playback.
- Power/Mode Button: Used to power on/off the device and switch between modes.
- Shutter/Record Button: Activates photo capture or video recording.
- Micro USB Port: For charging and data transfer.
- SD Card Slot: Houses the Micro SD/TF card for storage.
- Microphone: Captures audio during video recording.
- LED Indicator: Provides status information (e.g., charging, recording).
Setup
1. Charging the Camera
Before first use, fully charge the camera for approximately 1 hour. Use the provided USB data cable to connect the camera to a USB power source (e.g., computer USB port, USB wall adapter).
- The LED indicator will show charging status (e.g., solid red while charging, off when fully charged).
- A full charge provides approximately 60 minutes of recording time.

Image: The mini camera connected to a USB cable, illustrating the charging process.
2. Inserting/Removing the SD Card
The camera comes with a 32GB SD/TF card already inserted. If you need to replace or remove it:
- Ensure the camera is powered off.
- Locate the SD card slot on the side of the camera.
- To remove: Gently push the SD card inward until it clicks, then release. The card will spring out slightly, allowing you to pull it out.
- To insert: Align the SD card with the slot (metal contacts facing down, typically) and gently push it in until it clicks into place.
The camera supports up to 128GB TF/SD cards.

Image: A hand demonstrating the insertion of a Micro SD card into the camera's dedicated slot.
Operating Instructions
1. Power On/Off
- Power On: Press and hold the Power/Mode button for a few seconds until the LCD screen illuminates.
- Power Off: Press and hold the Power/Mode button again for a few seconds until the screen turns off.
2. Switching Modes
After powering on, short press the Power/Mode button to cycle through available modes: Video Recording, Photo Mode, and Playback Mode.
3. Taking Photos
- Power on the camera.
- Press the Power/Mode button until the camera is in Photo Mode (indicated by an icon on the LCD screen).
- Frame your shot using the LCD screen.
- Press the Shutter/Record button once to take a photo. The screen may briefly flash or an indicator light may confirm capture.
4. Recording Videos
- Power on the camera.
- Press the Power/Mode button until the camera is in Video Recording Mode (indicated by a video camera icon on the LCD screen).
- Press the Shutter/Record button once to start recording. A red dot or flashing indicator on the screen typically confirms recording is active.
- Press the Shutter/Record button again to stop recording. The video file will be saved to the SD card.
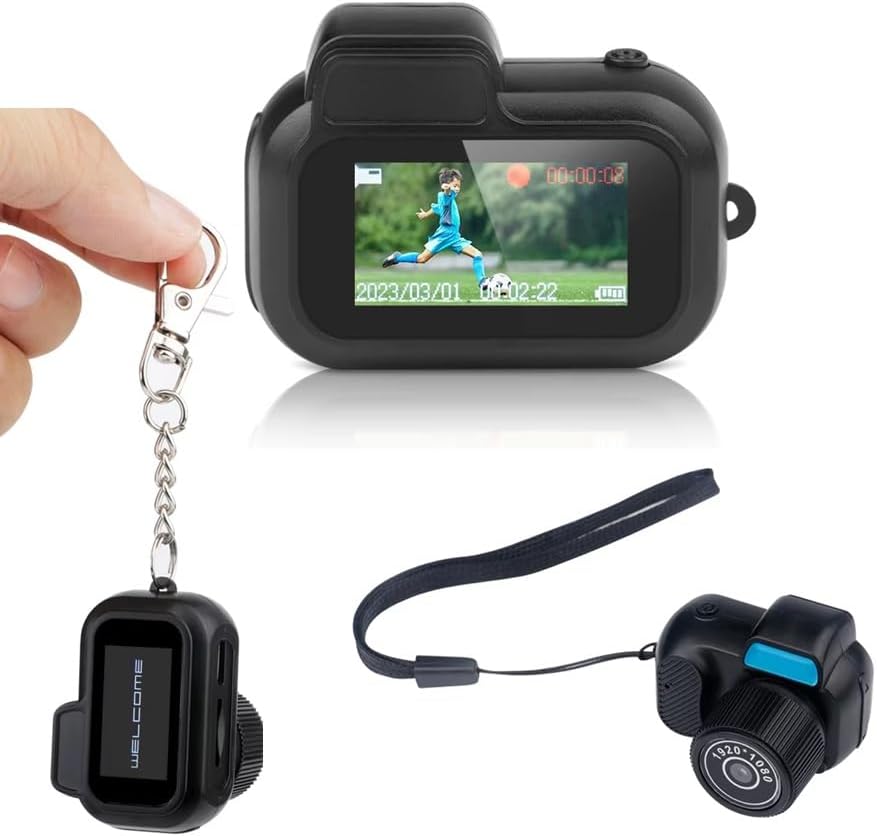
Image: The mini camera's LCD screen showing a video recording in progress, demonstrating its real-time display capability.
5. Playback
- Power on the camera.
- Press the Power/Mode button until the camera is in Playback Mode.
- Use the navigation buttons (if available, or Power/Mode button for cycling) to browse through your photos and videos.
- Press the Shutter/Record button to play a selected video or view a photo.
6. Connecting to a Computer
To transfer files to your computer:
- Ensure the camera is powered off.
- Connect the camera to your computer using the provided USB data cable.
- The camera should appear as a removable disk drive on your computer.
- Open the drive to access your recorded photos and videos.
- Safely eject the device from your computer before disconnecting the USB cable.
7. Loop Recording
The camera supports loop recording. When the SD card is full, the oldest files will be overwritten by new recordings. This feature is typically enabled by default. Refer to the on-screen menu (if accessible) for specific settings.
8. Filters
The camera includes 8 types of filters. These can typically be accessed and applied through the camera's menu system while in photo or video mode. Consult the on-screen interface for navigation and selection of filters.
Maintenance
Cleaning
- Use a soft, dry cloth to clean the camera body.
- For the lens, use a specialized lens cleaning cloth and solution to avoid scratches.
- Do not use harsh chemicals or abrasive cleaners.
Storage
- Store the camera in a cool, dry place away from direct sunlight.
- If storing for extended periods, ensure the battery is partially charged (around 50%) to prolong battery life.
Troubleshooting
| Problem | Possible Cause | Solution |
|---|---|---|
| Camera does not power on. | Low battery. | Charge the camera for at least 1 hour. |
| Cannot record video/take photos. | SD card full or not inserted correctly. | Check SD card insertion. Transfer files to computer and format the card, or replace with a new one. |
| Poor image/video quality. | Insufficient lighting, dirty lens, or camera movement. | Ensure adequate lighting. Clean the lens. Hold the camera steady during capture. |
| Camera not recognized by computer. | Faulty USB cable or connection. | Try a different USB port or cable. Ensure camera is powered off before connecting. |
Specifications
| Feature | Detail |
|---|---|
| Product Model | Y3000 (op90) |
| Resolution | 1920 * 1080p (Full HD) |
| Charging Interface | USB (Micro USB) |
| Battery Capacity | 180mAh Lithium Polymer |
| Charging Voltage | DC5V/1A |
| Charging Time | Approximately 1 hour |
| Recording Time | Approximately 1 hour |
| Video Frames | 30fps |
| Video Format | AVI |
| Image Scale | 4:3 |
| Image Format | JPG |
| Photo Sensor Technology | CMOS |
| Screen Size | 0.96 Inches |
| Flash Memory Type | SD (Supports up to 128GB TF/SD card) |
| Product Material | ABS |
| Product Weight | Approximately 19g (0.705 ounces) |
| Product Dimensions | 47mm * 40mm * 36mm (1.42 x 1.85 x 1.42 inches) |
Warranty and Support
For warranty information or technical support, please refer to the contact details provided with your purchase or visit the official Omana website. Keep your proof of purchase for warranty claims.
Related Documents - Y3000 (op90)
 |
Omana Lazy Shisha Pipe - Hands-Free Hookah Hose Safety Information Safety information for the Omana Lazy Shisha Pipe, a hands-free hookah hose. Details intended use, safety warnings, hygiene guidance, storage, and compliance for adult recreational use. |
 |
Mini Digital Camera Y2000 & Y3000: Portable HD Video Recorder with TF Card Support Discover the compact Y2000 and Y3000 mini digital cameras, offering portable video recording solutions. The Y3000 features 1080p HD video and a 0.96-inch screen, supporting up to 128GB TF cards. The Y2000 provides VGA video and a compact design, ideal for discreet recording. |
 |
Honeywell OmniProx™ Proximity Card Readers | Access Control Solutions Explore Honeywell's OmniProx™ family of 125 kHz HID compatible proximity card readers. Featuring outstanding performance, attractive styling, and robust security features for diverse access control applications. |
 |
Analog Devices PCN 25_0151 Rev. A: Wafer Fabrication Site Change Notification Official Product/Process Change Notice (PCN) from Analog Devices regarding a change in wafer fabrication site for 6um Bipolar products, including affected models and revision history. |
 |
Inverters and Display Cables Compatibility List for Laptops A comprehensive compatibility list of Dell, Compaq, HP, Toshiba, Acer, IBM Thinkpad, Lenovo, and Sony laptop models for inverters and display cables. Includes model numbers and series. |