1. Introduction
This manual provides detailed instructions for the proper use of the Dragoart Magic Creator 100-Piece Tattoo Transfer Paper. Designed for both thermal copiers and freehand drawing, this A4-sized paper facilitates the precise transfer of tattoo designs onto skin. Adhering to these instructions will help ensure optimal results and longevity of your stencil transfers.
2. Product Overview: 4-Layer Structure
The Dragoart Magic Creator Tattoo Transfer Paper features a specialized 4-layer construction, each serving a distinct purpose in the transfer process:
- Layer 1: Transfer Sheet - This is the top white sheet where your design will be applied, either by printing or drawing.
- Layer 2: Protective Tissue - A semi-transparent sheet positioned between the transfer sheet and the carbon sheet. This layer must be removed before use.
- Layer 3: Blue Carbon Sheet - This sheet contains the blue pigment that transfers the design.
- Layer 4: Yellow Backing Sheet - The bottom yellow sheet provides support and holds the layers together.

Image: Detailed diagram illustrating the four distinct layers of the Dragoart Magic Creator Tattoo Transfer Paper.
3. Operating Instructions
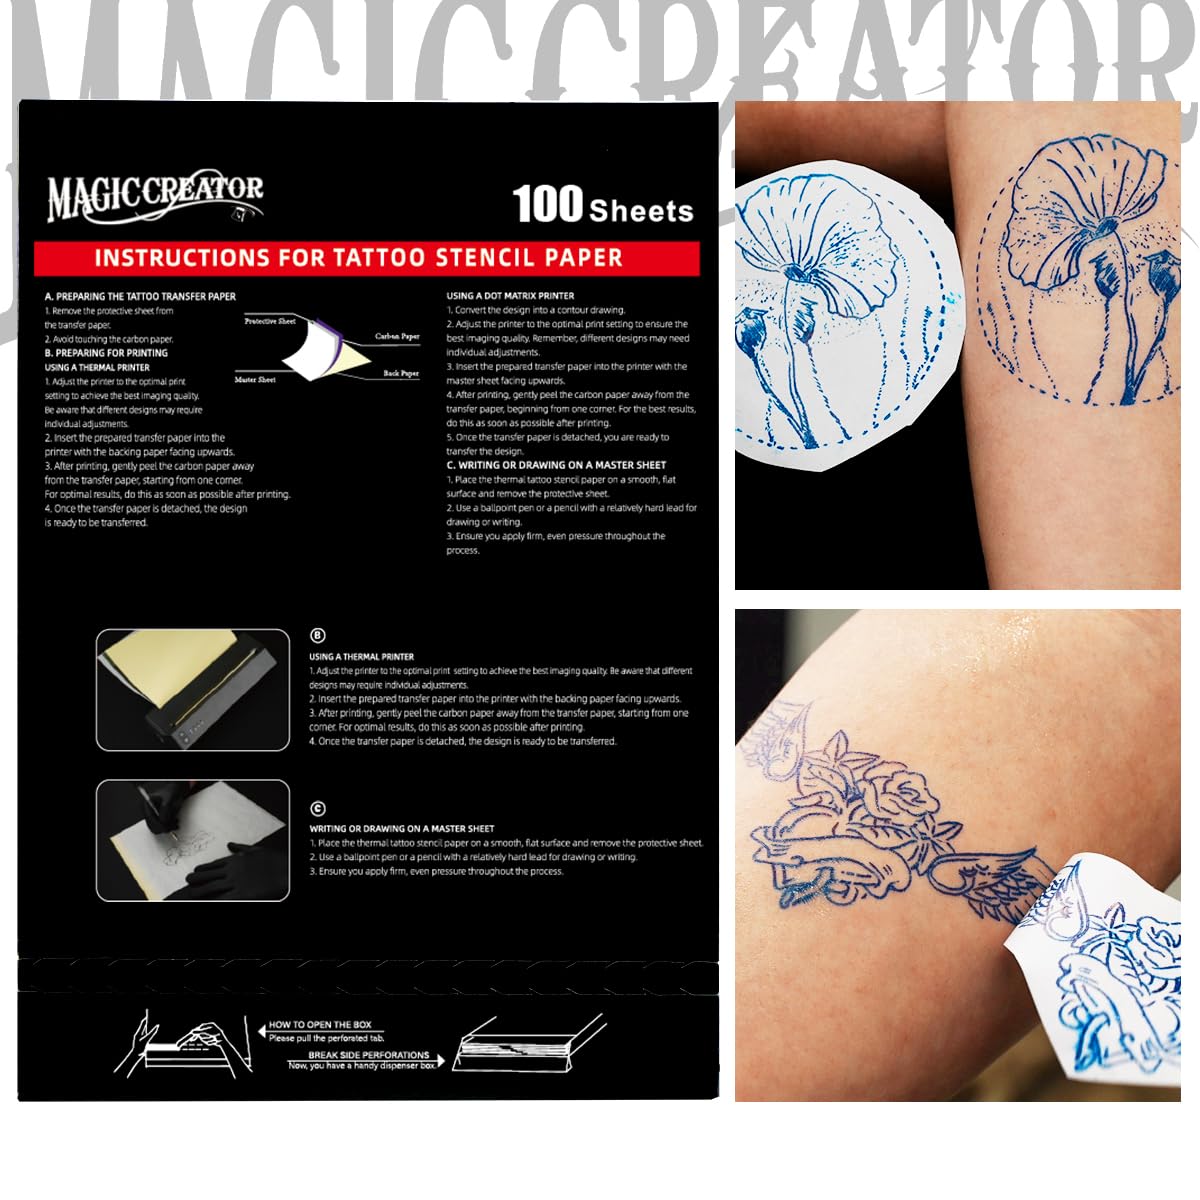
Image: Visual summary of instructions for tattoo stencil paper use.
3.1. Preparation of the Transfer Paper
Before using the transfer paper, ensure proper preparation:
- Remove Protective Tissue: Gently remove Layer 2, the semi-transparent protective tissue, from the transfer paper stack. This layer is discarded before use.

Image: A hand carefully removing the protective tissue (Layer 2) from the transfer paper.
3.2. Using with a Thermal Printer
This method is ideal for achieving precise and consistent stencil transfers from digital designs.
- Prepare the Design: Ensure your tattoo design is ready for printing. Adjust printer settings to achieve the best imaging quality. Some printers may require the transfer paper to be inserted with the master sheet facing up.
- Insert Paper: Carefully insert the transfer paper into your thermal printer.
- Print: Initiate the printing process. The thermal printer will transfer the design from the master sheet onto the transfer sheet.
- Separate Layers: After printing, gently peel the carbon paper away from the transfer paper, starting from one corner. Discard the carbon sheet (Layer 3).
- Ready for Transfer: The transfer sheet (Layer 1) with the design is now ready to be applied to the skin.

Image: Illustration of using the transfer paper with a thermal printer (left) and for freehand drawing (right).
3.3. Freehand Drawing
For custom designs or when a thermal printer is not available, you can draw directly onto the transfer paper.
- Prepare the Paper: Place the transfer sheet (Layer 1) on a smooth, flat surface.
- Draw the Design: Use a ballpoint pen or a pencil with a relatively hard lead to draw your design onto the transfer sheet (Layer 1). Apply even pressure throughout the drawing process to ensure a clear transfer.
- Ready for Transfer: Once the drawing is complete, the transfer sheet is ready for application to the skin.

Image: A hand drawing a tattoo design onto the transfer sheet using a pen.
3.4. Applying the Stencil to Skin
Proper application to the skin is crucial for a clear and long-lasting stencil.
- Clean the Skin: Thoroughly clean and prepare the skin area where the tattoo will be applied. Ensure it is free of oils, dirt, and hair.
- Apply Stencil Gel: Apply a thin, even layer of stencil transfer gel (not included) to the prepared skin area. Do not over-saturate the skin.
- Position the Stencil: Carefully place the transfer sheet (Layer 1, with the design facing down) onto the skin, aligning it precisely.
- Apply Pressure: Gently but firmly press the transfer sheet onto the skin, ensuring full contact. Avoid shifting or moving the paper during this step.
- Remove Stencil: After a few seconds (refer to your stencil gel's instructions for exact timing), carefully peel off the transfer sheet.
- Allow to Dry: Let the transferred stencil dry completely on the skin before proceeding with tattooing. This typically takes 5-15 minutes.


Image: Left: Application of stencil gel to the skin. Right: Peeling off the transfer sheet to reveal the transferred design.
4. Maintenance and Storage
- Store transfer paper in a cool, dry place away from direct sunlight and excessive heat to prevent premature activation or degradation of the carbon layer.
- Keep the paper flat to avoid creases or damage that could affect transfer quality.
- Unused sheets should be kept in their original packaging to protect them from moisture and light.
5. Troubleshooting
- Faint or Incomplete Transfer:
- Ensure sufficient pressure was applied during freehand drawing or thermal printing.
- Check thermal printer settings for optimal darkness.
- Verify that the protective tissue (Layer 2) was removed before use.
- Ensure the stencil gel was applied evenly and thinly to the skin.
- Smudged or Blurred Transfer:
- Avoid shifting the transfer paper once it's placed on the skin.
- Allow the stencil gel to become tacky before applying the paper.
- Ensure the skin is completely clean and dry before applying stencil gel.
- Paper Not Feeding Correctly in Thermal Printer:
- Check your printer's manual for specific paper loading instructions.
- Ensure the paper is inserted straight and not at an angle.
6. Product Specifications
| Feature | Detail |
|---|---|
| Product Name | Magic Creator Tattoo Transfer Paper |
| Brand | Dragoart |
| Model Number | MSSZYZ100 |
| Quantity | 100 Sheets |
| Paper Size | A4 (approximately 8.3 x 11.7 inches / 21.5 x 29.2 cm) |
| Layers | 4 Layers (Transfer Sheet, Protective Tissue, Carbon Sheet, Yellow Backing Sheet) |
| Compatibility | Thermal Copiers, Freehand Drawing |
| Package Dimensions | 12.28 x 8.7 x 0.87 inches |
| Item Weight | 1.94 Pounds |
7. Warranty and Support
Dragoart stands behind the quality of its products. For the Magic Creator Tattoo Transfer Paper, the following support is available:
- Satisfaction Guarantee: A 100% satisfaction guarantee is offered.
- Money-Back Guarantee: A 30-day money-back guarantee is provided from the date of purchase.
- Warranty: A 6-month warranty covers manufacturing defects.
- Customer Support: For any questions or assistance, please contact Dragoart customer service. Contact information can typically be found on the product packaging or the official Dragoart website.