1. Introduction
This manual provides detailed instructions for the safe installation, operation, and maintenance of your ACTIVA Gracia 1200mm BLDC Ceiling Fan with LED Light. This fan features a 28W energy-efficient BLDC motor, 3 wider blades for optimal airflow, a BEE 5-star rating, full remote control, and silent operation. Please read this manual thoroughly before installation and use.

Image: The ACTIVA Gracia BLDC Ceiling Fan in Sparkle Blue, showcasing its sleek design and remote control functionality.
2. Safety Instructions
- Always disconnect power at the main circuit breaker before installing, cleaning, or servicing the fan.
- Ensure all electrical connections comply with local codes and ordinances.
- The fan must be securely mounted to a ceiling joist or a suitable support structure capable of supporting the fan's weight.
- Do not operate the fan with damaged wiring or if any parts are missing or damaged.
- Keep hands, clothing, and other objects clear of the fan blades when the fan is in operation.
- This fan is designed for indoor use only.
- Installation should be performed by a qualified electrician.
3. What's in the Box
Carefully unpack all components and ensure you have received the following items:
- 48" Fan Motor
- Blades Set (3 Wider Blades)
- Canopy Set (Top and Bottom)
- Down Rod
- Remote Control (Batteries not included)
4. Installation Instructions
Important: Product installation is to be done by the customer. It is highly recommended to have a qualified technician perform the installation. Before proceeding, ensure the power supply is disconnected.
Mandatory Step: Regulator Removal
Disconnect the existing fan regulator from the connection before installing the ACTIVA BLDC fan. This ensures seamless performance and prevents potential issues. Your technician should remove the previous regulator.
Assembly Steps:

Image: Visual guide for the initial assembly steps of the ceiling fan, including unpacking, canopy placement, and blade attachment.
- Step 1: Unpack the Motor
Open the box and carefully remove the fan motor. Place it on a soft surface to prevent scratches. - Step 2: Attach Canopy to Down Rod
Place the top canopy inside the down rod. Fix the shackle to the ceiling hook using the screws provided. Fasten the nut, washer, and R-pin to prevent slippage. Position the top canopy to cover the assembly and connection. - Step 3: Attach Blades
Make uniform holes on the blade shank to align with the motor holes. Securely tighten the blades with the screws and washers.
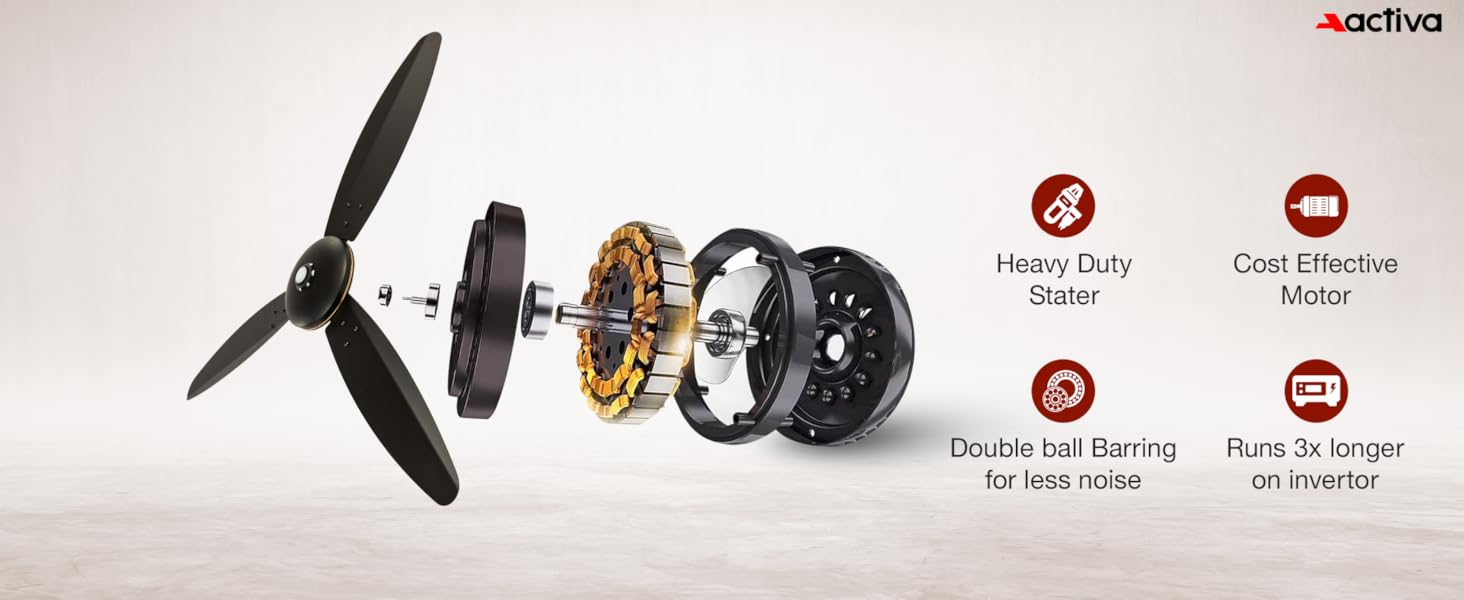
Image: Diagram illustrating the final step of hanging the fan, showing the shaft, down rod, motor, and canopy components.
- Step 4: Hang the Fan
Insert the screws to assemble the shaft and the down rod. Insert the washer, nut, and R-pin in the sequence shown in the illustration. Pull down the canopy to cover the motor/PCB box.
Note: Ensure all connections are tight and secure before restoring power.
5. Operating Instructions
Your ACTIVA Gracia BLDC Ceiling Fan can be operated using the included remote control or manually via the main switch.
Remote Control Functions:

Image: Detailed diagram of the remote control, highlighting buttons for power, speed, LED light, timer, and reverse mode.
- Fan Turn ON/OFF: Press the power button to turn the fan on or off.
- Speed Control (1-6): Use the numbered buttons (1-6) to select your desired fan speed. Speed 6 is the highest.
- Smart Speed Reduction: Press the "Smart" button to gradually reduce fan speed for comfort at night.
- One-Touch Hi-Speed Control: Use the "BOOST" button for instant maximum speed.
- LED Light ON/OFF: Press the "Light" button to turn the integrated LED light on or off. This can also be used as a night lamp.
- Timer Function: Set the fan to turn off automatically after 2, 4, or 8 hours using the respective timer buttons.
- Reverse Mode: Press the "Reverse" button to change the direction of blade rotation, useful for humidity control in winter.
- Natural Breeze Mode: Press the "Nature" button for automatic speed increase and decrease, simulating a natural breeze.
Control Fan Speed Without Remote:
The fan's main switch can be used to control its speed.
- Turn the fan's switch ON & OFF twice from your switchboard. You will hear a long buzzer sound, indicating the fan is now ON.
- To set the desired speed, repeatedly toggle the fan's switch ON & OFF. The delay between toggling should be approximately 1 second. If toggling is too fast or too slow, it may not register correctly.
Important Note: Before installing this fan, remove any existing fan regulator from your switchboard.
6. Maintenance
Regular maintenance ensures optimal performance and longevity of your ceiling fan.
- Cleaning: Dust the fan blades and motor housing regularly with a soft, damp cloth. Do not use abrasive cleaners or solvents. Ensure the fan is completely dry before operating.
- Blade Inspection: Periodically check the blades for any signs of damage or warping. Damaged blades can cause imbalance and noise.
- Tightness of Screws: Annually check all screws and connections for tightness. Loose screws can cause wobbling or noise.
- Lubrication: The fan's double ball bearings are permanently lubricated and do not require additional oiling.
Always ensure the power is disconnected at the circuit breaker before performing any maintenance.
7. Troubleshooting
If you encounter issues with your fan, refer to the following common problems and solutions:
| Problem | Possible Cause | Solution |
|---|---|---|
| Fan does not start | No power supply; Loose wiring; Remote control battery low. | Check circuit breaker; Ensure all connections are secure; Replace remote control batteries. |
| Fan wobbles | Loose blades or mounting screws; Unbalanced blades. | Tighten all screws; Ensure blades are securely attached; Check for bent blades. |
| Excessive noise | Loose screws; Blades hitting an obstruction; Motor issue. | Check and tighten all screws; Ensure no obstructions are near blades; If noise persists, contact support. |
| Remote control not working | Low or dead batteries; Remote out of range; Interference. | Replace batteries; Ensure remote is within operating range; Remove any obstructions between remote and fan. |
| LED light not working | Loose connection; LED module failure. | Check wiring connections to the LED light; If issue persists, contact support. |
For issues not listed here or if troubleshooting steps do not resolve the problem, please contact customer support.
8. Specifications
Key technical specifications for the ACTIVA Gracia 1200mm BLDC Ceiling Fan:
| Feature | Detail |
|---|---|
| Brand | ACTIVA |
| Model Name | Gracia |
| Electric Fan Design | Ceiling Fan |
| Colour | Sparkle Blue |
| Power Source | Corded Electric |
| Product Dimensions (D x W x H) | 52D x 25W x 20H Centimeters |
| Room Type | Bedroom, Dining Room, Guestroom, Kitchen, Living Room |
| Motor Type | BLDC (Brushless DC) |
| Wattage | 28 Watts |
| Voltage | 230 Volts |
| Number of Blades | 3 |
| Blade Length | 48 Inches (1200 mm) |
| Speed | 380 RPM |
| Air Flow Capacity | 225 Cubic Centimeters Per Minute |
| Number Of Speeds | 5 (Remote offers 6 speed settings) |
| Controller Type | Remote Control |
| Light Type | Integrated LED |
| Material Type | Aluminium (Blades and Body) |
| Item Weight | 3.9 Kilograms |
| Energy Rating | BEE 5 Star Rated |
| Special Features | Energy Efficient BLDC Motor, Wider High Airflow Blades, Decorative Finish, Inbuilt LED Light, Inverter Compatible, Silent & Smooth Operation |

Image: Visual representation of key specifications including BEE certification, 1200mm sweep size, double ball bearing, and anti-dust coating.

Image: Comparison chart demonstrating the electricity savings of the ACTIVA Gracia BLDC fan compared to an ordinary ceiling fan.
9. Warranty
Your ACTIVA Gracia BLDC Ceiling Fan comes with a 5 Year Assured Replacement Warranty of Motor from our authorized service center only.
For warranty claims, the customer is responsible for sending the product to a service center for repair. The product will be repaired at our service center only.
10. Customer Support
For warranty claims or any product-related issues, please contact ACTIVA customer support:
- Email: info@activaappliances.com
- Phone: 9999427599
- Manufacturer: TECHVISION INTERNATIONAL PVT. LTD. INDIA


