VEVOR Sewer Camera 150FT
VEVOR Sewer Camera Instruction Manual
Brand: VEVOR | Model: Sewer Camera 150FT
Introduction
The VEVOR Sewer Camera is a professional pipeline inspection system designed for inspecting hard-to-reach areas such as wastewater systems, stormwater systems, various pipelines, drains, and ducts. It features a 9-inch color TFT LCD screen for clear, vibrant images, a waterproof IP68 camera with 12 adjustable LED lights, and a durable 150-foot cable with a distance count function. The system includes a DVR function and an 8GB micro SD card for recording and saving inspection footage. Powered by a 4500mAh 12V Lithium battery, it offers 8-10 hours of continuous operation, making it suitable for both home and industrial use by plumbers, contractors, inspectors, and other professionals.
What's in the Box
- 1 x Pipe Inspection Camera
- 1 x LCD Monitor
- 1 x Cable
- 1 x Battery

The complete VEVOR Sewer Camera system, including the monitor case, cable reel, camera head, and various accessories.
Setup
- Charge the Battery: Ensure the 12V 4500mAh Lithium battery is fully charged before use. Connect the provided power adapter to the battery box and a power outlet. The battery indicator lights will show the charging status.
- Connect Components: Connect the camera cable to the designated port on the battery box/monitor unit. Ensure a secure connection.
- Insert SD Card: Locate the TF card slot on the monitor. Insert the 8GB micro SD card firmly into the slot for recording and saving data.
- Attach Guide Wheels/Skids: For larger pipes or to center the camera, attach the appropriate guide wheels or protective covers to the camera head. Use the provided screwdriver to secure them.

The VEVOR Sewer Camera system laid out, showing the monitor, cable reel, and various attachments ready for setup.

Detailed view of the camera head, highlighting its waterproof design and the 12 adjustable LED lights for illumination.
Official VEVOR video demonstrating the setup and initial operation of the 9-inch sewer camera system.
Operating Instructions
- Power On: Open the monitor case and locate the power button on the battery box/monitor unit. Press it to turn on the system. The monitor should display the camera feed.
- Adjust LED Lights: Use the controls on the monitor to adjust the brightness of the 12 LED lights on the camera head for optimal visibility in dark pipes.
- Insert Camera: Carefully feed the camera head into the pipe or drain you wish to inspect. Use the cable reel to extend the cable as needed. The cable features a distance count function to track the length extended.
- Record Footage: To record video, press the 'REC' button on the monitor. The system will save the footage to the inserted 8GB SD card. Press 'REC' again to stop recording. You can also capture still images.
- Monitor Inspection: Observe the live feed on the 9-inch LCD screen. The flexible spring of the camera allows it to navigate turns in pipelines.

The 9-inch color TFT LCD screen provides a clear and vibrant display of the pipe's interior during inspection.
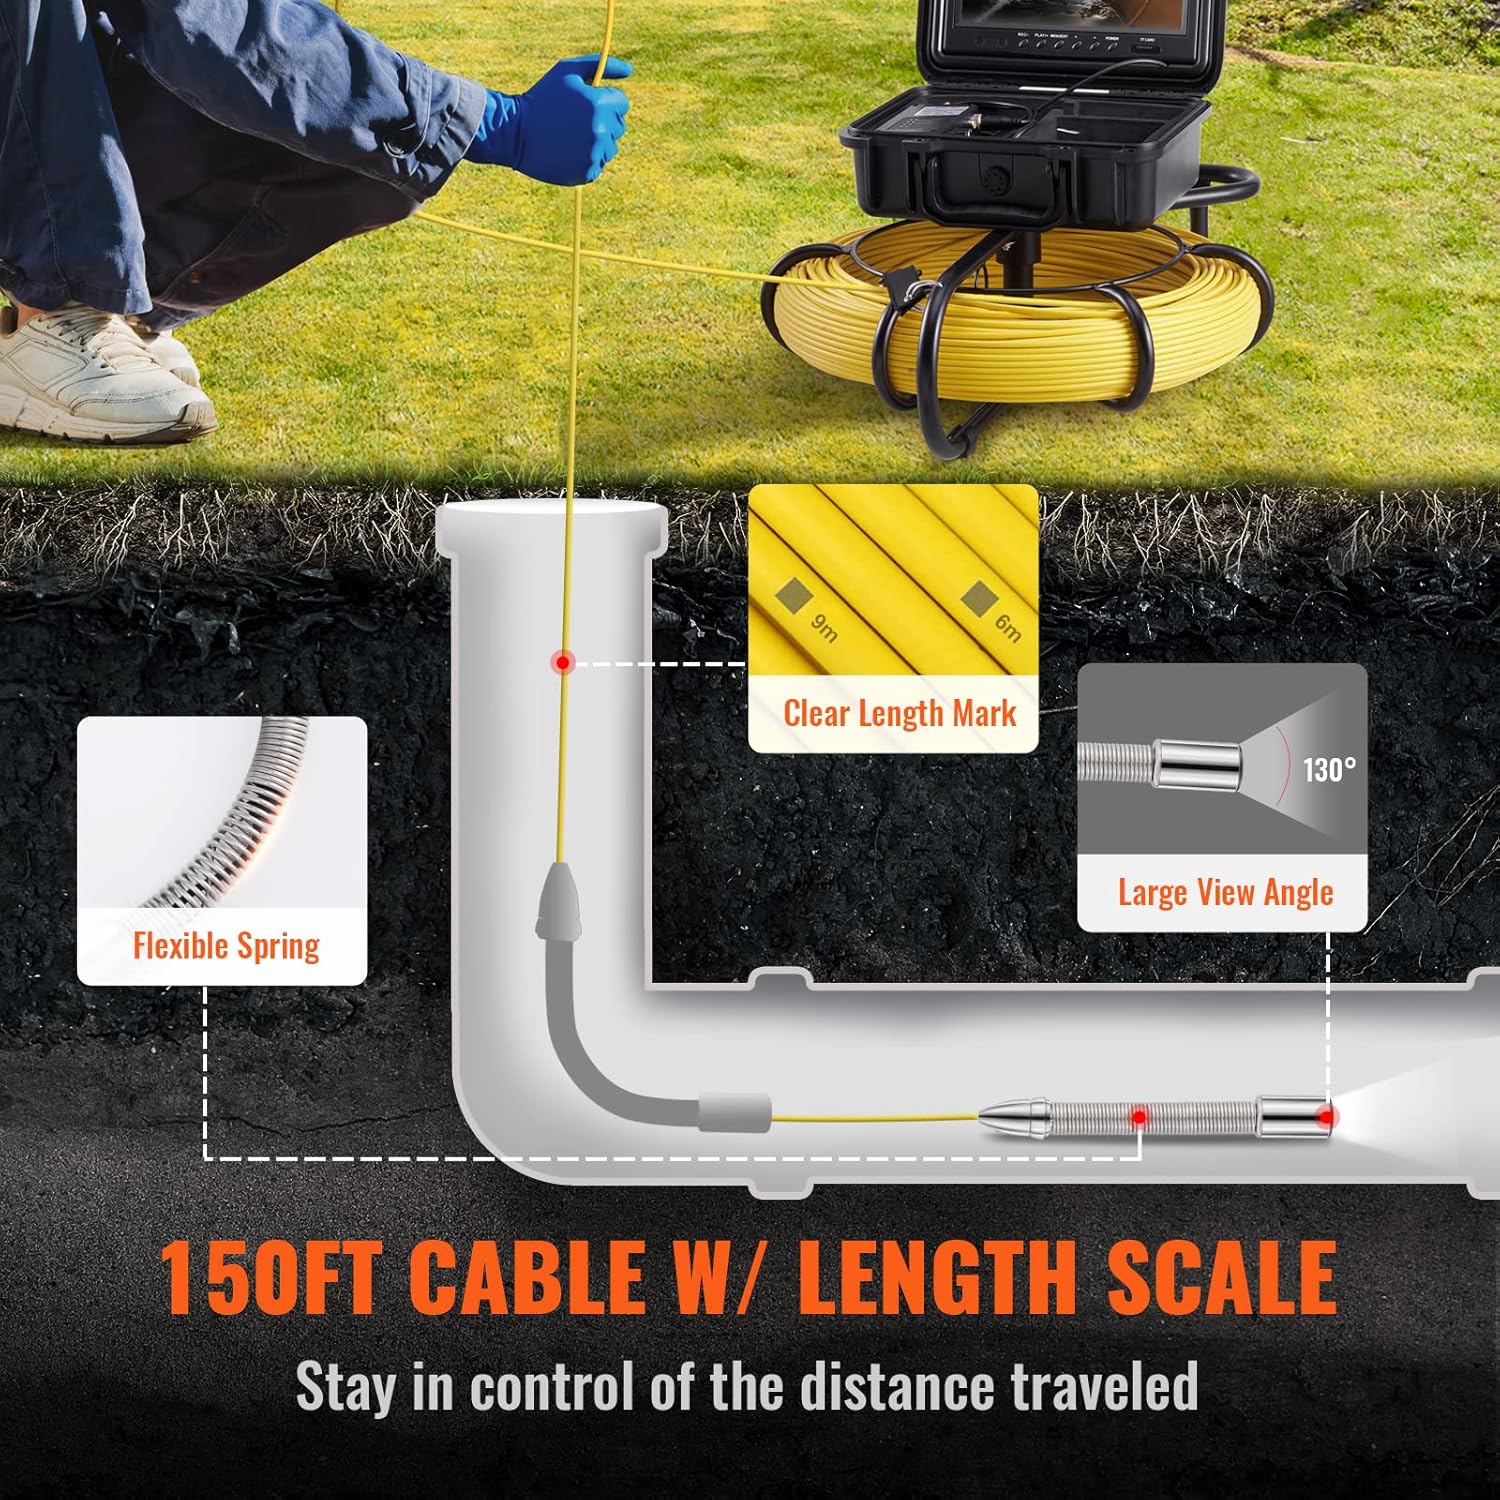
Illustration of the 150-foot cable with a clear length mark and flexible spring, demonstrating its use in pipe inspection.

The monitor highlights the DVR function, allowing users to capture and record images and videos for later analysis.
Maintenance
- Cleaning: After each use, carefully clean the camera head and the entire length of the cable with a damp cloth to remove any debris or residue. Ensure all components are dry before storage.
- Storage: Coil the cable neatly onto the handy cable reel. Store all components, including the monitor, camera head, and accessories, in the portable case to protect them from damage and environmental elements.
- Battery Care: Fully charge the battery after each use, especially before long periods of storage, to maintain battery health and longevity.

Overview of the product's dimensions and key features, including battery life and LED lights.
Troubleshooting
- Camera stops recording after a few seconds: This issue often indicates a problem with the SD card. Try formatting the SD card directly through the monitor's menu or replace it with a new one. Ensure the card is properly inserted.
- Camera head stopped working: First, check all cable connections to ensure they are secure. If the issue persists, the camera head may be damaged. Contact VEVOR customer support for repair or replacement options.
- Cable kinks or snaps during reeling: Always reel the cable carefully and avoid forcing it. Kinks can weaken the cable over time. Ensure the cable reel is properly positioned and free of obstructions during operation and storage.
- Water pooling in the pipe: While the camera can identify water pooling (often indicating a dip or belly in the pipe), this is typically a pipe infrastructure issue, not a camera malfunction. The camera serves as a diagnostic tool to pinpoint such problems.
Specifications
| Feature | Specification |
|---|---|
| Screen Size | 9" Color TFT LCD |
| Camera Resolution | 1200TVL |
| Camera Diameter | 0.9" / 23mm |
| LED Lights | 12 adjustable LEDs |
| Waterproof Rating | IP68 |
| Cable Length | 150ft / 45.7m |
| Battery Capacity | 12V 4500mAh Lithium |
| Operating Time | 8-10 hours (continuous) |
| Storage | 8GB Micro SD Card (included) |
| Compatible Pipe Diameter (Straight) | 0.98 - 5.91 inch (25 - 150 mm) |
| Compatible Pipe Diameter (Right Angle) | 1.97 - 5.91 inch (50 - 150 mm) |
Warranty and Support
VEVOR products typically come with a standard warranty. For specific warranty details, technical support, or service inquiries, please refer to the warranty card included in your product packaging or visit the official VEVOR website. Keep your purchase receipt as proof of purchase.
Ask a question about this manual
Ask about setup, troubleshooting, compatibility, parts, safety, or missing instructions. Manuals+ will review the question and use this page’s manual context to help answer it.