1. Introduction
This manual provides instructions for the safe and efficient operation of your YJDayy Incubator for Hatching Eggs. This device is designed to facilitate the incubation of various poultry eggs, featuring automatic egg turning, humidity control, and an integrated LED egg candler. Please read this manual thoroughly before use to ensure optimal performance and successful hatching results.
2. Safety Information
- Always place the incubator on a stable, level surface away from direct sunlight, drafts, or extreme temperature fluctuations.
- Ensure the power supply matches the voltage specified on the incubator label (AC95-125V).
- Do not immerse the incubator or any electrical components in water or other liquids.
- Keep out of reach of children and pets.
- Unplug the incubator from the power outlet before cleaning or performing any maintenance.
- Do not operate the incubator if the power cord or plug is damaged.
- Avoid opening the incubator frequently during the incubation period to maintain stable temperature and humidity.
3. Product Components
Familiarize yourself with the main parts of your incubator:
- Top Cover: Transparent lid for viewing the incubation process.
- Control Panel: Features LED display for temperature, control buttons, and egg candler.
- Egg Tray: Holds eggs and facilitates automatic turning.
- Hatching Tray (Grille): Used during the final days of incubation for hatching.
- Water Tank/Bottle: For automatic water refilling to maintain humidity.
- Ventilation Port: Ensures proper air circulation.

Figure 3.1: Diagram showing the main components of the incubator, including the top cover, grille, egg tray, hatching tray, and water tank.

Figure 3.2: Close-up of the incubator's control panel, highlighting the egg candler, ventilation port, LED display, and control buttons.
4. Setup Instructions
- Unpack and Inspect: Carefully remove all components from the packaging. Inspect for any damage.
- Assemble Egg Tray: Install the egg tray according to the size of the eggs you intend to incubate. The tray is designed to accommodate various egg sizes.
- Fill Water Bottle: Fill the provided water bottle halfway with clean, distilled water. Connect it to the automatic water refilling port on the incubator. This system helps maintain consistent humidity levels.
- Preheat Incubator: Connect the incubator to a power source. Allow it to preheat for at least 2-4 hours to stabilize the internal temperature and humidity before placing eggs inside. Monitor the LED display to ensure the temperature reaches the desired setting.

Figure 4.1: Image illustrating the installation of the egg tray within the incubator base.

Figure 4.2: Image showing the water bottle connected to the incubator and the unit powered on for preheating.
5. Operating Instructions
5.1. Placing Eggs
Once the incubator has stabilized, carefully place the fertilized eggs into the egg tray. Ensure they are positioned correctly for the automatic turning mechanism. The incubator can hold 16-35 eggs depending on their size.

Figure 5.1: The incubator loaded with chicken and quail eggs, demonstrating its capacity.
5.2. Automatic Egg Turning
The incubator features an automatic egg turning function. Once the turntable is inserted into the egg pan, it will automatically turn the eggs at regular intervals to ensure even heating and development. This reduces the need for manual intervention.

Figure 5.2: Illustration of the automatic egg turning feature, showing eggs being rotated within the tray.
5.3. Temperature and Humidity Control
The incubator maintains automatic temperature control and circulating air flow. The LED display shows the current temperature. Humidity is maintained via the automatic water refilling system. Refer to the table below for recommended incubation parameters for common poultry.
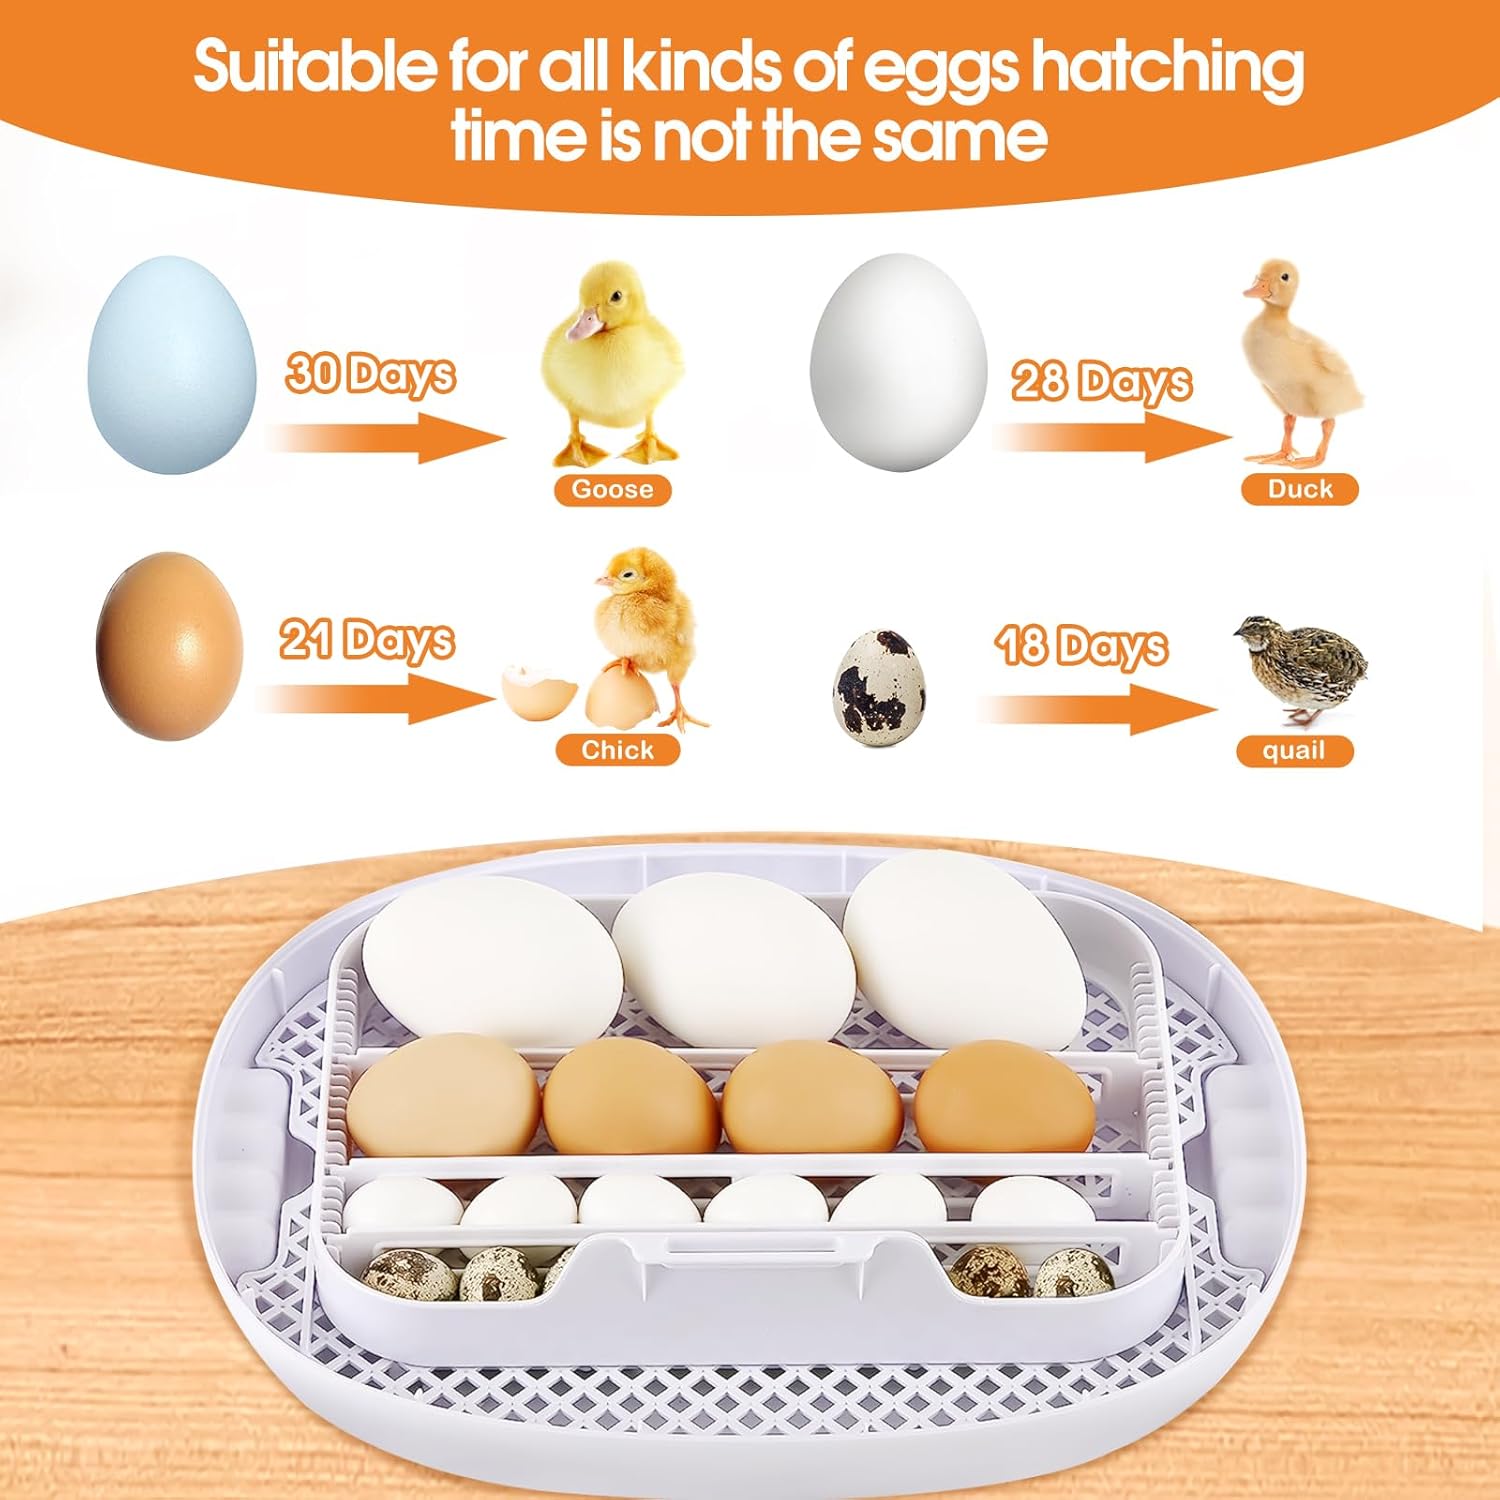
Figure 5.3: Chart indicating typical hatching times for goose (30 days), duck (28 days), chicken (21 days), and quail (18 days) eggs.
| Egg Type | Temperature (°C) | Humidity (%) | Incubation Period (Days) |
|---|---|---|---|
| Chicken | 37.5 - 37.8 | 50 - 60 (Days 1-18), 65-75 (Days 19-21) | 21 |
| Duck | 37.5 - 37.8 | 55 - 65 (Days 1-25), 70-80 (Days 26-28) | 28 |
| Quail | 37.5 - 37.8 | 50 - 60 (Days 1-15), 65-75 (Days 16-18) | 18 |
| Goose | 37.5 - 37.8 | 60 - 70 (Days 1-27), 75-85 (Days 28-30) | 30 |
5.4. LED Egg Candler
The built-in LED egg candler allows you to observe the development of the embryo without disturbing the incubation process. Simply press the candler button on the control panel and hold an egg over the light to check for viability and growth. This is typically done around day 7-10 for chicken eggs.
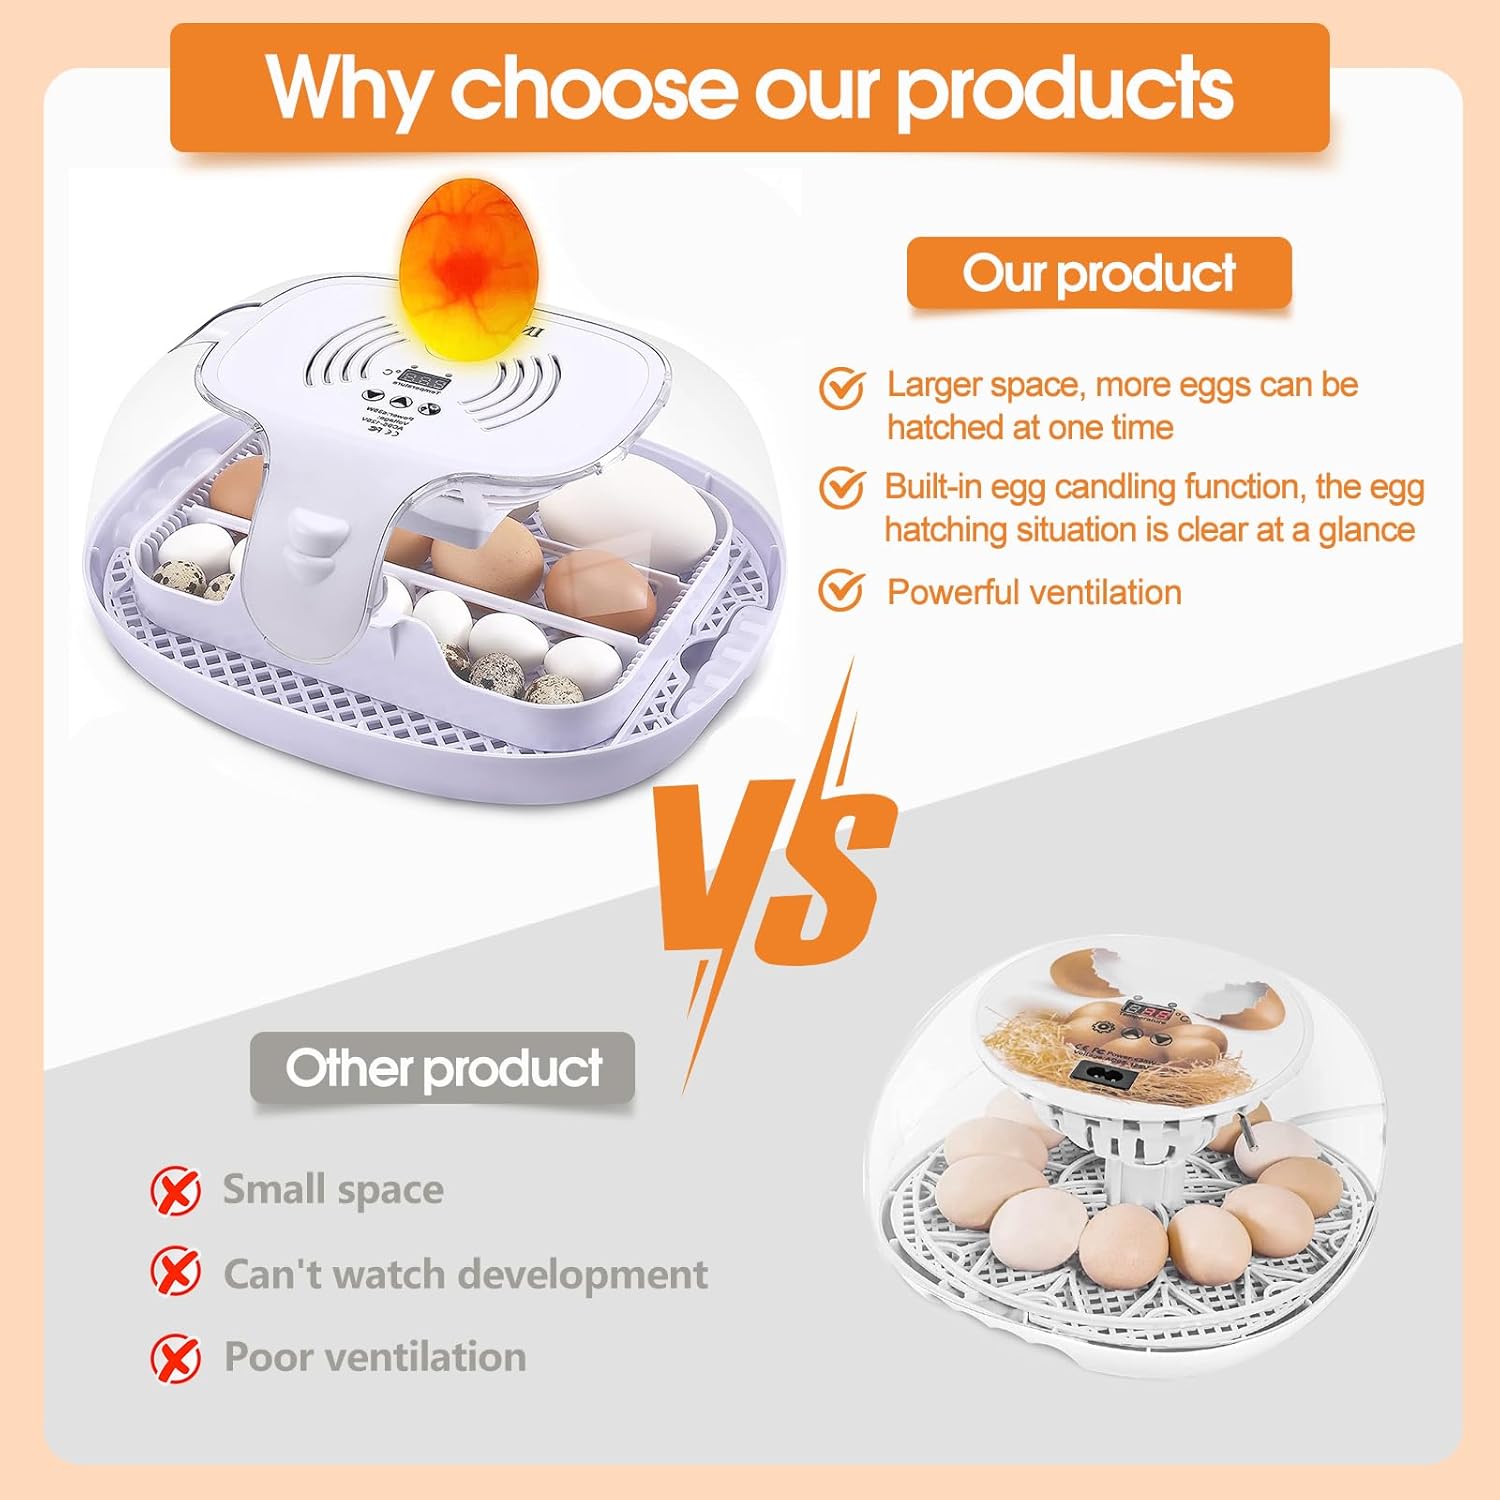
Figure 5.4: An egg being candled using the integrated LED light, revealing the embryo's development.
5.5. Hatching Process (Lockdown)
Approximately 3 days before the expected hatch date (e.g., Day 18 for chicken eggs), remove the egg turning tray and place the eggs directly onto the hatching grille. Increase the humidity as per the table above. Do not open the incubator during hatching unless absolutely necessary. Allow chicks to dry completely before removing them.

Figure 5.5: Newly hatched chicks resting inside the incubator after emerging from their shells.
6. Maintenance
- Cleaning: After each hatch, unplug the incubator and allow it to cool. Disassemble the egg tray and hatching grille. Wash all removable parts with a mild disinfectant solution and warm water. Rinse thoroughly and allow to air dry completely before reassembly or storage.
- Exterior: Wipe the exterior of the incubator with a damp cloth. Do not use abrasive cleaners.
- Storage: Store the incubator in a clean, dry place away from direct sunlight when not in use.
7. Troubleshooting
| Problem | Possible Cause | Solution |
|---|---|---|
| Incubator not powering on | Power cord not connected; power outlet malfunction. | Check power cord connection; try a different outlet. |
| Temperature fluctuations | Incubator placed in a drafty area; lid not sealed properly; ambient temperature too unstable. | Move incubator to a stable environment; ensure lid is securely closed; allow more preheating time. |
| Humidity too low | Water bottle empty or not connected; insufficient water in channels. | Refill water bottle; ensure proper connection; check for blockages in water channels. |
| Eggs not turning automatically | Turntable not properly installed; motor malfunction. | Ensure turntable is correctly seated in the egg pan; contact customer support if motor is faulty. |
| Poor hatch rate | Incorrect temperature/humidity; infertile eggs; frequent opening of incubator; poor egg quality. | Verify temperature/humidity settings; use fresh, fertile eggs; minimize opening the lid; ensure proper ventilation. |
8. Specifications
- Model: Incubators for Hatching Eggs
- Brand: YJDayy
- Capacity: 16-35 eggs (depending on size)
- Power: 35W
- Voltage: AC95-125V
- Product Dimensions: 9.84 x 9.84 x 5.9 inches
- Item Weight: 4.29 pounds
- Features: Automatic Egg Turning, Humidity Control, LED Egg Candler, 360° View
9. Warranty and Support
For warranty information or technical support, please refer to the seller's contact information provided at the point of purchase. YJDayy is committed to providing quality products and customer service. For assistance, you may contact the seller via email as mentioned in the brand story.
Typical return policy allows for a 30-day return for refund or replacement. Protection plans may also be available for extended coverage.