Introduction
This manual is a quality reproduction of the original Singer Operator's Manual for the Singer Stylist 457 Zig-Zag Sewing Machine. It serves as a complete guide for using and maintaining your sewing machine, ensuring you get the most out of its features. The content is presented clearly and concisely, with detailed illustrations to assist you.
The Singer Stylist 457 is designed for a variety of sewing tasks, offering features such as perfect straight stitching, timesaving blindstitching, practical and decorative zig-zag stitching, twin-needle stitching for extra finishing touches, one-way needle insertion, and a quick-change throat plate.

Figure 1: Front cover of the Singer Stylist 457 Instruction Manual.
Setup
Proper setup is crucial for optimal performance of your Singer Stylist 457 sewing machine. This section guides you through the initial steps, including threading and bobbin preparation.
Threading Your Sewing Machine
Accurate threading ensures smooth operation and consistent stitch quality. Follow these steps carefully:
- Place a spool of thread on the spool pin.
- Lead the thread through the upper tension disc and around the thread guides.
- Thread the needle from front to back.

Figure 2: Illustrations for threading the sewing machine and removing the bobbin.
The Bobbin Thread
Winding and inserting the bobbin correctly is essential for proper stitch formation.
- Raise the presser foot.
- Turn the hand wheel towards you until the needle is in its highest position.
- Open the slide plate and remove the bobbin.
- Wind the bobbin evenly, ensuring it is not overfilled.
- Insert the wound bobbin into the bobbin case, ensuring the thread feeds correctly.
Raising the Bobbin Thread
After inserting the bobbin, you need to bring the bobbin thread up through the needle plate hole.
- Hold the needle thread lightly with your left hand.
- Turn the hand wheel towards you slowly, allowing the needle to enter the throat plate.
- Continue turning the hand wheel; the needle thread will rise and bring up a loop of bobbin thread.
- Pull the loop to bring the bobbin thread fully through the plate.

Figure 3: Steps for raising the bobbin thread and needle positioning for straight stitching.
Operation
The Singer Stylist 457 offers various stitching options. This section details how to perform common sewing tasks.
Straight Stitching
For basic straight stitching, set the needle position to 'C' (center) and the stitch width selector to '0'. Adjust stitch length according to your fabric and desired seam type.
Zig-Zag Stitching
The zig-zag function allows for decorative stitches, seam finishing, and buttonholes. Use the pattern selector to choose your desired zig-zag pattern and adjust the stitch width and length as needed.
Twin-Needle Stitching
For twin-needle stitching, insert two needles and thread them separately. This creates two parallel lines of stitching, ideal for decorative purposes or hemming.
Seams and Hems
The manual provides instructions for various seam types, including hairline seams for sheer fabrics and seams in knit fabrics. Proper technique ensures durable and neat finishes.

Figure 4: Examples of hairline seams and seams in knit fabrics.
Buttonholes
Creating buttonholes involves a multi-step process using the zig-zag function and specific settings. The manual details procedures for standard and corded buttonholes, including bar tacking and fastening stitches.
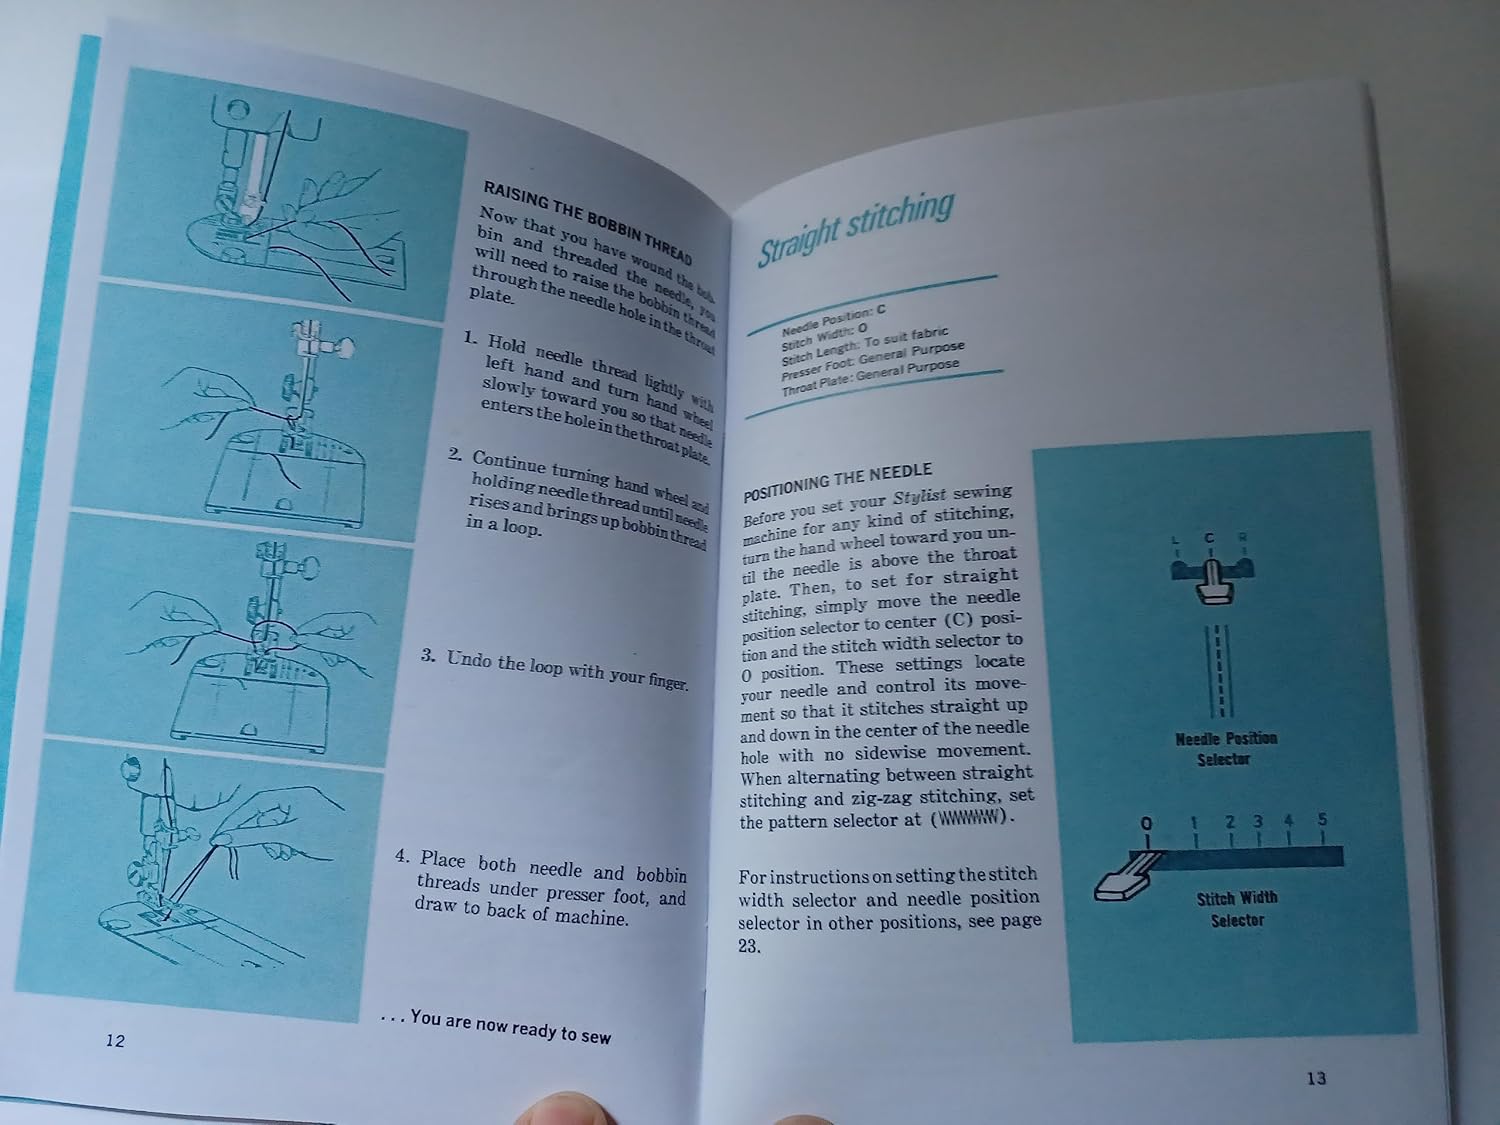
Figure 5: Step-by-step guide for buttonhole creation.
Maintenance
Regular maintenance ensures the longevity and smooth operation of your Singer Stylist 457 sewing machine. This includes cleaning, lubrication, and periodic checks.
Cleaning and Lubrication
- Every Few Weeks: Remove lint and dust from the bobbin area and feed dog with a small brush.
- Every Few Months: Apply a drop of sewing machine oil to designated lubrication points as indicated in the manual.
- Every Year: Consider a more thorough cleaning and professional servicing.
Replacing the Light Bulb
To replace the light bulb, ensure the machine is unplugged. Carefully unscrew the old bulb and replace it with a new one of the correct wattage.
Replacing the Slide Plate
The slide plate can be removed for cleaning or replacement. Follow the instructions to lift and re-seat the plate correctly.
Troubleshooting
This section addresses common issues you might encounter with your Singer Stylist 457 and provides solutions.
- Skipped Stitches: Check needle insertion, ensure the needle is not bent, and verify correct threading.
- Thread Breakage: Inspect for burrs on the needle plate or bobbin case, ensure proper tension, and use good quality thread.
- Uneven Stitches: Adjust tension settings, check for proper bobbin winding, and ensure the presser foot pressure is appropriate for the fabric.
- Machine Jamming: Remove any tangled threads, check for obstructions in the bobbin area, and ensure the needle is correctly installed.
Refer to the "Performance Check List" in the original manual for more detailed troubleshooting steps.
Specifications
| Feature | Detail |
|---|---|
| Machine Model | Singer Stylist 457 |
| Manual Dimensions | 0.1 x 5.5 x 8.5 inches |
| Manual Weight | 4 ounces |
| Stitch Types | Straight, Zig-Zag, Twin-Needle, Blindstitch, Buttonholes |
| Needle Insertion | One-way (prevents backward insertion) |
| Throat Plate | Quick-Change |
| Power Source | AC (for the machine) |
| Manual Material | Quality Heavy Weight Paper |
Warranty and Support
This manual is a reprint and does not include a direct product warranty from the original manufacturer. For information regarding the warranty of your Singer Stylist 457 sewing machine, please refer to the documentation provided at the time of purchase of the machine itself.
For technical support or service related to your Singer sewing machine, it is recommended to contact your local authorized Singer dealer or visit the official Singer website for assistance. Ensure you have your machine's model number (457 Stylist) available when seeking support.

Figure 6: Index from the manual, showing topics covered.