CLUBRALLY Aix-CB-116
CLUBRALLY Golf Cart Control Wiring Harness Manual
Model: Aix-CB-116 (OEM#102196601)
For Club Car DS with Black Controller #1510-5201
1. Introduction
This manual provides comprehensive instructions for the safe and effective installation, operation, and maintenance of your CLUBRALLY Golf Cart Control Wiring Harness. Please read this manual thoroughly before attempting any installation or maintenance procedures. Proper installation ensures optimal performance and longevity of the product.
Safety Precautions
- Always disconnect the golf cart's battery before performing any electrical work to prevent electric shock or damage to the system.
- Wear appropriate personal protective equipment, including safety glasses and gloves.
- Ensure the golf cart is turned off and secured to prevent accidental movement during installation.
- If you are unsure about any step, consult a qualified technician.
2. Product Overview
The CLUBRALLY Golf Cart Control Wiring Harness is designed as a direct replacement for Club Car DS models. It provides the necessary electrical connections for the golf cart's controller and other essential components. Constructed with high-quality copper core, it offers high temperature resistance and excellent electrical insulation for reliable performance.

Figure 2.1: Overview of the CLUBRALLY Golf Cart Control Wiring Harness, coiled for packaging.
Video 2.1: A detailed look at the CLUBRALLY Golf Cart Control Wiring Harness, highlighting its various connectors and overall construction. This video demonstrates the product's features and build quality.
Video 2.2: A 360-degree view of the wiring harness, showcasing all angles and connector types. This provides a comprehensive visual inspection of the product.
3. Compatibility
This wiring harness is specifically designed for Club Car DS golf cart models. It is crucial to ensure your golf cart is equipped with the Black Controller #1510-5201 for proper functionality and fit. This harness replaces OEM part number 102196601.
Important Note: The golf cart controller is NOT included with this wiring harness and must be purchased separately if needed.
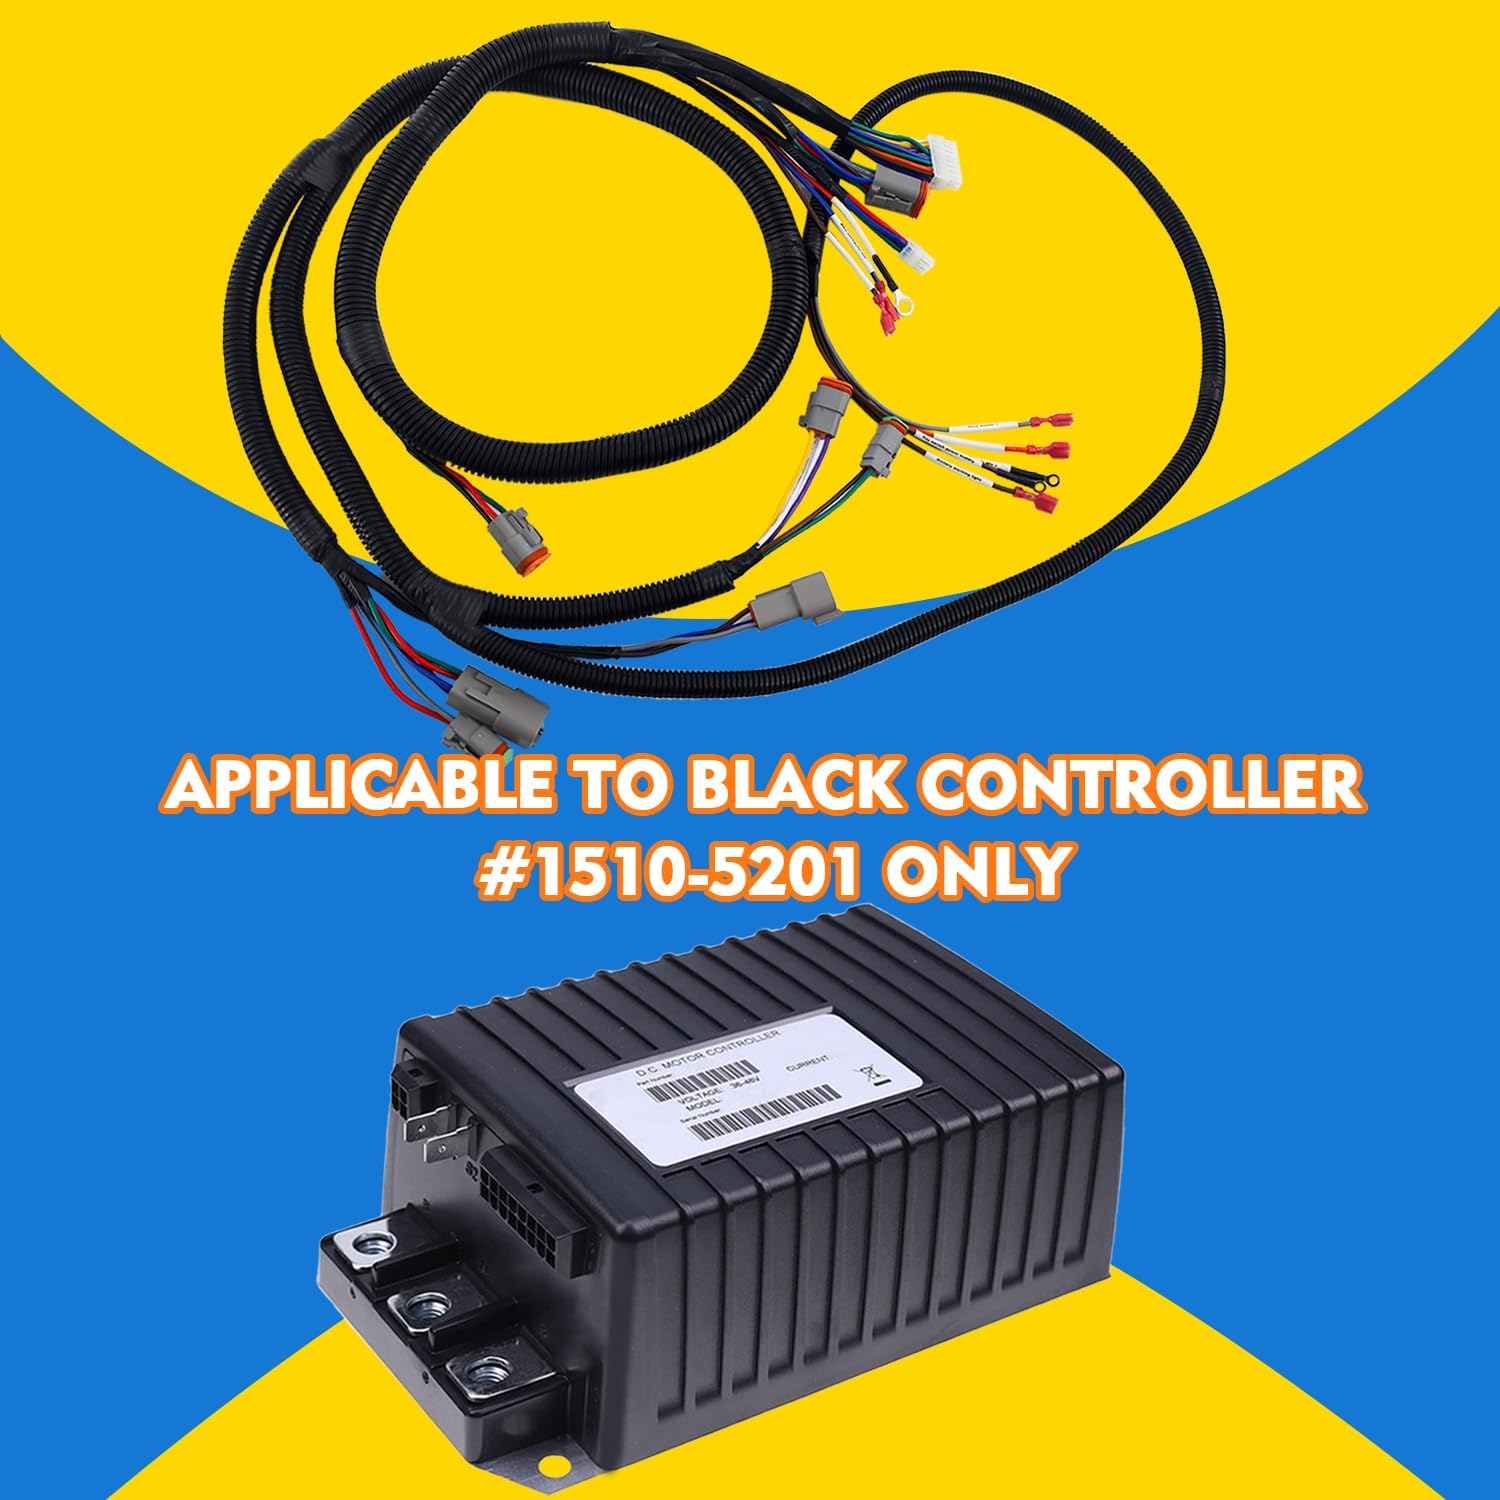
Figure 3.1: The wiring harness shown alongside the compatible Club Car DS Black Controller #1510-5201, emphasizing the specific compatibility requirement.

Figure 3.2: Important notes regarding product purchase, highlighting that the controller is separate and confirming compatibility with the Black Controller #1510-5201.
4. Installation Instructions
This wiring harness is designed for "Plug & Play" installation, meaning it connects directly to existing ports. However, careful attention to detail is required. Always refer to your golf cart's specific service manual for detailed wiring diagrams and safety procedures.
Required Tools:
- Basic hand tools (wrenches, screwdrivers)
- Wire cutters/strippers (if minor modifications are needed, though generally not for plug-and-play)
- Multimeter (for testing connections)
- Safety glasses and gloves
Installation Steps:
- Prepare the Golf Cart: Ensure the golf cart is powered off and the main battery disconnect switch is in the OFF position. Disconnect the main battery cables (negative first, then positive) to prevent any electrical hazards.
- Access Existing Harness: Locate the existing wiring harness connected to your golf cart's controller and other electrical components. This may require removing panels or covers.
- Document Connections: Before disconnecting anything, take photos or make detailed notes of all existing wire connections and their routing. This will serve as a reference during reassembly.
- Remove Old Harness: Carefully disconnect all connectors and terminals of the old wiring harness. Pay attention to any clips or fasteners holding the harness in place.
- Install New Harness: Route the new CLUBRALLY wiring harness into position, matching the path of the old harness. Connect each plug and terminal to its corresponding port. The harness features various connectors designed for specific functions.
- Verify Connections: Double-check all connections to ensure they are secure and correctly seated. Refer to your documented notes or photos.
- Reconnect Battery: Once all connections are verified, reconnect the main battery cables (positive first, then negative).
- Test Functionality: Turn on the golf cart and test all electrical functions, including lights, horn, and motor operation, to ensure the new harness is working correctly.
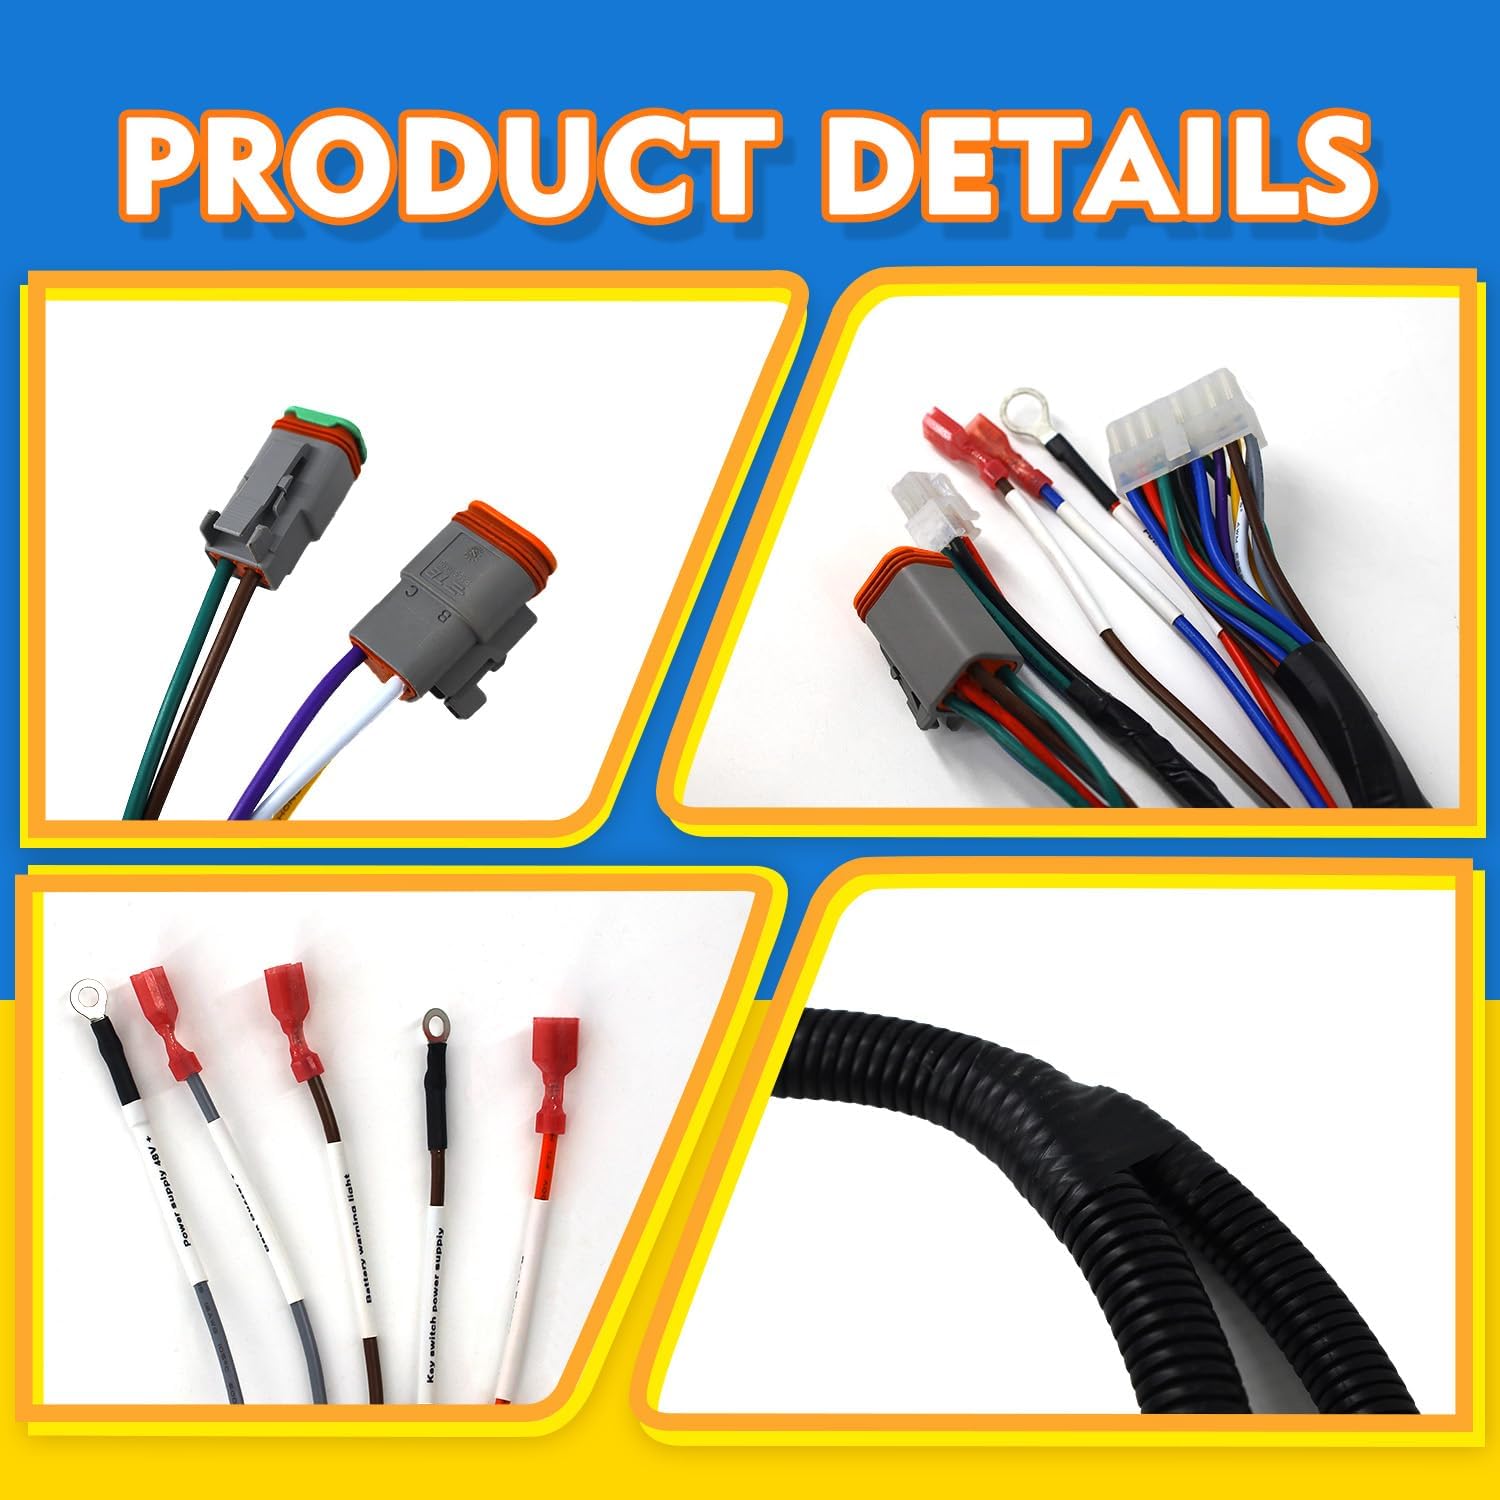
Figure 4.1: Detailed view of the harness connectors, designed for secure and precise connections.

Figure 4.2: Illustration of specific wire color coding for key functions such as power supply, battery warning light, and key switch connections.
5. Operation
Once the CLUBRALLY Golf Cart Control Wiring Harness is correctly installed, the operation of your golf cart should remain consistent with its original functionality. The harness facilitates the electrical communication between the controller and other components, ensuring proper power distribution and signal transmission. No specific operational steps are required for the harness itself beyond ensuring its secure installation.
6. Maintenance
Regular maintenance of your wiring harness can extend its lifespan and prevent potential electrical issues.
- Visual Inspection: Periodically inspect the entire harness for any signs of wear, fraying, cuts, or damage to the insulation. Check for loose or corroded connections.
- Cleanliness: Keep the harness and its connectors clean and free from dirt, debris, and moisture. Use a soft, dry cloth to wipe down the harness. Avoid using harsh chemicals that could damage the insulation.
- Secure Connections: Ensure all connectors remain firmly seated. Vibrations from golf cart operation can sometimes loosen connections over time.
- Corrosion Check: If operating in humid or corrosive environments, regularly check terminals for signs of corrosion. Clean any corrosion with a wire brush and appropriate electrical contact cleaner.
7. Troubleshooting
If you encounter issues after installing the wiring harness, consider the following troubleshooting steps:
- No Power to Components:
- Check main battery connections and ensure the battery is charged.
- Verify all harness connectors are fully seated and locked.
- Inspect for any blown fuses in the golf cart's electrical system (not part of this harness, but critical).
- Intermittent Electrical Function:
- Examine all connections for looseness or corrosion.
- Check for any pinched or damaged wires within the harness.
- Controller Malfunction:
- Ensure the harness is correctly connected to the controller.
- Confirm that your controller is indeed the compatible Black Controller #1510-5201.
- If the issue persists, the controller itself may be faulty (not related to the harness).
If these steps do not resolve the issue, it is recommended to seek assistance from a qualified golf cart technician.
8. Specifications
| Feature | Detail |
|---|---|
| Brand | CLUBRALLY |
| Model Number | Aix-CB-116 |
| OEM Part Number | 102196601 |
| Compatibility | Club Car DS with Black Controller #1510-5201 |
| Material | Copper (core) |
| Item Weight | 1.68 Pounds (approx. 0.76 kg) |
| Package Dimensions | 11.89 x 8.86 x 2.24 inches |
| Included Components | 1x Club Car DS Wiring Harness |
9. Warranty and Support
This CLUBRALLY product comes with a 1-Year Warranty from the date of purchase, covering manufacturing defects. For warranty claims or technical assistance, please contact the seller or CLUBRALLY customer support. When contacting support, please have your purchase details and product model number (Aix-CB-116) readily available.
For further inquiries, you may visit the CLUBRALLY Store on Amazon.
Related Documents - Aix-CB-116
 |
Curtis 1510(A) Controller Installation and Troubleshooting Guide A comprehensive guide for the installation and troubleshooting of the Curtis 1510(A) controller for Club Car Precedent (IQ) golf carts. Includes pre-installation checks, wiring diagrams, and fault code resolutions. |
 |
GTW Light Kit Installation Instructions for Yamaha Drive Golf Cart Step-by-step installation guide for the GTW 02-080 Light Kit on Yamaha Drive golf carts, including included parts and detailed instructions for headlights, taillights, and wiring. |
 |
CADDYBAR™ User Guide: Installation, Usage, and Maintenance for Golf Carts Comprehensive user guide for the CADDYBAR™, detailing installation, safety, usage guidelines, maintenance, and warranty information for golf cart owners. Learn how to enhance your golf cart experience with this versatile accessory. |
 |
2025 JPSMGolf Electric Golf Trolley Buyers Guide A comprehensive guide to electric golf trolleys from JPSMGolf, featuring brands like Stewart, PowerBug, Cart Tek, and Flat Cat. Learn about trolley types, features, and care to find the perfect fit for your game. |
 |
Classic Fairway Deluxe 3-Sided Golf Car Enclosure Assembly and Care Instructions Comprehensive assembly and care instructions for the Classic Fairway Deluxe 3-Sided Golf Car Enclosure, including installation steps, cleaning tips, and storage guidelines for Club Car, Yamaha, and EZ Go golf carts. |
 |
SereneLife SLGCX5 Foldable 2-Wheel Golf Push Cart User Manual User manual for the SereneLife SLGCX5, a foldable 2-wheel golf push cart with steel pull cart features, upper & lower brackets, and strap. Includes assembly, folding, maintenance, and safety instructions. |
Ask a question about this manual
Ask about setup, troubleshooting, compatibility, parts, safety, or missing instructions. Manuals+ will review the question and use this page’s manual context to help answer it.