BONEW GETIDY 23L Class B Vacuum Autoclave Instruction Manual
Model: JY-23
Comprehensive guide for safe and effective operation.
1. Product Overview and Key Features
The BONEW GETIDY 23L Class B Vacuum Autoclave (Model JY-23) is designed for high-temperature, high-pressure steam sterilization. This device features automatic control, a drying function, and a water and steam separation design, ensuring efficient and reliable sterilization processes. It is equipped with a USB connector for record keeping and various safety mechanisms.
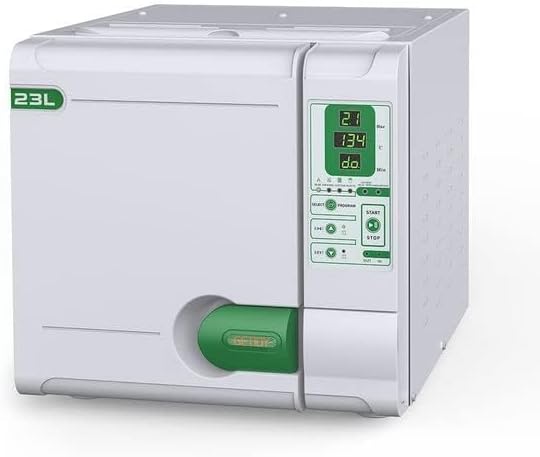
Image 1.1: Front view of the BONEW GETIDY 23L Class B Vacuum Autoclave, showing the control panel and 23L capacity indicator.
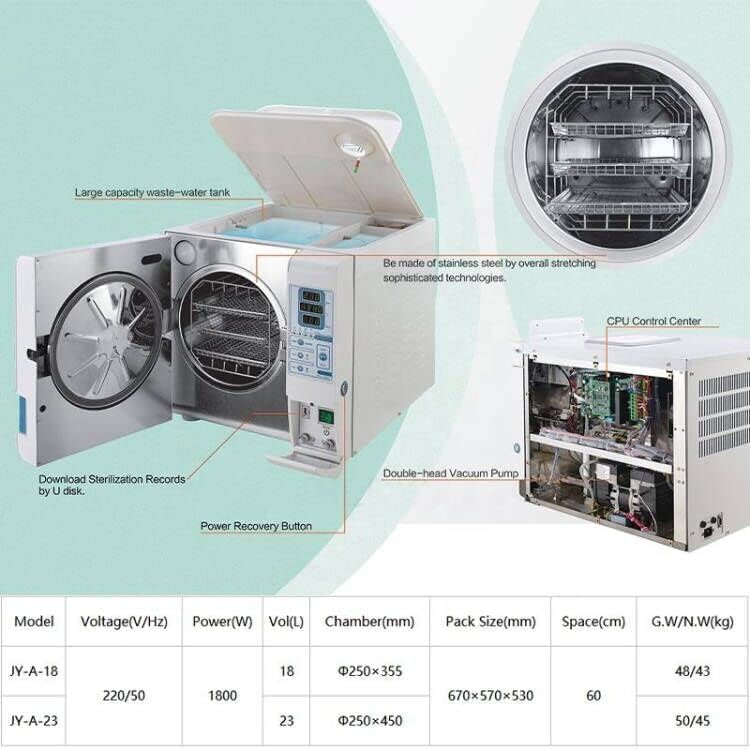
Image 1.2: Diagram illustrating key internal components such as the waste-water tank, CPU control center, double-head vacuum pump, and power recovery button.
Key Features:
- Automatic Control: Fully automated sterilization cycles with precise temperature and pressure management.
- Drying Function: Integrated drying cycle to ensure instruments are ready for use or storage immediately after sterilization.
- USB Connectivity: Allows for downloading sterilization records to a U disk for documentation and compliance.
- Delay-Start & Sleep-Mode: Flexible scheduling options for operational convenience and energy saving.
- "WASH" Program: Dedicated pipeline cleaning program to prevent clogging and maintain optimal performance.
- Upward-Open Water Tank: Convenient access for filling and maintenance.
- Durable Construction: Features SU 304 stripe stainless steel chamber and a double door lock control structure for safety and longevity.
- Advanced Steam Generator: New rapid steam generator made of stainless steel pipe, designed to prevent aging issues associated with silicone pipelines.
- Integrated Test Programs: Supports BOWIE & DICK, HELIX, and VACUUM tests for validation of sterilization efficacy.
2. Setup and Installation
Proper setup is crucial for the safe and efficient operation of your autoclave. Follow these steps carefully.
2.1 Unpacking and Inspection
- Carefully remove the autoclave and all accessories from the packaging.
- Inspect the unit for any signs of damage incurred during transit. Report any damage to your supplier immediately.
- Verify that all components listed in the packing list are present. The packaging typically includes the sterilizer unit, sealing ring, plastic handle, water and steam pipe, power cord, fuses, instrument rack, and instruction manual.

Image 2.1: Illustration of the typical contents included in the sterilizer packaging, such as the main unit, trays, power cord, and manual.
2.2 Placement
- Place the autoclave on a stable, level surface capable of supporting its weight.
- Ensure adequate ventilation around the unit. Do not block air vents.
- Keep the unit away from heat sources, direct sunlight, and areas with excessive humidity.
2.3 Power Connection
- Connect the power cord to a grounded electrical outlet. The unit operates on 220 Volts and consumes 1800 watts. Ensure your power supply meets these requirements.
2.4 Water Supply
- The autoclave has two internal water tanks: a 3.5L fresh water tank and a 5L waste water tank.
- Open the upward-open water tank cover and fill the fresh water tank with distilled water only. Using tap water or deionized water can lead to mineral buildup and damage the unit.
- Do not overfill the tank.

Image 2.2: A person demonstrating the filling of the autoclave's fresh water tank with distilled water.
3. Operating Instructions
This section details the steps for operating the BONEW GETIDY 23L Autoclave for sterilization.
3.1 Control Panel Overview
The autoclave features a clear digital LED screen panel for displaying operational status, temperature, pressure, and cycle time. Control buttons allow for program selection, start, and stop functions.

Image 3.1: Close-up of the autoclave's digital LED control panel, showing indicators for temperature, pressure, and program selection.
3.2 Loading Instruments
- Open the autoclave door. The unit features a double door lock control structure for safety.
- Place instruments to be sterilized onto the provided 5-layer activity pallet rack with 3 trays. Ensure items are arranged to allow for proper steam penetration.
- Common items suitable for sterilization include exposed metal type instruments, wrapper class items, cotton fabrics, and plastic/rubber products.
- Close the door securely until it latches.

Image 3.2: View of the autoclave's open chamber, showing the internal trays for loading instruments.

Image 3.3: Illustration of the autoclave's high-pressure sterilization process and examples of items that can be sterilized.
3.3 Selecting and Starting a Sterilization Cycle
- Power on the unit using the main power switch.
- Use the "SELECT" button to cycle through available programs. The autoclave offers programs for 121°C and 134°C sterilization, as well as specific tests like BOWIE & DICK, HELIX, and VACUUM. There are generally 4 kinds of programs for different materials (e.g., NUDE PACKAGE, COTTON PLASTIC).
- Once the desired program is selected, press the "START" button to begin the sterilization cycle.
- The unit will automatically proceed through pre-vacuum, heating, sterilization, and drying phases.
- Monitor the digital display for cycle progress.
- Important Safety Note: Do not attempt to open the door until the pressure has fallen to "0" bar and the cycle is complete.
3.4 USB Record Download
The autoclave is equipped with a USB connector to download sterilization records. This feature is essential for maintaining compliance and documentation.
- Insert a U disk (USB flash drive) into the USB port located on the front panel.
- Follow the on-screen prompts or refer to the specific instructions in the full manual for initiating the data transfer.
- Once the download is complete, safely remove the U disk.
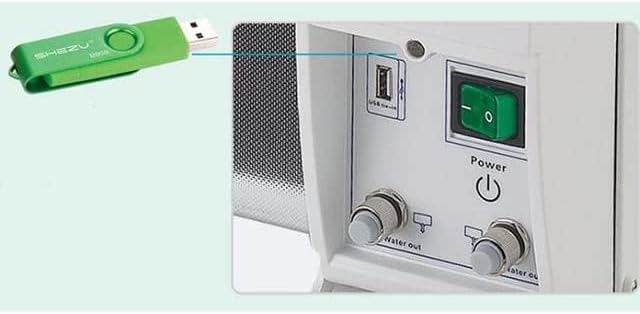
Image 3.4: Close-up of the USB connector on the autoclave, with a USB flash drive inserted for data download.

Image 3.5: Visual representation of the USB connector feature for downloading sterilization records.
3.5 Delay-Start and Sleep-Mode
These functions allow for flexible operation and energy management.
- Delay-Start: Program the autoclave to begin a cycle at a later time. Consult the full manual for specific programming steps.
- Sleep-Mode: The unit can enter a low-power sleep mode when not in active use, conserving energy.

Image 3.6: Overview of various features including the open-upward water tank, pipeline cleaning function, USB download, and delay start/sleep mode.
4. Maintenance
Regular maintenance ensures the longevity and optimal performance of your autoclave.
4.1 Water Tank and Filter Cleaning
- Regularly clean both the fresh water and waste water tanks.
- Clean the water filter periodically to prevent blockages and ensure proper water flow.
- Always use distilled water to prevent mineral buildup, which can damage internal components and affect sterilization efficacy.
4.2 Pipeline Cleaning ("WASH" Program)
- Utilize the dedicated "WASH" program to clean the internal pipelines. This helps prevent clogging and maintains the efficiency of the steam generation system.
- Refer to the full instruction manual for the frequency and specific steps for running the "WASH" program.
4.3 Safety Valve and General Checks
- Ensure the machine is in good condition, paying particular attention to the safety valve. Regular checks of the safety valve are recommended.
- Do not move the sterilizer during the process of work.
- Always ensure the pressure has completely dropped to "0" bar before attempting to open the door after a cycle.
5. Troubleshooting
This section provides general guidance for common issues. For detailed troubleshooting, please consult the comprehensive manual or contact customer support.
- Error Codes: If an error code appears on the display, note the code and refer to the full manual's troubleshooting section for specific remedies.
- Cycle Failure: Ensure the water tank is adequately filled with distilled water, the door is securely latched, and the correct program is selected.
- Poor Sterilization Results: Verify proper loading of instruments, ensure items are not overcrowded, and confirm that the correct sterilization program for the load type was used. Check for proper maintenance of water tanks and pipelines.
- No Power: Check the power cord connection, the wall outlet, and the unit's fuses.
6. Specifications
Detailed technical specifications for the BONEW GETIDY 23L Class B Vacuum Autoclave (Model JY-23).

Image 6.1: A table detailing the specifications for the JY-A-18 and JY-A-23 models, including voltage, power, volume, and chamber dimensions.
| Attribute | Value |
|---|---|
| Brand | BONEW |
| Model Number | JY-23 |
| Capacity | 23 Liters |
| Power/Wattage | 1800 watts |
| Voltage | 220 Volts |
| Work Temperature | 121°C or 134°C |
| Dry Procedure | Vacuum Drying |
| Display | Digital LED Display |
| Work Programs | 4 kinds of programs, plus BOWIE & DICK, HELIX, VACUUM tests |
| Water Supply System | Two water tanks (3.5L fresh, 5L waste) |
| Instrument Containers | 5-layer activity pallet rack with 3 trays |
| Chamber Dimensions | Ø250×450 mm |
| UPC | 758358762742 |
7. Warranty Information
Specific warranty details for the BONEW GETIDY 23L Autoclave are not provided in the available product information. Please refer to the warranty card included with your product or contact the manufacturer/seller directly for comprehensive warranty terms and conditions.
8. Support Information
For technical assistance, service, or inquiries regarding your BONEW GETIDY 23L Autoclave, please contact the manufacturer or your authorized distributor. Contact information is typically provided in the product packaging or on the manufacturer's official website.