Aquapix W3027-M Wave Digital Camera User Manual
Introduction
Welcome to your new Aquapix W3027-M Wave digital camera. This manual provides essential information for setting up, operating, and maintaining your camera. Please read it thoroughly to ensure optimal performance and longevity of your device. The Aquapix W3027-M Wave is designed for ease of use, offering waterproof capabilities and high-resolution imaging for capturing your moments.
Product Overview
Key Features
- Underwater camera functionality
- Waterproof up to 3 meters depth
- 2.7 inch display for clear viewing
- Photo resolution up to 30 Megapixels
- 4x digital zoom
Camera Components

Figure 1: Front and back view of the Aquapix W3027-M Wave digital camera, showcasing its compact design and button layout.
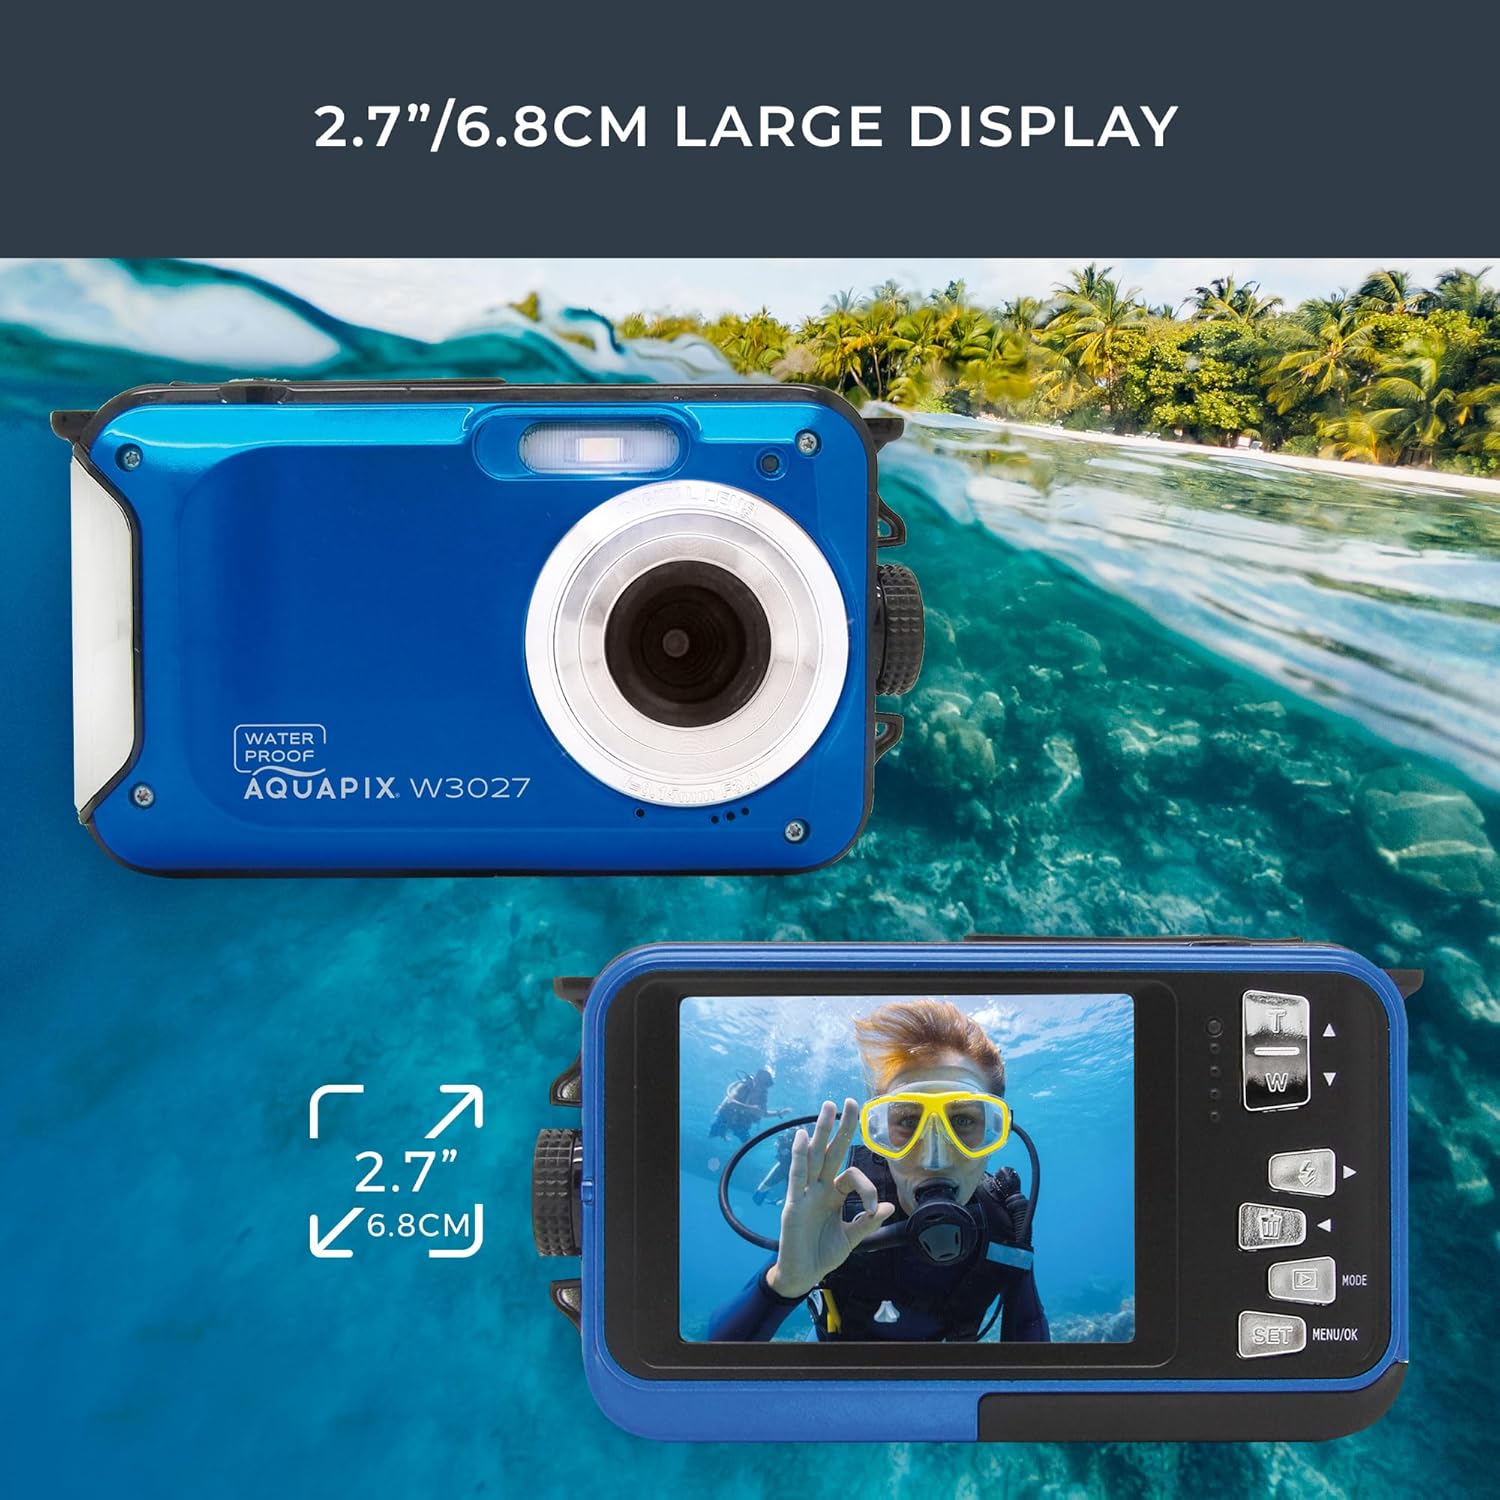
Figure 2: Close-up of the camera's 2.7-inch display, providing a clear interface for settings and image review.

Figure 3: The camera submerged in water, demonstrating its waterproof capability up to 3 meters.
Setup
1. Battery Installation
- Locate the battery compartment on the side or bottom of the camera.
- Open the compartment cover. Ensure it is securely latched to maintain waterproof integrity.
- Insert the included Lithium Ion battery, matching the polarity indicators (+/-).
- Close the battery compartment cover firmly until it clicks into place.
2. Memory Card Installation
The camera requires a Micro SD card (not included) to store photos and videos.
- Locate the Micro SD card slot, usually near the battery compartment.
- Insert the Micro SD card with the gold contacts facing the correct direction (refer to the diagram inside the compartment if available) until it clicks into place.
- To remove, gently push the card until it springs out.
3. Initial Power On and Language Setting
- Press and hold the Power button to turn on the camera.
- Upon first use, you may be prompted to select a language. Use the navigation buttons to select your preferred language and confirm.
- Set the date and time if prompted.
Operating Instructions
1. Power On/Off
- To Power On: Press and hold the Power button.
- To Power Off: Press and hold the Power button again until the screen turns off.
2. Mode Selection
Press the MODE button to cycle through available modes: Photo, Video, and Playback.
3. Taking Photos
- Switch to Photo mode using the MODE button.
- Frame your shot using the display.
- Press the Shutter button halfway to focus (if applicable), then fully press to capture the image.
- Use the zoom buttons (W/T) to adjust the 4x digital zoom.
4. Recording Videos
- Switch to Video mode using the MODE button.
- Press the Shutter button to start recording. A timer or indicator will appear on the screen.
- Press the Shutter button again to stop recording.
5. Playback and Deletion
- Switch to Playback mode using the MODE button.
- Use the navigation buttons to browse through your photos and videos.
- To delete a file, select it and press the Delete button (often indicated by a trash can icon). Confirm deletion when prompted.
6. Menu Settings
Press the MENU/OK button to access the camera's settings. Use the navigation buttons to scroll through options and MENU/OK to confirm selections. Settings may include resolution, white balance, exposure, and date/time.
Maintenance
1. Waterproof Care
- Before submerging the camera, ensure all compartment covers (battery, memory card, USB) are securely closed and latched.
- After use in saltwater, rinse the camera thoroughly with fresh water and dry it completely with a soft cloth.
- Do not open compartments when the camera is wet or in a humid environment.
- Regularly check rubber seals for dirt, sand, or damage. Clean them gently if necessary.
2. Cleaning the Camera
- Use a soft, lint-free cloth to clean the camera body.
- For the lens and display, use a specialized lens cleaning cloth and solution to avoid scratches.
- Do not use harsh chemicals or abrasive materials.
3. Storage
- Store the camera in a cool, dry place away from direct sunlight and extreme temperatures.
- Remove the battery if the camera will not be used for an extended period.
Troubleshooting
| Issue | Possible Cause | Solution |
|---|---|---|
| Camera does not power on. | Low or depleted battery. Incorrect battery installation. | Charge the battery. Reinstall the battery correctly. |
| Cannot take photos/videos. | No memory card inserted. Memory card full. Memory card error. | Insert a Micro SD card. Delete unnecessary files or replace the card. Format the card (this will erase all data). |
| Images are blurry. | Lens is dirty. Insufficient light. Camera shake. | Clean the lens. Use in better lighting conditions. Hold the camera steady. |
| Water inside camera compartments. | Compartment cover not properly sealed. Damaged seal. | Immediately power off and dry the camera. Ensure all covers are securely closed before water exposure. Inspect seals for damage. If damage is found, discontinue use in water. |
Specifications
| Feature | Detail |
|---|---|
| Brand | Aquapix |
| Model Number | W3027-M (Item model number: 10034) |
| Manufacturer | Easypix |
| Waterproof Depth | Up to 3 meters |
| Display Size | 2.7 inches |
| Max Photo Resolution | 30 Megapixels |
| Digital Zoom | 4x |
| Image Stabilization | Digital |
| Photo Sensor Technology | CMOS |
| Supported File Format | JPEG |
| Aspect Ratio | 16:9 |
| Minimum Expanded ISO | 100 |
| Maximum Aperture | 3.5 Millimeters |
| Maximum Focal Length | 10 |
| Metering Description | Evaluative |
| Product Dimensions | 14 x 9 x 5 cm |
| Weight | 135 g |
| Batteries | 1 Lithium Ion battery (included) |
Warranty and Support
For warranty information and technical support, please refer to the documentation provided with your purchase or visit the official Aquapix website. Keep your proof of purchase for any warranty claims.