Introduction
This manual provides instructions for the safe and effective operation of your Mryitcal Button Maker Machine DC109. Please read this manual thoroughly before use to ensure proper setup and function.
Product Overview and Package Contents
The Mryitcal Button Maker Machine DC109 is designed for creating custom pin badges in multiple sizes.
Package Contents:
- 1 x Button Maker Machine Host
- 3 x Replaceable Button Dies (25mm, 32mm, 58mm)
- 100 x 25mm Metal Button Refills
- 100 x 32mm Metal Button Refills
- 100 x 58mm Metal Button Refills
- 3 x Circle Cutters (for 25mm, 32mm, 58mm paper)
- Additional accessories as specified in your kit (e.g., holographic films, keychains, magnets, cutting mat).

Image: The Mryitcal Button Maker Machine with various components including the machine body, interchangeable dies, button parts, and circle cutters.
Setup
- Unpack Components: Carefully remove all items from the packaging.
- Place Machine: Position the button maker machine on a stable, flat surface.
- Install Desired Die Set: The machine uses a magnetic suction base for die installation. Select the appropriate die size (25mm, 32mm, or 58mm). Align the 'A' die (left side) and 'B' die (right side) with their respective positions on the machine base. The magnetic base will secure them.
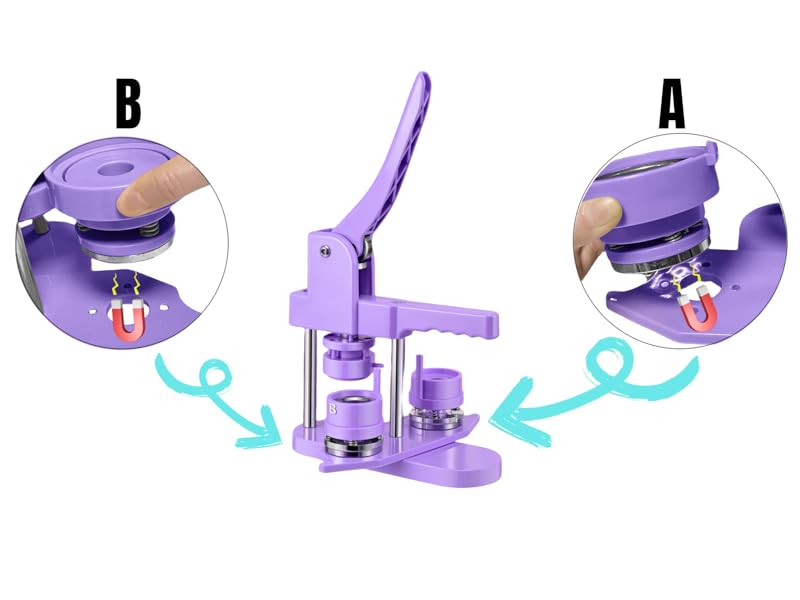
Image: Close-up view demonstrating how to install and remove the 'A' and 'B' dies using the magnetic suction base.
Operating Instructions: Making a Button
Follow these steps to create a button badge. Ensure the correct die size is installed for your chosen button parts.
Step 1: Prepare Your Design
- Design your artwork.
- Use the provided circle cutters to cut your design to the correct size. Refer to the "Size Comparison" section for exact paper dimensions for each button size.

Image: A set of three circle cutters, one for each button size (25mm, 32mm, 58mm), used to prepare paper designs.
Step 2: Assemble the Front of the Button
- Place a metal button cover (front shell) into the 'A' die (left side).
- Place your cut paper design on top of the metal cover, ensuring it is centered.
- Place a transparent film (Mylar) on top of the paper design.

Image: A visual guide showing the sequence of placing the metal cover, paper design, and transparent film into the 'A' die.
- Rotate the die base so that the 'A' die is directly under the press handle.
- Press the handle down firmly and completely. This crimps the front shell, paper, and film together.
Step 3: Assemble the Back of the Button
- Rotate the die base so that the 'B' die (right side) is directly under the press handle.
- Place a pinback into the 'B' die. Ensure the pin is oriented correctly (e.g., the pin mechanism facing upwards, with the hinge at the top and the clasp at the bottom, or as desired for final orientation).
- For 32mm and 58mm buttons, a washer may be required. Place the washer on top of the pinback if necessary. The 25mm buttons typically do not require a washer.

Image: A visual guide showing the sequence of placing the pinback and washer into the 'B' die.
- Rotate the die base so that the 'B' die is directly under the press handle.
- Press the handle down firmly and completely. This crimps the pinback onto the front assembly, completing the button.
Important Notes:
- Ensure all components are correctly seated in the dies before pressing.
- Apply consistent and firm pressure when operating the handle.
- The machine features rotary positioning, allowing quick switching between 'A' and 'B' dies.

Image: A finished button badge displaying a design, ready for use.
Die Replacement
To change button sizes, replace the 'A' and 'B' dies.
- Gently pull up on the installed 'A' and 'B' dies to detach them from the magnetic base.
- Select the new desired die set.
- Align the new 'A' die with the left position and the new 'B' die with the right position on the machine base. The magnets will secure them in place.

Image: The button maker machine shown with its three interchangeable die sets (25mm, 32mm, 58mm) highlighting the versatility.
Maintenance
- Cleaning: Wipe the machine surfaces with a soft, dry cloth. Avoid abrasive cleaners or solvents.
- Storage: Store the machine and dies in a dry, dust-free environment when not in use.
- Lubrication: Periodically check moving parts for smooth operation. Light lubrication with a general-purpose machine oil may be applied if necessary, avoiding contact with button-making surfaces.
- Circle Cutter Blades: The circle cutters come with spare blades. Exercise caution when replacing blades.
Troubleshooting
- Button not crimping properly / Button parts separating:
- Ensure all components (metal cover, paper, film, pinback, washer) are correctly placed and aligned in their respective dies.
- Apply firm and complete pressure on the handle. The handle should be pressed all the way down.
- Verify you are using the correct size button parts for the installed dies.
- Check if a washer is needed for 32mm or 58mm buttons and if it is correctly placed.
- Paper or film getting wrinkled/damaged:
- Ensure the paper and film are cut precisely to the recommended size for the die.
- Make sure the paper and film are flat and free of creases before placing them in the die.
- Do not use excessive force when placing components.
- Dies are difficult to change:
- The dies are held by magnets. A firm, upward pull should release them.
- Ensure no debris is obstructing the magnetic connection points.
- Pinback orientation is incorrect:
- Pay close attention to the pinback's orientation when placing it in the 'B' die. Practice with a few spare parts to get the desired alignment.
Specifications
| Feature | Detail |
|---|---|
| Brand | Mryitcal |
| Model Name | Swivel-magnetic Style button maker (DC109) |
| Supported Button Sizes | 25mm (1''), 32mm (1.25''), 58mm (2.25'') |
| Material | High hardness plastic, Metal |
| Product Dimensions (L x W x H) | 11.81 x 9.45 x 11.81 inches |
| Item Weight | 11.44 pounds |
Size Comparison for Paper Inserts:
- 25mm (1'') Badge: Requires 35mm (1.38'') diameter paper.
- 32mm (1.25'') Badge: Requires 44mm (1.73'') diameter paper.
- 58mm (2.25'') Badge: Requires 70mm (2.76'') diameter paper.
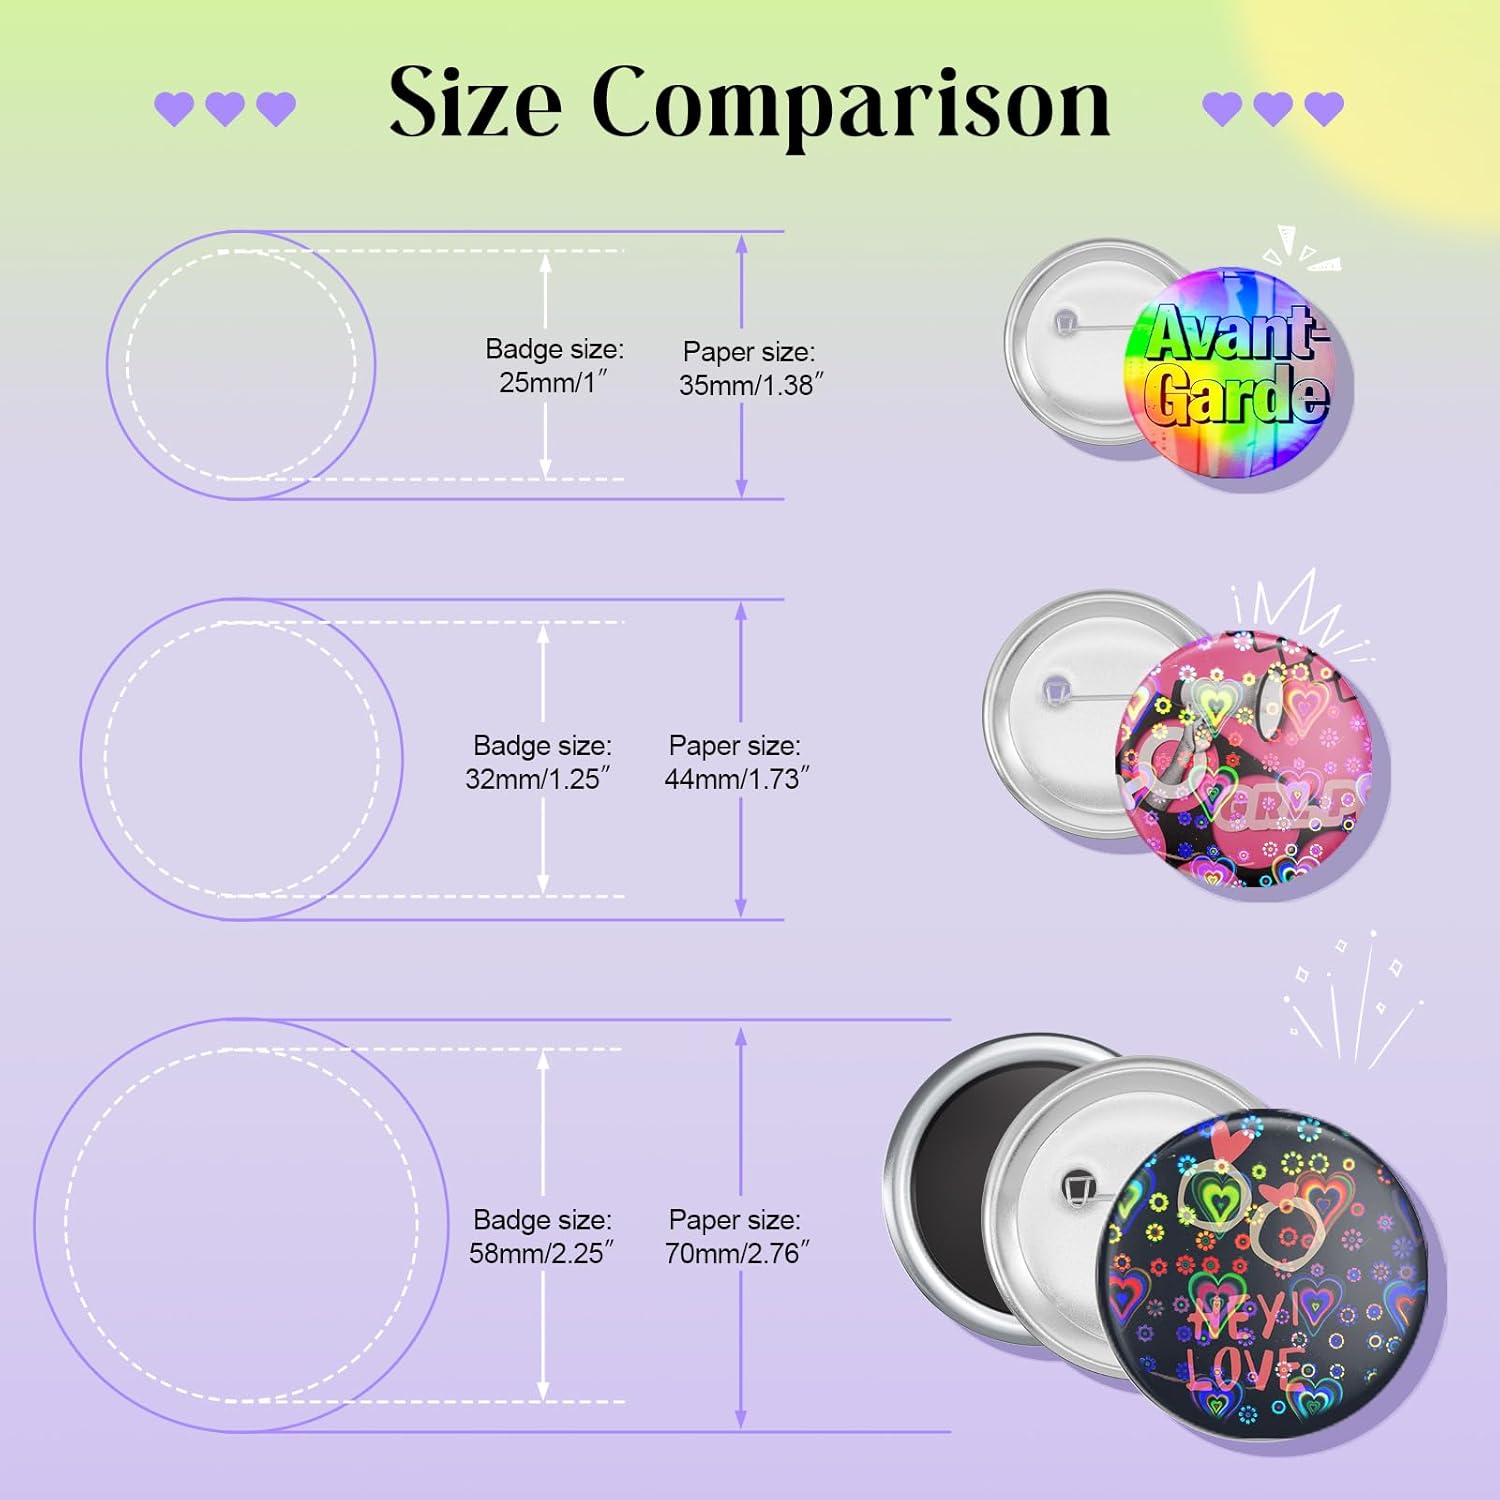
Image: A diagram illustrating the required paper diameter for each badge size (25mm, 32mm, 58mm) and a visual of the finished buttons.
Warranty and Support
For warranty information or technical support, please refer to the contact details provided with your purchase or visit the official Mryitcal store.
Visit the Mryitcal Store on Amazon for additional products and support.