1. Introduction
This manual provides detailed instructions for the installation, operation, and maintenance of your KETOTEK Smart Radiator Thermostat KTF0188. This device is designed to offer precise temperature control for individual radiators, enhancing comfort and energy efficiency in your home. It requires a Tuya Zigbee Gateway (not included) for smart functionality.

Image 1: Front view of the KETOTEK Smart Radiator Thermostat KTF0188, displaying the current temperature and various status icons.
2. Package Contents
Please verify that all items are present in the package:
- 1 x KETOTEK Smart Radiator Thermostat (batteries not included)
- 1 x User Manual (EN, DE, FR, ES, IT)
- 6 x Connection Adapters (Danfoss RA, Danfoss RAV, Danfoss RAVL, Giacomini, Caleffi, M28)
3. Product Overview
Familiarize yourself with the components and display indicators of your smart radiator thermostat.

Image 2: Diagram illustrating the union nut (M30*1.5), Auto mode icon, Wi-Fi icon (for Zigbee connection status), Heating status icon, Low battery warning icon, Temperature display, Knob button, and Middle button.
- Union Nut: For securing the thermostat to the radiator valve (M30 x 1.5 mm).
- Display: Shows current temperature, mode, and status icons.
- Knob Button: Used for manual temperature adjustment and menu navigation.
- Middle Button: For confirming selections and accessing settings.
- Icons: Wi-Fi (Zigbee connection), Clock (scheduling), Flame (heating status), Battery (low battery warning).
4. Setup
4.1. Battery Installation
- Remove the battery cover from the thermostat.
- Insert two AA batteries, ensuring correct polarity.
- Replace the battery cover.
4.2. Mounting on Radiator Valve
The thermostat is compatible with M30 x 1.5 mm radiator valves. Use the appropriate adapter from the package if your valve type differs.
- Unscrew your existing thermostatic radiator valve head.
- If necessary, select the correct adapter for your radiator valve and attach it.
- Screw the KETOTEK Smart Radiator Thermostat onto the valve or adapter until it is securely fastened.
4.3. Connecting to Tuya Zigbee Gateway
This smart radiator thermostat requires a Tuya Zigbee Gateway (not included) to function with the Smart Life/Tuya App and voice assistants.
- Ensure your Tuya Zigbee Gateway is powered on and connected to your home Wi-Fi network.
- Open the Smart Life or Tuya App on your smartphone.
- Follow the app's instructions to add a new device. Typically, this involves selecting 'Add Device' or '+' and then choosing 'Radiator Thermostat (Zigbee)'.
- On the thermostat, press and hold the middle button for a few seconds until the Zigbee icon (often represented as a Wi-Fi symbol) starts blinking, indicating pairing mode.
- The app will detect and connect to the thermostat. Once connected, the Zigbee icon on the thermostat will stop blinking and remain solid.
4.4. App Installation and Pairing
Download the Smart Life or Tuya App from your smartphone's app store (iOS or Android). Register an account or log in, then proceed with the gateway and thermostat pairing as described above.
5. Operating Instructions
5.1. Manual Temperature Control
You can adjust the temperature directly on the thermostat:
- Rotate the knob button clockwise to increase the target temperature.
- Rotate the knob button counter-clockwise to decrease the target temperature.
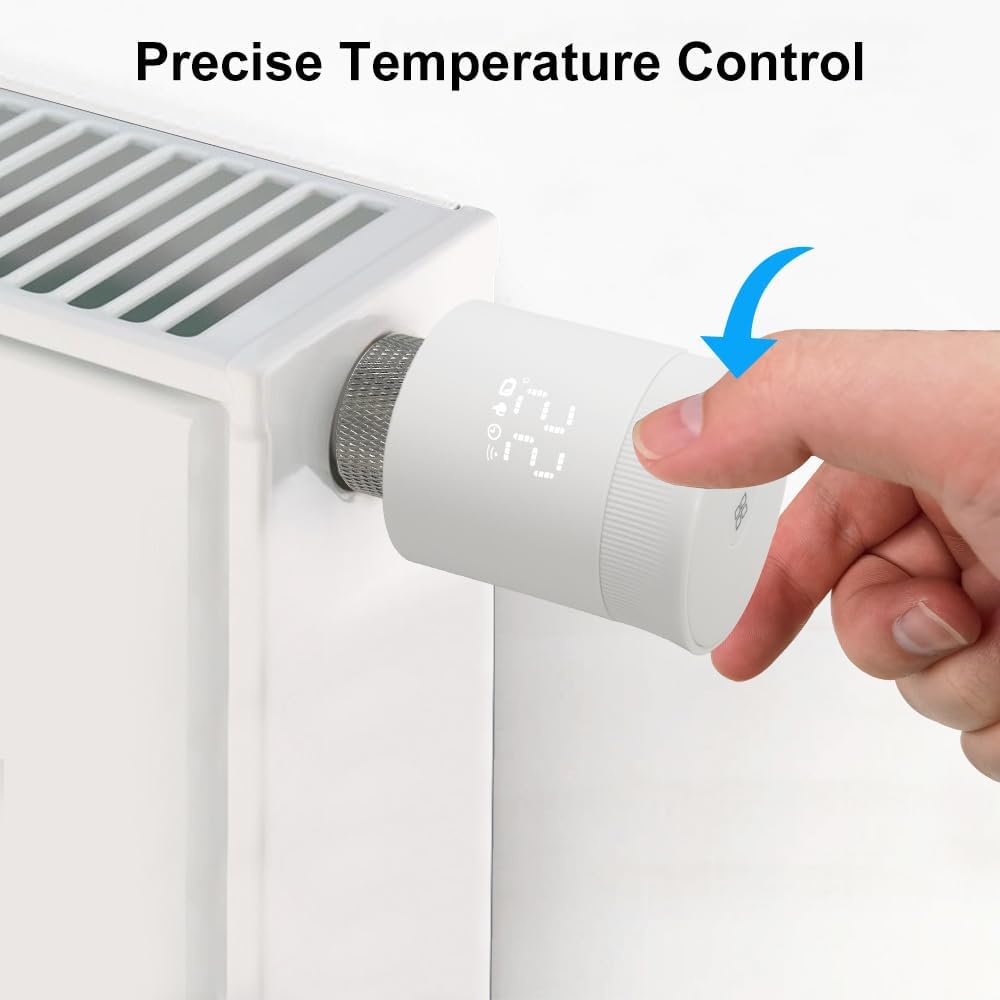
Image 3: A hand manually adjusting the temperature on the KETOTEK Smart Radiator Thermostat, which is mounted on a radiator.
5.2. App Control (Smart Life/Tuya App)
The Smart Life or Tuya App provides comprehensive control over your thermostat:
- Remote Control: Adjust temperature, change modes, and view status from anywhere.
- Scheduling: Set up to 6 time periods per day with weekly programming to match your routine.
- Group Control: Create groups to control multiple thermostats simultaneously.
- Historical Record: View past temperature data.
- Smart Scenes: Integrate with other smart home devices for automated actions.
- Home Sharing: Share control with family members.
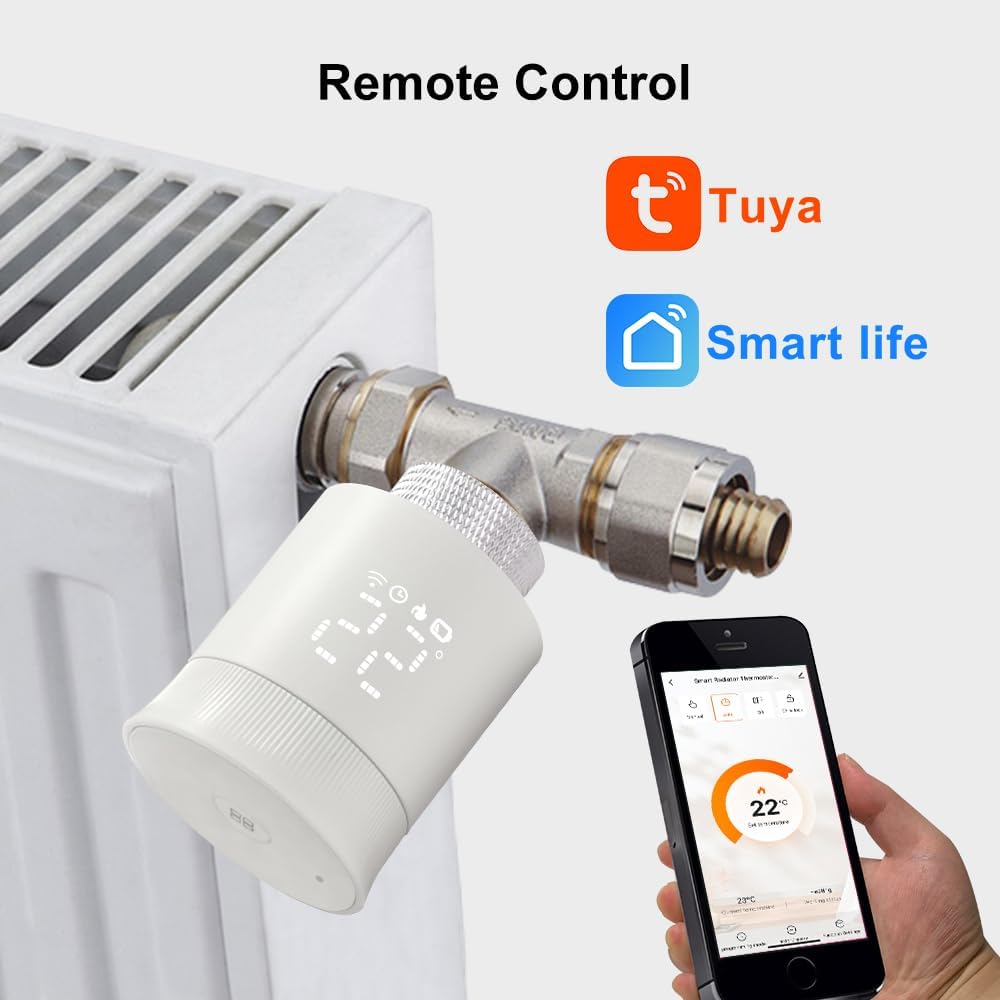
Image 4: The KETOTEK Smart Radiator Thermostat on a radiator, with a smartphone showing the Tuya/Smart Life app interface for remote temperature control.
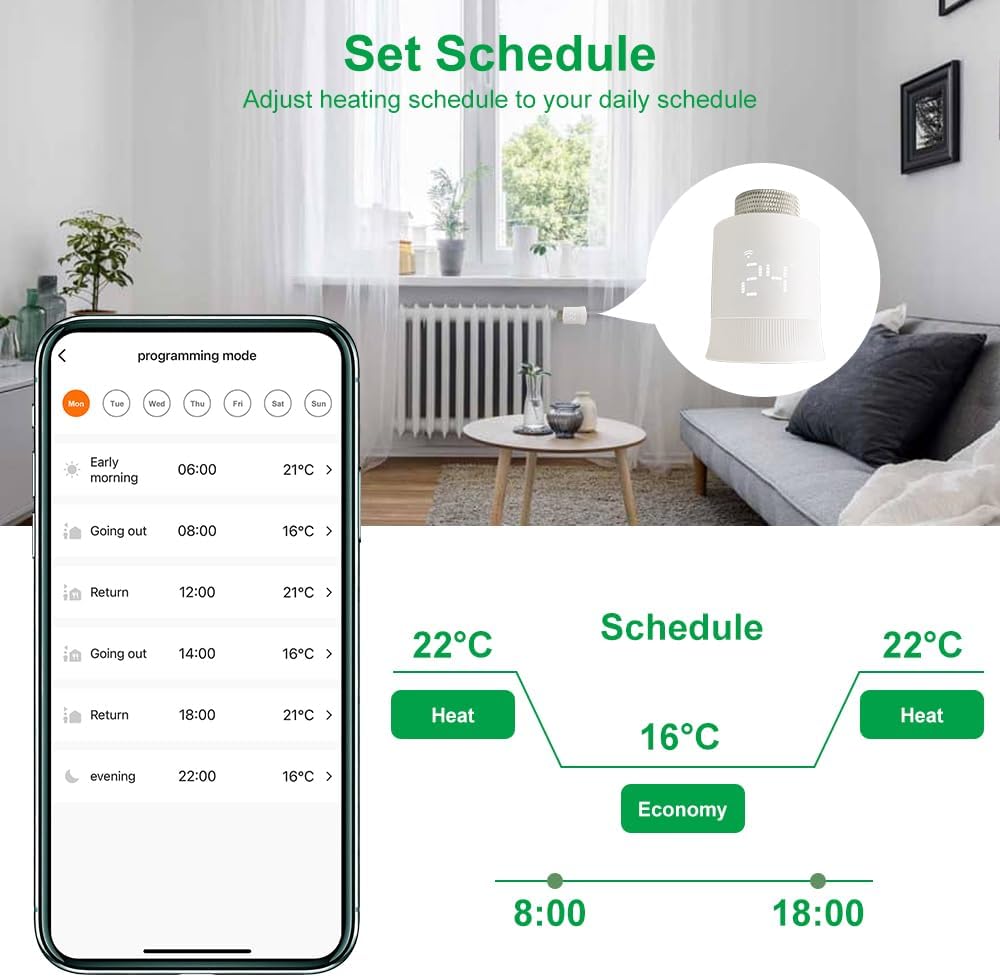
Image 5: The Smart Life app displaying the weekly programming schedule for the thermostat, allowing users to set different temperatures for various times of the day.
5.3. Voice Control (Alexa/Google Assistant)
Once connected to the Tuya Zigbee Gateway and integrated with the Smart Life/Tuya App, you can link your thermostat to Amazon Alexa or Google Assistant for voice commands.
- Enable the Smart Life or Tuya skill in your Alexa or Google Home app.
- Discover devices.
- Use commands like: "Alexa, set the [room name] thermostat to 22 degrees." or "Hey Google, what's the temperature in the [room name]?"
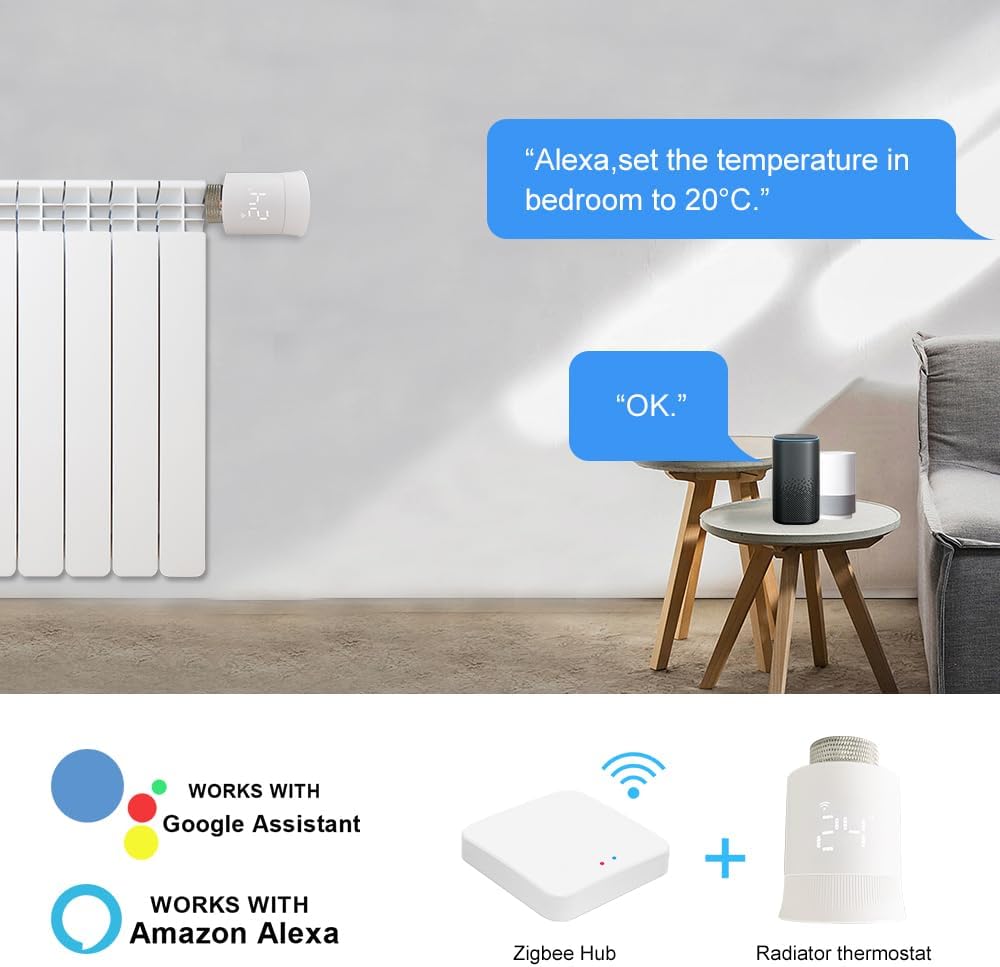
Image 6: An illustration of the KETOTEK Smart Radiator Thermostat being controlled via voice commands using Amazon Alexa and Google Home devices.
5.4. Special Features
- Open Window Detection: The thermostat can detect a sudden drop in temperature (e.g., from an open window) and temporarily turn off heating to save energy.
- Frost Protection: Automatically activates heating if the room temperature drops below a set minimum to prevent pipes from freezing.
- Child Lock: Prevents unauthorized changes to settings by locking the physical controls. This feature can be activated via the app.
- Valve Protection (Anti-calcification): Periodically opens and closes the valve to prevent calcification and ensure smooth operation.
- Temperature Calibration: Allows for fine-tuning of the temperature sensor for accuracy.
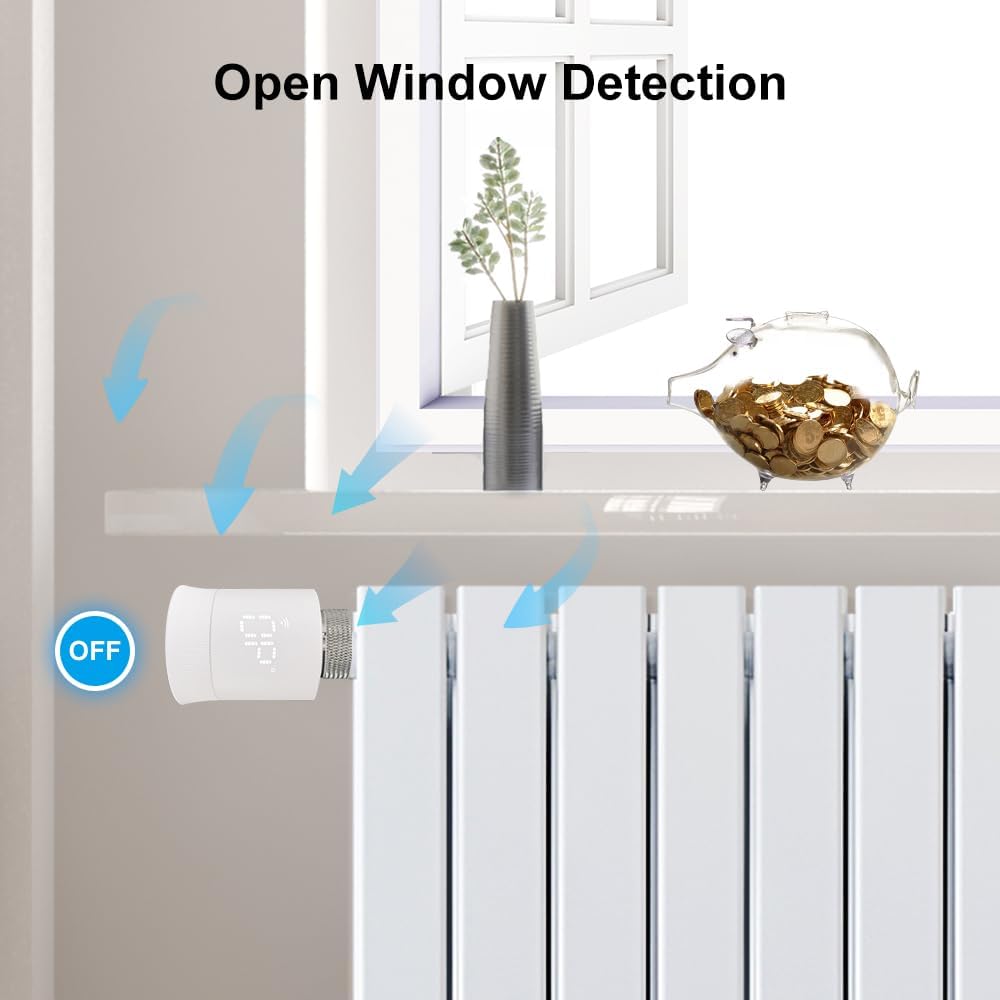
Image 7: The thermostat detecting an open window, indicated by blue arrows representing cold air entering the room, leading to a temporary pause in heating.
6. Maintenance
6.1. Battery Replacement
When the low battery warning icon appears on the display, replace the batteries promptly to ensure continuous operation. Follow the steps in Section 4.1.
6.2. Cleaning
Wipe the thermostat with a soft, dry cloth. Do not use abrasive cleaners or solvents, as these can damage the device.
6.3. Valve Protection
The thermostat includes an automatic valve protection function to prevent calcification. No user intervention is typically required for this feature.
7. Troubleshooting
- Thermostat not connecting to Zigbee Gateway:
Ensure the gateway is powered on and connected to your Wi-Fi. Check if the thermostat is in pairing mode (blinking Zigbee icon). Try restarting both the thermostat (by removing and reinserting batteries) and the gateway. Ensure they are within range. - Temperature not adjusting:
Check if the child lock is active via the app. Ensure batteries are not low. Verify the thermostat is securely mounted on the radiator valve. - Display is upside down:
Some radiator valve orientations may result in the display appearing upside down. This is a physical limitation of the device design and cannot be changed via software. Control via the app is recommended in such cases. - Inaccurate temperature readings:
Perform temperature calibration via the Smart Life/Tuya App if you suspect inaccurate readings. Ensure the thermostat is not exposed to direct sunlight or drafts that could affect its sensor. - Thermostat making noise:
The motor inside the thermostat makes a slight noise when adjusting the valve. This is normal operation. If the noise is excessive or continuous, check for proper installation and ensure the valve is not stuck.
8. Specifications
| Feature | Specification |
|---|---|
| Model Number | KTF0188 |
| Brand | KETOTEK |
| Connectivity | Zigbee (requires Tuya Zigbee Hub) |
| Power Source | 2 x AA Batteries (not included) |
| Valve Compatibility | M30 x 1.5 mm (with included adapters for Danfoss RA, RAV, RAVL, Giacomini, Caleffi, M28) |
| Control Type | App (Smart Life/Tuya), Voice (Alexa, Google Assistant), Manual Knob |
| Special Features | Frost Protection, Low Battery Indicator, Programmable, Open Window Detection, Temperature Display, Child Lock, Valve Protection |
| Color | White |
| Item Weight | 251 Grams |
| Certifications | CE |
9. Warranty and Support
For warranty information and technical support, please refer to the documentation included with your purchase or visit the official KETOTEK website. You may also contact KETOTEK customer service directly for assistance.


