1. Introduction
This manual provides detailed instructions for the installation, operation, and maintenance of your Lelukee 12V LED Dimmer with RF Wireless Remote Control. This device is designed to provide precise brightness control for various DC 12V-24V LED lighting applications, including LED strip lights, spotlights, and recessed lights.

Figure 1.1: Lelukee 12V LED Dimmer unit and its accompanying RF wireless remote control.
2. Product Features
- PWM Dimming Controller: Utilizes PWM digital dimming technology to prevent rush current, thereby protecting LED lights from damage and contributing to energy savings by allowing reduction of light levels.
- RF Wireless Remote Control: Features an RF wireless remote for convenient adjustment of brightness and power on/off functions.
- Extended Remote Control Distance: The remote control offers an effective range of up to 30 meters (98.4 feet), ensuring practical and convenient operation.
- Full Range Dimmable: Provides 0%-100% full dimming capability, allowing for precise brightness adjustment to suit various needs and preferences. The dimming process is designed to be soft, stable, and flicker-free.
- Wide Application: Compatible with DC 12V-24V LED lighting devices with a maximum current of 30A, including LED strip lights, LED spotlights, LED recessed lights, and aquarium lighting.
3. Safety Information
Please read and understand all safety instructions before installing or operating this device. Failure to follow these instructions may result in electric shock, fire, or other hazards.
- Ensure the power supply is disconnected before any installation or wiring.
- This dimmer is designed for DC 12V-24V LED lighting systems only. Do not connect to AC power or devices outside this voltage range.
- The maximum current capacity is 30A. Do not exceed this limit to prevent damage to the dimmer or connected lights.
- All wiring should be performed by a qualified electrician if you are unsure.
- Keep the device away from water, moisture, and high temperatures.
- Do not attempt to disassemble or modify the dimmer unit or remote control.
4. Package Contents
Verify that all items are present in the package:
- 1 x Lelukee 12V LED Dimmer Unit
- 1 x RF Wireless Remote Control
- 1 x User Manual (this document)
5. Setup and Installation
Follow these steps to correctly install your LED dimmer:
- Power Disconnection: Before starting, ensure that the power supply to your LED lighting system is completely disconnected.
- Identify Terminals: The dimmer unit has clearly labeled "INPUT" and "OUTPUT" terminals. Each section has positive (V+) and negative (V-) connections.
- Connect Power Input: Connect the positive (+) wire from your DC 12V-24V power supply to the "INPUT V+" terminal on the dimmer. Connect the negative (-) wire from your power supply to the "INPUT V-" terminal.
- Connect LED Output: Connect the positive (+) wire from your LED strip light or other LED device to the "OUTPUT V+" terminal on the dimmer. Connect the negative (-) wire from your LED device to the "OUTPUT V-" terminal.
- Secure Connections: Ensure all wire connections are secure and properly tightened to prevent loose connections or short circuits.
- Mounting (Optional): The dimmer unit can be mounted using screws through the pre-drilled holes on its casing, if desired.
- Power On: Once all connections are verified and secure, reconnect the power supply.

Figure 5.1: Illustration of the dimmer unit connected to an LED strip and power supply, demonstrating the wiring process.

Figure 5.2: The dimmer unit connected and ready for operation, highlighting its compact size and ease of integration.
6. Operating Instructions
The Lelukee LED Dimmer is operated using the provided RF wireless remote control.
- Power On/Off: Press the Power button (usually a circle with a vertical line) on the remote control to turn the connected LED lights on or off.
- Increase Brightness: Press the Up arrow button (usually an upward-pointing triangle) to increase the brightness of the LED lights.
- Decrease Brightness: Press the Down arrow button (usually a downward-pointing triangle) to decrease the brightness of the LED lights.
The dimmer allows for smooth adjustment from 0% to 100% brightness, providing flexibility for various lighting moods and requirements.
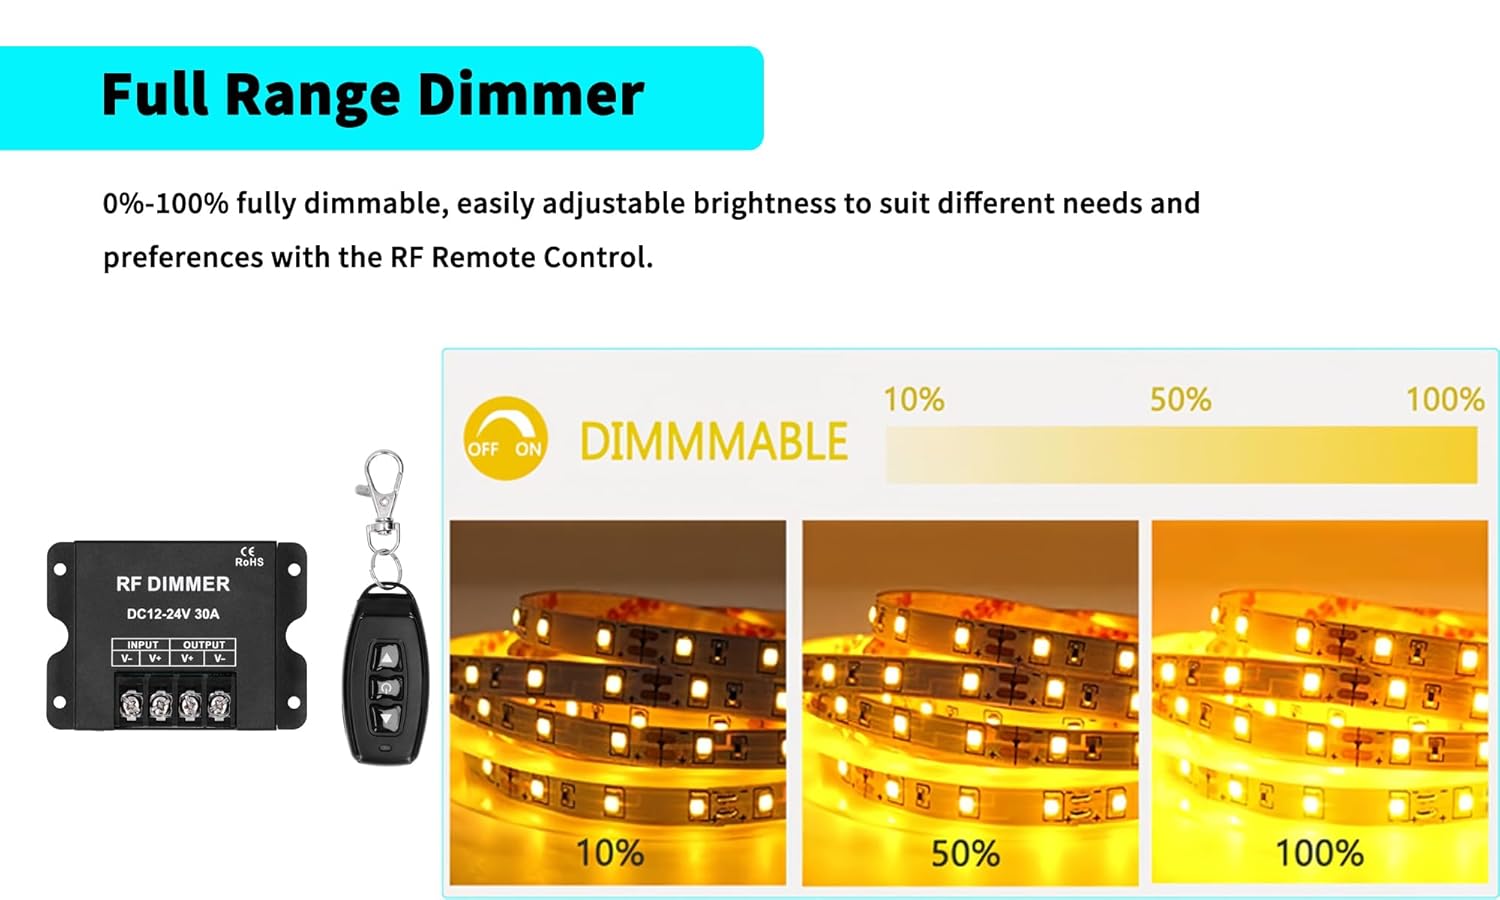
Figure 6.1: Visual representation of the full dimming range, from low brightness to full illumination.
7. Maintenance
The Lelukee LED Dimmer requires minimal maintenance. Follow these guidelines to ensure its longevity:
- Keep the dimmer unit and remote control clean by wiping them with a soft, dry cloth.
- Avoid using abrasive cleaners or solvents.
- Ensure the dimmer is not exposed to extreme temperatures or direct sunlight for prolonged periods.
- Check wiring connections periodically to ensure they remain secure.
8. Troubleshooting
If you encounter issues with your Lelukee LED Dimmer, refer to the following common problems and solutions:
| Problem | Possible Cause | Solution |
|---|---|---|
| Lights do not turn on. | No power to the dimmer; incorrect wiring; faulty LED lights; remote battery dead. | Check power supply connection. Verify input/output wiring. Test LED lights with a different power source. Replace remote battery. |
| Lights flicker or dim erratically. | Loose wiring connection; overloaded dimmer; incompatible LED lights. | Check and secure all wiring connections. Ensure total current draw does not exceed 30A. Verify LED lights are dimmable. |
| Remote control not responding. | Remote battery dead; remote out of range; interference. | Replace remote battery. Move closer to the dimmer unit. Reduce potential RF interference sources. |
| Dimmer unit is hot. | Overloaded circuit; poor ventilation. | Reduce the load on the dimmer (ensure total current is below 30A). Ensure adequate airflow around the unit. |
9. Specifications
Key technical specifications for the Lelukee 12V LED Dimmer:
- Brand: Lelukee
- Model: Type A
- Operating Voltage: DC 12V-24V
- Maximum Current: 30A
- Control Method: RF Wireless Remote
- Dimming Range: 0% - 100%
- Remote Control Distance: Up to 30m (98.4ft)
- Operation Mode: MANUAL-AUTOMATIC
- Connectivity Protocol: RF
- Actuator Type: Slide (referring to remote control)
- Circuit Type: 1-way
- Package Dimensions: 3.54 x 2.64 x 1.65 inches
- Weight: 3.84 ounces
10. Warranty and Support
Lelukee products are designed for reliability and performance. While specific warranty details are not provided in this manual, please refer to your purchase documentation or the retailer's return policy for information regarding warranty coverage and returns.
For technical support or inquiries, please contact Lelukee customer service through the retailer's platform or the official Lelukee store on Amazon: Lelukee Amazon Store.