
YITAHOME MAYIH0008866MA
YITAHOME Large Record Player Stand Instruction Manual
Brand: YITAHOME | Model: MAYIH0008866MA
Introduction
Thank you for choosing the YITAHOME Large Record Player Stand. This versatile furniture piece is designed to enhance your living space with its ample storage for up to 120 vinyl albums, integrated power outlets, and customizable RGB LED lighting. It serves not only as a record player stand but also as a multi-functional storage solution for various media essentials. This manual provides detailed instructions for assembly, operation, maintenance, and troubleshooting to ensure you get the most out of your new record player stand.

Image: The YITAHOME Large Record Player Stand, showcasing its design and storage capabilities in a home environment.
Important Safety Information
Please read and understand all safety instructions before assembly and use. Failure to follow these instructions may result in injury or damage to the product.
- Anti-Tip Kits: For enhanced stability and to prevent accidental tipping, it is essential to install the provided anti-tip kits securely to a wall. This is particularly important in households with children or pets.
- Weight Capacity: Do not exceed the recommended weight capacity for the top surface or shelves. Overloading can compromise the stand's stability and lead to damage or injury.
- Electrical Safety: When using the integrated power outlets and USB ports, ensure that all connected devices comply with their respective power requirements. Do not overload the outlets. Keep liquids away from electrical components.
- Assembly: Assemble the unit on a soft, clean surface to prevent scratches. Ensure all screws and fasteners are tightened securely before use.
- Placement: Place the stand on a level, stable surface. Avoid placing it in direct sunlight or near heat sources to prevent material degradation.

Image: Illustration of the anti-tip kit, emphasizing its importance for stability.
Parts List
Before beginning assembly, please ensure all parts are present and undamaged. If any parts are missing or damaged, please contact customer support.
| Part | Description | Quantity |
|---|---|---|
| Top Panel | Main top surface for record player or other items. | 1 |
| Side Panels | Vertical supports for the stand structure. | 2 |
| Middle Shelf | Shelf for display or additional storage. | 1 |
| Bottom Panel | Base of the stand. | 1 |
| Vertical Dividers | Creates cubbies for vinyl record storage. | 5 |
| Power Outlet Unit | Includes 2 AC outlets and 2 USB ports. | 1 |
| LED Light Strip | RGB LED strip for illumination. | 1 |
| Remote Control | For controlling LED light strip. | 1 |
| Hardware Pack | Screws, dowels, cam locks, etc. | 1 |
| Anti-Tip Kit | Wall anchor and strap for stability. | 1 |
| Instruction Manual | This document. | 1 |
Setup and Assembly
Assembly is required for this product. Please follow these steps carefully. It is recommended to have two people for assembly.
- Unpack and Identify: Carefully unpack all components and lay them out on a soft, clean surface to prevent scratches. Identify each part using the provided parts list.
- Assemble Side Panels: Attach the side panels to the bottom panel using the designated hardware (screws, dowels, cam locks). Ensure they are securely fastened.
- Install Vertical Dividers: Insert the vertical dividers into the pre-drilled slots on the bottom panel and secure them. These form the record storage cubbies.
- Attach Middle Shelf: Secure the middle shelf to the side panels and vertical dividers. This shelf will house the LED lights and can be used for display.
- Install Power Outlet Unit: Carefully place the power outlet unit into its designated cutout on the top panel or middle shelf, depending on the design. Ensure it sits flush and is secured if necessary.
- Attach Top Panel: Secure the top panel to the assembled structure. Ensure all connections are tight and stable.
- Apply LED Light Strip: Adhere the LED light strip to the underside of the middle shelf or within the display area as per the visual guide. Connect it to the power outlet unit.
- Install Anti-Tip Kit: Locate a suitable wall stud and securely attach the anti-tip kit to the wall and the back of the stand. This step is crucial for safety.
- Cable Management: Utilize the cable management holes to neatly route power cords from your record player or other devices to the integrated power outlets.

Image: Detailed views of the stand's features, including its sturdy construction and ample storage.
Operating Instructions
Using the Power Outlets and USB Ports
The YITAHOME Record Player Stand is equipped with a convenient charging station, featuring 2 standard AC outlets (120V/12A) and 2 USB ports (5V/2A).
- Connecting Devices: Plug your record player, speakers, phone chargers, or other electronic devices directly into the AC outlets or USB ports.
- Power Cord: Ensure the stand's main power cord (6.5-foot) is securely plugged into a wall outlet.
- Overload Protection: Avoid plugging in devices that collectively exceed the maximum current rating to prevent circuit overload.

Image: The integrated power outlets and USB ports, demonstrating their use for charging various devices.

Image: A detailed view of the power outlet unit.
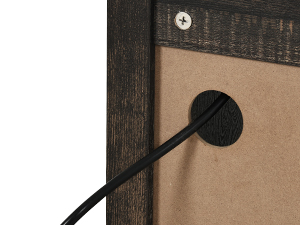
Image: A detailed view of the cable management hole for neat wiring.
Controlling the RGB LED Lights
The stand features multi-color RGB LED light strips to create a personalized ambiance. Use the included remote control to operate the lights.
- Power On/Off: Press the power button on the remote to turn the lights on or off.
- Color Selection: Use the color buttons on the remote to select your desired static color (e.g., red, green, blue, white).
- Brightness Adjustment: Use the brightness up/down buttons to adjust the intensity of the lights.
- Dynamic Modes: Explore various dynamic modes (e.g., flash, strobe, fade, smooth) by pressing the corresponding buttons.
- DIY Colors: Some remotes allow for custom color mixing. Refer to the remote's specific instructions if available.

Image: The multi-color RGB light strip feature, showing the remote control and various color options.
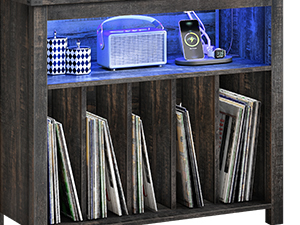
Image: A close-up view of the blue LED lights illuminating the shelf.
Video: An official product video demonstrating the YITAHOME Large Record Player Stand with Power Outlets.
Care and Maintenance
Proper care will help maintain the appearance and longevity of your record player stand.
- Cleaning: Wipe surfaces with a soft, damp cloth. Avoid harsh chemicals or abrasive cleaners, which can damage the finish.
- Spills: Promptly wipe up any spills to prevent water damage, especially on the engineered wood surfaces. The product is designed with some water resistance.
- Dusting: Regularly dust the stand to prevent buildup, which can dull the finish.
- Sunlight Exposure: Avoid prolonged exposure to direct sunlight, which can cause fading or discoloration over time.
- Electrical Components: Ensure the power outlets and LED lights are kept dry and free from dust. Do not attempt to repair electrical components yourself.

Image: A close-up demonstrating the water-resistant properties of the stand's surface.
Troubleshooting Guide
If you encounter any issues with your YITAHOME Record Player Stand, please refer to the following common problems and solutions.
| Problem | Possible Cause | Solution |
|---|---|---|
| Stand is wobbly/unstable. | Screws are loose; not on a level surface; anti-tip kit not installed. | Check and tighten all screws. Move to a level surface. Install the anti-tip kit as per instructions. |
| Power outlets/USB ports not working. | Main power cord unplugged; circuit breaker tripped; device not properly connected. | Ensure the stand's power cord is fully plugged into a working wall outlet. Check your household circuit breaker. Ensure devices are correctly plugged into the outlets/ports. |
| LED lights not turning on/responding to remote. | Remote battery dead; LED strip not properly connected; remote sensor blocked. | Replace the remote control battery. Check the connection of the LED light strip to the power source. Ensure there are no obstructions between the remote and the LED sensor. |
| Scratches or damage to surface. | Rough handling; abrasive cleaning. | Use soft cloths for cleaning. Avoid dragging heavy objects across the surface. For minor scratches, furniture repair kits may be used. |
Product Specifications
| Feature | Detail |
|---|---|
| Brand | YITAHOME |
| Model Name | Record Player Stand |
| Item Model Number | MAYIH0008866MA |
| Material | Engineered Wood |
| Finish Type | Lacquered, Rustic Oak |
| Product Dimensions | 15.7"D x 31.5"W x 31.6"H (40cm D x 80.1cm W x 80.3cm H) |
| Item Weight | 50.05 Pounds (approx. 22.7 kg) |
| Number of Shelves | 5 cubbies for records + 1 open display shelf |
| Record Capacity | Up to 120 albums |
| Power Outlets | 2 x 120V/12A AC Outlets |
| USB Ports | 2 x 5V/2A USB Ports |
| LED Lights | Multi-color RGB with remote control |
| Assembly Required | Yes |
| Included Components | Anti-tip kits, Power Outlet Unit, LED Light Strip, Remote Control |

Image: Detailed product dimensions for planning your space.
Warranty and Customer Support
YITAHOME is committed to providing high-quality products and excellent customer service. While specific warranty details are not provided in this manual, please retain your proof of purchase for any warranty claims.
If you have any questions, require assistance with assembly, or encounter any issues not covered in this troubleshooting guide, please do not hesitate to contact YITAHOME customer support. Our team is dedicated to ensuring your satisfaction.
For support, please refer to the contact information provided at the point of purchase or visit the official YITAHOME website.
Related documentsMAYIH0008866MA

Ask a question about this manual
Ask about setup, troubleshooting, compatibility, parts, safety, or missing instructions. Manuals+ will review the question and use this page’s manual context to help answer it.