1. Safety Information
Operating a CO2 laser engraver requires strict adherence to safety protocols to prevent injury and equipment damage. This machine is a Class 2 laser product with 0.827 mW output power.
- Eye Protection: Always wear appropriate laser safety glasses when the laser is in operation. Never look directly into the laser beam.
- Ventilation: Ensure proper ventilation to remove smoke, fumes, and debris generated during engraving and cutting. The machine includes a powerful air pump and 318 cfm turbo exhaust fan.
- Fire Safety: Keep a fire extinguisher nearby. Do not leave the machine unattended during operation, especially when working with flammable materials. The flame-retardant PC board and window enhance safety.
- Material Compatibility: Only use materials approved for CO2 laser processing. Avoid materials that produce toxic fumes or can ignite easily.
- Water Chiller: The water chiller is essential for cooling the laser tube. Ensure it is properly connected and filled with distilled water before operation.
- Emergency Stop: Familiarize yourself with the location and operation of the emergency stop button.
- Electrical Safety: Ensure the machine is properly grounded and connected to a suitable power supply. Avoid operating in wet conditions.
- Overheating & Low-Pressure Alarms: The machine is equipped with advanced sensors that monitor air pressure and temperature, pausing operation if needed and triggering alarms for overheating (above 131°F) or low pressure.
2. Setup Guide
Proper setup is crucial for optimal performance and safety. Please note that the laser engraver and water chiller may arrive in separate packages.
2.1 Unpacking and Placement
- Carefully unpack all components. Retain packaging for potential future transport.
- Place the laser engraver on a stable, level surface capable of supporting its weight. Ensure adequate space around the machine for ventilation and access.
2.2 Water Chiller Connection
- Connect the water chiller to the laser tube according to the chiller's specific instructions. Use distilled water only.
- Ensure water circulates properly before powering on the laser tube.
2.3 Exhaust System Setup
- Connect the exhaust fan to the machine and vent it to the outside environment. Ensure the exhaust hose is free of kinks and obstructions.
2.4 Power Connection
- Connect the machine to a grounded power outlet. Verify voltage requirements match your local supply.
2.5 Software Installation
- Install the necessary software (LightBurn, RDWorks, CorelLaser) on your computer. Follow the software-specific installation guides.
- Connect your computer to the laser engraver via USB or Ethernet.

Image: The OMTech Pronto 35 laser engraver, highlighting its spacious 28"x20" work area.
3. Operating Instructions
This section guides you through the basic operation of your OMTech Pronto 35 laser engraver.
3.1 Power On Sequence
- Turn on the water chiller and ensure water is flowing.
- Power on the laser engraver.
- Start the exhaust fan.
3.2 Material Loading
- Place your material on the honeycomb workbed. The adjustable platform allows for an 8.66" work height for larger projects.
- Utilize the two-way pass-through feature for handling pieces larger than the workbed.

Image: The OMTech Pronto 35 demonstrating its two-way pass-through capability for extended materials.
3.3 Autofocus Function
- Press the autofocus button on the control panel. The smart autofocus feature will automatically adjust the laser's focal point.
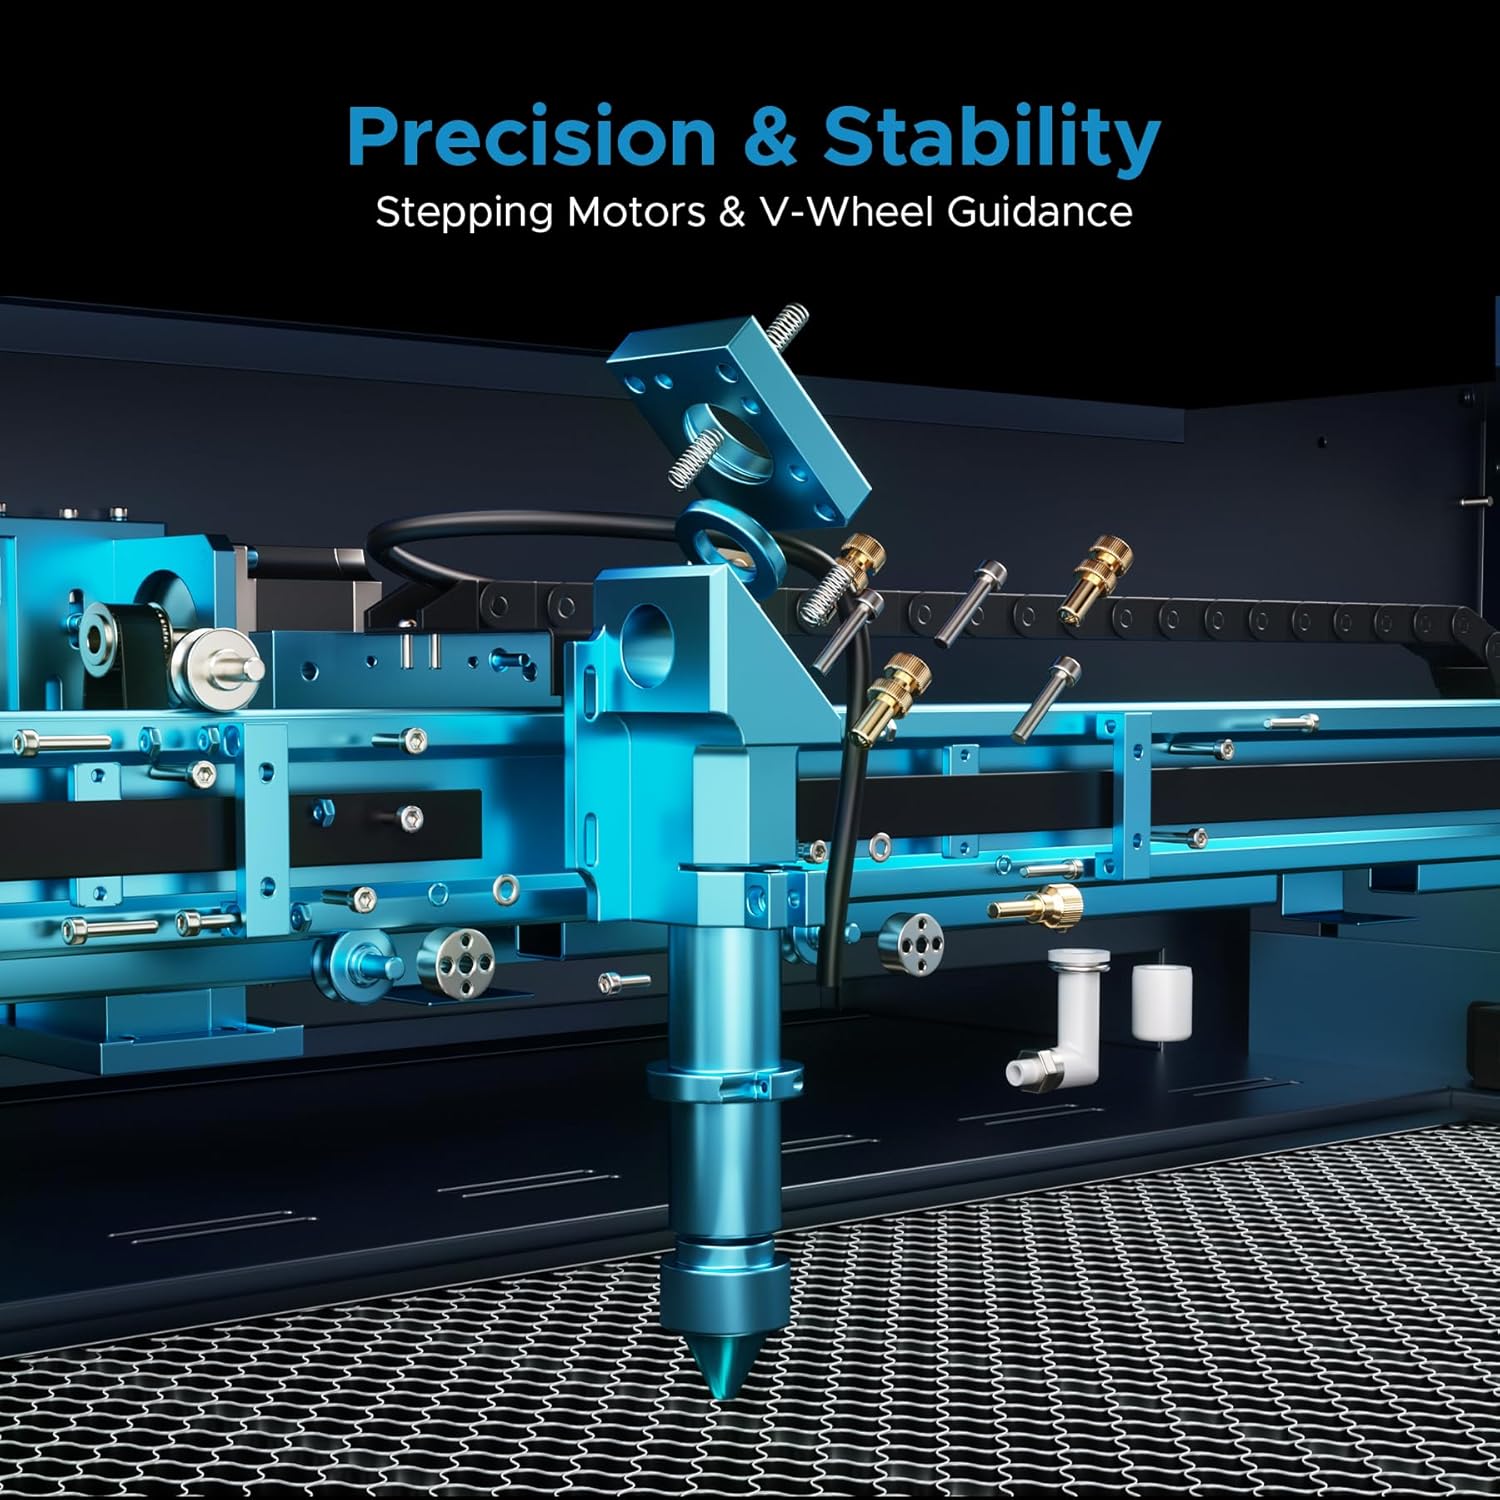
Image: Close-up of the intelligent auto-focus system on the OMTech Pronto 35.
3.4 Design and Engraving
- Open your design software (LightBurn, RDWorks, CorelLaser).
- Import or create your design.
- Set appropriate power and speed settings for your material. The machine supports engraving speeds up to 1,000 mm/s.
- Send the job to the laser engraver.
- Press "Start" on the control panel to begin engraving or cutting. Monitor the process through the flame-resistant window.

Image: Screenshot showing LightBurn, RDWorks, and CorelLaser software interfaces, compatible with the OMTech Pronto 35.
3.5 Material Capabilities
The OMTech Pronto 35 can cut, engrave, and shape a variety of non-metallic materials:
| Material | Engraving | Cutting | Max Thickness (100W) |
|---|---|---|---|
| Wood | Yes | Yes | 0.4" |
| Acrylic | Yes | Yes | 0.8" |
| Leather | Yes | Yes | Varies |
| Glass | Yes | No | N/A |
| MDF | Yes | Yes | Varies |
| Fabric | Yes | Yes | Varies |
| Paper/Cardboard | Yes | Yes | Varies |
| Rubber | Yes | Yes | Varies |
Video: Demonstrates how to achieve high-quality photo engravings on wood using the OMTech CO2 laser engraver. It covers software settings and material preparation for optimal results.
Video: Shows the process of laser engraving and cutting on acrylic mirror, including design setup, material loading, and post-processing for a clean finish.
4. Maintenance
Regular maintenance ensures the longevity and optimal performance of your laser engraver.
4.1 Cleaning the Work Area
- Regularly clean the honeycomb workbed and interior of the machine to remove debris and residue. The powerful air pump and 318 cfm turbo exhaust fan help keep dust and debris in check.
4.2 Laser Lens and Mirror Cleaning
- Clean the laser lens and mirrors with specialized lens cleaning solution and wipes to maintain beam quality.
4.3 Water Chiller Maintenance
- Periodically check and replace the distilled water in the chiller to prevent algae growth and ensure efficient cooling.
4.4 Rail and Belt Lubrication
- Lubricate the X and Y-axis guide rails and belts as recommended in the full user manual to ensure smooth and consistent movement.
5. Troubleshooting
This section addresses common issues you might encounter during operation.
5.1 Laser Not Firing
- Check if the water chiller is running and water is flowing.
- Ensure the laser power key is turned to the "ON" position.
- Verify all safety interlocks (lid closed, emergency stop disengaged) are correctly set.
5.2 Poor Engraving/Cutting Quality
- Focus: Re-run the autofocus function to ensure proper focal distance.
- Lens/Mirrors: Clean the laser lens and mirrors.
- Settings: Adjust power and speed settings for the specific material. Refer to material test results for optimal parameters.
- Material Flatness: Ensure the material is flat on the workbed to maintain consistent focus.
5.3 Overheating Alarm
- Check the water chiller's temperature. Ensure it's within the recommended operating range.
- Verify water flow and ensure no blockages in the cooling system.
5.4 Low-Pressure Alarm
- Check the air assist pump connection and ensure it's functioning correctly.
- Inspect air lines for leaks or blockages.
6. Specifications
| Feature | Detail |
|---|---|
| Model | Pronto 35 |
| Laser Type | CO2 Laser |
| Laser Power | 100W |
| Work Area | 28" x 20" |
| Max Engraving Speed | 1,000 mm/s |
| Autofocus | Yes |
| Air Assist | Yes (with 318 cfm turbo exhaust fan) |
| Water Chiller | Included |
| Pass-Through | 2-Way |
| Compatible Software | RDWorks, CorelLaser, LightBurn |
| Laser Class | Class 2 (0.827 mW output power) |
| Transmission System | X and Y-axis stepping motors with V-wheel guide rails |
7. Warranty & Support
OMTech provides comprehensive support for your laser engraver.
- Warranty: Enjoy 2 years of comprehensive service.
- Technical Support: 24/7 global support team available for expert assistance, including technical guidance.
- Local Demos: Local demonstrations are available by appointment.
- Contact: For support, please visit the OMTech Store or refer to your product documentation.
Video: An overview of OMTech's commitment to customer support and community engagement, featuring testimonials from users.
Video: A brief introduction to the OMTech laser engraver, highlighting its ease of use and suitability for various projects.


