1. Introduction
This manual provides detailed instructions for the Derkiewn Digital LED Alarm Clock, Model AM03. Please read this manual thoroughly before operating the device and retain it for future reference. This alarm clock features a large 6.5-inch curved LED display, integrated temperature and humidity sensors, dual alarm settings, a snooze function, and adjustable brightness levels.

Image 1.1: Front view of the Derkiewn Digital LED Alarm Clock AM03 displaying time, temperature, and humidity.
2. Package Contents
Please check the package for the following items:
- Derkiewn Digital LED Alarm Clock AM03
- USB Power Cable
- User Manual (this document)
Note: A USB power adapter is not included and must be supplied separately.
3. Product Overview
The Derkiewn AM03 alarm clock features a sleek design with a large, curved mirror LED display. The top panel includes control buttons, and the rear panel houses the battery compartment and power interface.
3.1. Display Features
- Large Curved LED Screen: 6.5-inch display for clear visibility.
- Mirror Effect: The display surface functions as a mirror when not illuminated or off.
- Time Display: Shows time in 12-hour or 24-hour format.
- Temperature Display: Shows ambient temperature.
- Humidity Display: Shows ambient humidity.
3.2. Control Buttons and Ports

Image 3.1: Top and rear view of the alarm clock with labeled buttons and ports.
| Button | Function |
|---|---|
| MODE | Switch display modes (Time, Temperature, Humidity, Date); Enter setting mode. |
| ALARM | Enter alarm setting mode; Activate/Deactivate alarms. |
| SNZ/LIGHT | Activate Snooze function; Adjust display brightness. |
| UP | Increase value during setting; Toggle 12/24-hour format. |
| DOWN | Decrease value during setting; Toggle temperature unit (°C/°F). |
Rear Panel:
- Battery Compartment: Holds 3 AAA batteries for time memory backup.
- Power Interface: USB port for primary power supply.
4. Setup
4.1. Power Connection
- Connect the provided USB power cable to the Power Interface on the back of the alarm clock.
- Plug the other end of the USB cable into a compatible USB power adapter (not included) or a USB port.
- The display will illuminate, indicating the clock is powered on.
4.2. Battery Installation (Memory Backup)
For maintaining time settings during a power outage, install 3 AAA batteries (not included) into the battery compartment on the back of the unit. These batteries serve as a backup and do not power the main display continuously.
- Open the battery compartment cover.
- Insert 3 AAA batteries, ensuring correct polarity (+/-).
- Close the battery compartment cover securely.
5. Operating Instructions
5.1. Setting Time and Date
- Press and hold the MODE button for 3 seconds to enter time setting mode. The hour digits will flash.
- Use the UP or DOWN buttons to adjust the hour.
- Press MODE again to confirm the hour and move to minute setting. The minute digits will flash.
- Use the UP or DOWN buttons to adjust the minutes.
- Press MODE again to confirm the minutes and move to year setting.
- Repeat the process using UP/DOWN and MODE to set the year, month, and day.
- After setting the day, press MODE one last time to exit time/date setting.
5.2. 12/24-Hour Format Selection
While in normal time display mode, press the UP button to toggle between 12-hour and 24-hour formats.
5.3. Temperature Unit Selection
While in normal time display mode, press the DOWN button to toggle between Celsius (°C) and Fahrenheit (°F) temperature units.
5.4. Setting Alarms
The clock supports setting up to three independent alarms (AL1, AL2, AL3).

Image 5.1: Example of setting two distinct alarms for different activities.
- Press the ALARM button repeatedly to cycle through AL1, AL2, AL3, and OFF.
- When the desired alarm (e.g., AL1) is displayed, press and hold the ALARM button for 3 seconds. The hour digits will flash.
- Use the UP or DOWN buttons to adjust the alarm hour.
- Press ALARM again to confirm the hour and move to minute setting. The minute digits will flash.
- Use the UP or DOWN buttons to adjust the alarm minutes.
- Press ALARM again to confirm and exit alarm setting mode.
- To activate or deactivate an alarm, press the ALARM button until the desired alarm (AL1, AL2, or AL3) is displayed, then press ALARM once more to toggle its status (on/off). An alarm icon will appear on the display when active.
5.5. Snooze Function
When an alarm sounds:

Image 5.2: The SNZ/LIGHT button used to activate the snooze function.
- Press the SNZ/LIGHT button to activate the snooze function. The alarm will pause for 5 minutes and then sound again.
- To stop the alarm completely, press any other button (except SNZ/LIGHT).
5.6. Brightness Adjustment
The display brightness can be adjusted manually or automatically.
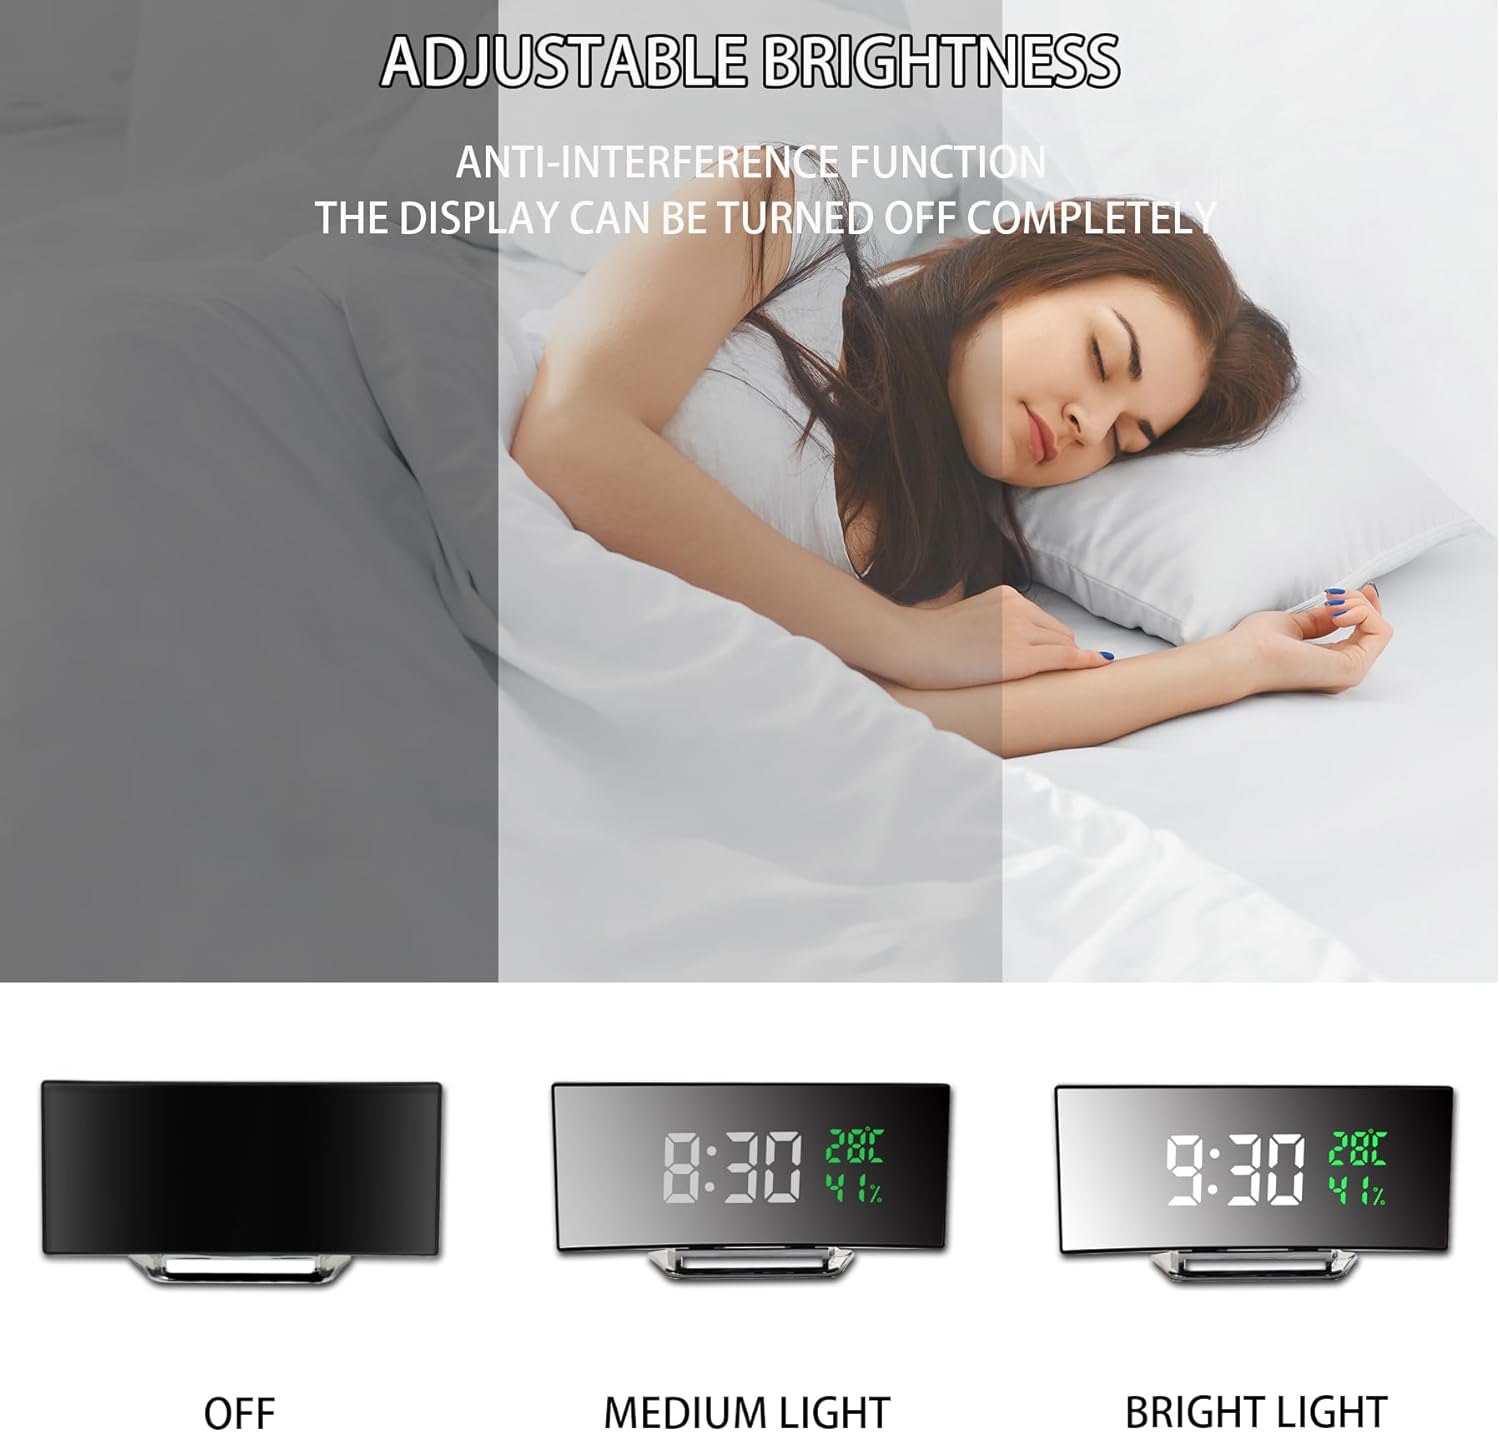
Image 5.3: Visual representation of the three brightness settings: Off, Medium, and Bright.
- Manual Adjustment: In normal time display mode, press the SNZ/LIGHT button repeatedly to cycle through High Brightness, Low Brightness, and Display Off.
- Automatic Adjustment: The clock automatically adjusts to high brightness between 7:00 AM and 6:00 PM, and to low brightness between 6:00 PM and 7:00 AM to optimize visibility and minimize disturbance during sleep.
5.7. Display Modes
The clock offers two primary display modes:
- Time Mode: Displays only the current time.
- Full Display Mode: Cycles through time, temperature, and humidity.
To switch between these modes, press the MODE button briefly. In Full Display Mode, the clock will automatically alternate between showing time, temperature, and humidity at regular intervals.
6. Maintenance
6.1. Cleaning
- Wipe the display and casing with a soft, dry cloth.
- Do not use abrasive cleaners, waxes, or chemical solvents as they may damage the surface.
6.2. Battery Replacement
If the time settings are not retained during a power interruption, the AAA backup batteries may need replacement. Follow the steps in Section 4.2 to replace them.
7. Troubleshooting
| Problem | Possible Cause | Solution |
|---|---|---|
| Display does not turn on. | No power supply. | Ensure the USB cable is securely connected to both the clock and a working power source. |
| Time resets after power outage. | Backup batteries are dead or not installed. | Install 3 new AAA batteries or replace existing ones. |
| Display cycles through time, temperature, humidity, date. | Clock is in Full Display Mode. | Press the MODE button briefly to switch to Time Mode (time only). |
| Alarm does not sound. | Alarm is not activated. | Ensure the alarm is set and activated (alarm icon visible on display). |
| Display is too bright/dim at night. | Brightness setting needs adjustment. | Press SNZ/LIGHT to manually adjust brightness or ensure automatic adjustment is functioning. |
8. Specifications
| Feature | Detail |
|---|---|
| Brand | Derkiewn |
| Model Number | AM03 |
| Display Type | LED |
| Display Size | 6.5 inches |
| Power Source | Corded Electric (USB) |
| Backup Batteries | 3 AAA batteries (not included) |
| Product Dimensions | 1.6"W x 3.3"H (Note: Width and Height seem swapped or incomplete based on typical clock dimensions and images. Assuming 1.6" depth, 3.3" height, and 6.5" width from display size.) |
| Item Weight | 5.6 ounces (0.16 Kilograms) |
| Material | Plastic, Acrylic (Frame) |
| Special Features | Large Display, Temperature & Humidity Display, Dual Alarms, Snooze Function, Adjustable Brightness |
9. Warranty and Support
For warranty information or technical support, please refer to the contact details provided with your purchase or visit the official Derkiewn website. Keep your purchase receipt as proof of purchase for any warranty claims.