NIDAGE ZP701
NIDAGE ZP701 Articulating Borescope
Instruction Manual
Introduction
This manual provides essential instructions for the safe and effective operation, maintenance, and troubleshooting of your NIDAGE ZP701 Articulating Borescope. Please read this manual thoroughly before using the device to ensure optimal performance and longevity.
Package Contents
Verify that all items listed below are present in your package:
- NIDAGE ZP701 Articulating Borescope
- Silicone Protective Cover
- Type-C Charging Cable
- 32GB TF Card (Pre-installed)
- Carrying Case
- User Manual (this document)
Setup
- Charging the Device: Connect the borescope to a power source using the provided Type-C charging cable. The device features a 4000mAh rechargeable battery, providing approximately 4-5 hours of operation on a full charge.
- TF Card Installation: The 32GB TF card is typically pre-installed. If not, locate the TF card slot and insert the card with the contacts facing down until it clicks into place. This card is used for storing captured images and videos.
- Power On: Press and hold the power button (usually marked 'OK' or with a power symbol) to turn on the device. The 7-inch IPS screen will illuminate.
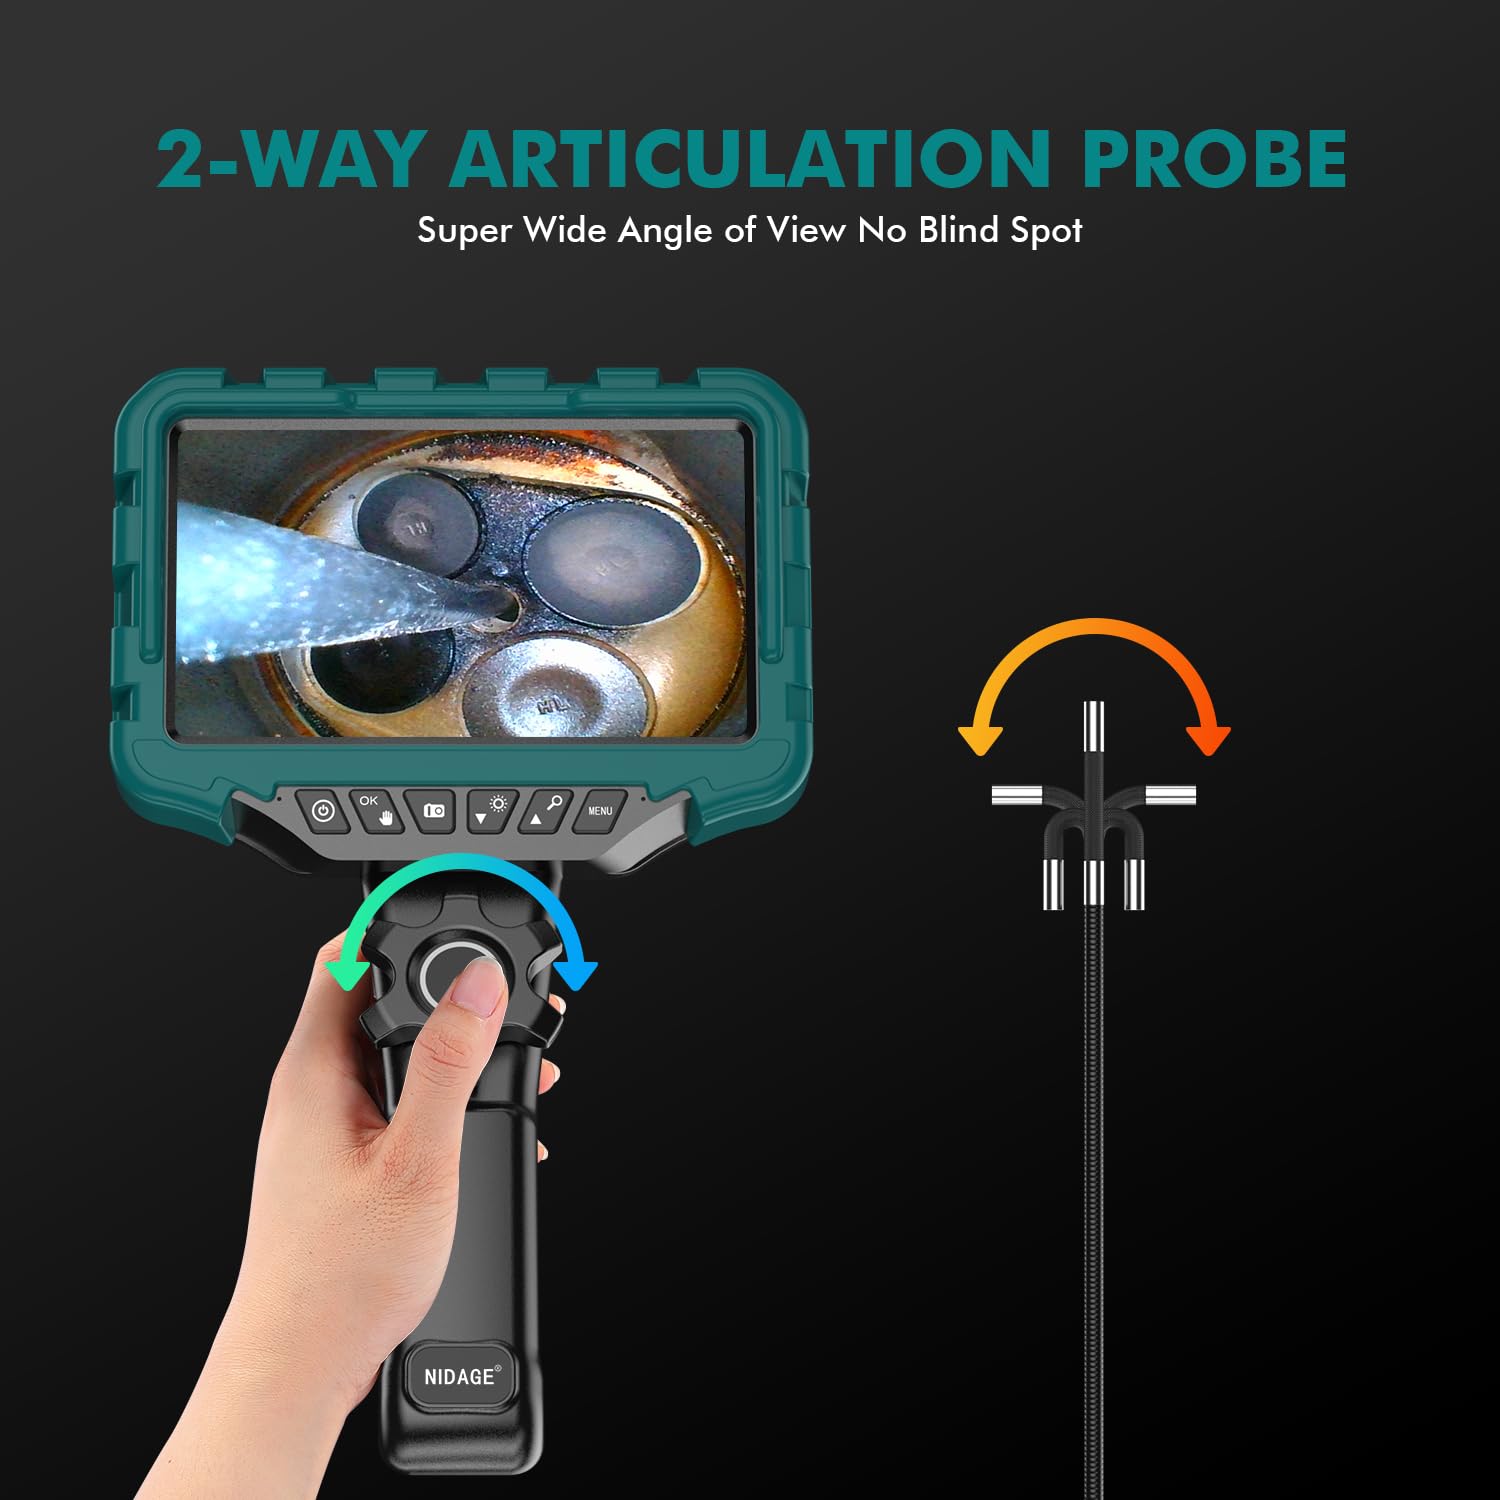
Image: The main unit of the NIDAGE ZP701 Articulating Borescope, showing the 7-inch IPS display and control buttons.
Operating Instructions
-
Probe Insertion: Carefully insert the 0.24-inch (6mm) diameter rigid gooseneck probe into the area you wish to inspect. The probe is 1.1m (3.6ft) long and designed to maintain its shape for precise positioning.

Image: Illustration of the rigid gooseneck probe being used to inspect a wall cavity.
-
Articulating the Probe: Use the control wheel on the handle to articulate the camera probe up to 180 degrees in two directions. This allows for flexible viewing angles without needing to reposition the entire probe.

Image: A diagram illustrating the 0.24-inch camera's ability to articulate and inspect internal components like engine valves.

Image: A user demonstrating the two-way 180-degree articulation feature for engine inspection.
-
Adjusting LED Lights: The probe is equipped with 8 high-intensity LED lights. Use the designated button (often marked with a light bulb icon) to cycle through 3 adjustable brightness levels to suit different inspection environments.

Image: The borescope probe submerged in water, highlighting its IP67 waterproof rating and the 8 adjustable LED lights.
- Image and Video Capture: Press the appropriate buttons (usually marked with camera and video icons) to capture still images or record video. The captured media will be saved to the installed 32GB TF card.
-
Viewing on the IPS Screen: The 7-inch IPS screen provides a clear and vibrant image for detailed inspections. Its larger size offers a significant advantage over smaller displays, enhancing visibility of inspection details.

Image: A visual comparison highlighting the larger and clearer display of the 7-inch IPS screen compared to a 5-inch screen.
- Zoom Function: Utilize the 6X zoom function to get a closer view of details on the 7-inch IPS screen.
- Optimal Focal Distance: For the clearest images, maintain a focal distance of 3-8 cm (approximately 1.2-3.1 inches) from the object being inspected.
- High Temperature Protection: The device features automatic shutdown for high-temperature protection. If the temperature exceeds 85°C, the unit will power off to prevent damage. The screen also displays the actual temperature during operation.
- Waterproof and Oil-Resistant: The probe is IP67 rated, making it suitable for inspection in wet plumbing or oily environments.
Maintenance
- Cleaning the Probe and Lens: After each use, especially in dirty or oily environments, gently wipe the probe and camera lens with a soft, damp cloth. For stubborn residue, a mild cleaning solution can be used, ensuring no liquid enters the main unit.
- Battery Care: To prolong battery life, charge the device regularly and avoid completely draining the battery. If storing for extended periods, charge the battery to approximately 50%.
- Storage: Store the borescope and its accessories in the provided carrying case in a cool, dry place, away from direct sunlight and extreme temperatures.
Troubleshooting
| Problem | Possible Cause | Solution |
|---|---|---|
| Device does not power on. | Low battery; device not charged. | Charge the device fully using the Type-C cable. |
| Poor image quality. | Lens is dirty; incorrect focal distance; insufficient lighting. | Clean the camera lens. Adjust the probe to be within 3-8 cm of the object. Increase LED brightness. |
| Probe articulation is stiff or unresponsive. | Debris in articulation mechanism; cable kinked. | Gently try to clear any visible debris. Ensure the cable is not severely bent or kinked. Do not force articulation. |
| Device shuts down unexpectedly. | High-temperature protection activated. | Allow the device to cool down. Avoid using in environments exceeding 85°C. |
| Cannot save images/videos. | TF card full or not properly inserted; TF card faulty. | Check TF card insertion. Delete old files to free space. Try a different compatible TF card. |
Specifications (Model: ZP701)
| Display Screen | 7-inch IPS LCD |
| Camera Resolution | 2.0 MP (True) |
| Probe Diameter | 0.24 inch (6mm) |
| Probe Length | 1.1m (3.6ft) |
| Articulation Angle | Two-way 180° |
| LED Lights | 8 adjustable high-intensity LEDs |
| Focal Distance | 3-8 cm |
| Zoom Function | 6X Digital Zoom |
| Water Resistance | IP67 (Probe) |
| Battery Capacity | 4000mAh |
| Operating Time | 4-5 hours |
| High Temperature Protection | Automatic shutdown at 85°C |
| Storage Media | 32GB TF Card (included) |
| Video Capture Resolution | 1080p |
| Connectivity | USB Type-C |
Warranty and Support
Your NIDAGE ZP701 Articulating Borescope comes with a 12-month warranty. For technical support, warranty claims, or any inquiries, please refer to the contact information provided on the product packaging or the official NIDAGE website.
Related Documents - ZP701
 |
NIDAGE ZP701 Articulating Borescope User Manual Comprehensive user manual for the NIDAGE ZP701 articulating borescope, detailing its features, operation, specifications, and maintenance for automotive and professional inspections. |
 |
NIDAGE WiFi Endoscope Camera User Manual: Setup, Operation, and Troubleshooting Comprehensive user manual for the NIDAGE WiFi Endoscope Camera (Model AW655). Learn how to connect, operate, and troubleshoot your endoscope for various inspection tasks. Includes safety guidelines and FCC compliance information. |
Ask a question about this manual
Ask about setup, troubleshooting, compatibility, parts, safety, or missing instructions. Manuals+ will review the question and use this page’s manual context to help answer it.