1. Safety Information
Please read and understand all instructions before installing and using the COMOMY Gate Extension. Keep this manual for future reference.
- This single-panel extension is designed for use exclusively with COMOMY 3-panel, 6-panel, or 8-panel gates. It cannot be used as a standalone gate.
- Ensure all connections are secure and locked before use.
- Regularly check the gate extension for any loose parts, damage, or signs of wear. Discontinue use if any damage is found.
- This product is intended to create a secure environment for pets. Always supervise pets, especially when first introducing them to the gate.
2. Package Contents
Verify that all components are present before beginning installation.
- 1 x COMOMY Gate Extension Panel (23.6" Wide, 30" Tall)
- Connection Rods (pre-attached or separate, depending on model)
- Instruction Manual

Image: The COMOMY Gate Extension panel with key dimensions: 30 inches tall, 20.47 inches length (panel width), 3.15 inches length (top connector), and 1.85 inches (bar spacing).
3. Specifications
| Brand | COMOMY |
| Model Number | Single Side Gate-W |
| Material | High-quality Alloy Steel |
| Color | White |
| Dimensions (W x H) | 23.6 inches x 30 inches |
| Mounting Type | Hardware Mount (for connection to existing gate) |
| Unit Count | 1 Panel |
| Target Species | Dogs, Babies (when used with appropriate COMOMY gate) |
4. Setup & Installation
This extension panel is designed to integrate with existing COMOMY multi-panel gates (3, 6, or 8 panels) to expand their coverage. It is not a standalone product.
4.1 Understanding the Connection Mechanism
The gate extension connects using a knob rod and spring clip system. The knob rod allows for rotation to lock or unlock the connection.

Image: A close-up view of the rotatable knob rod at the top of the gate extension. Turning it left unlocks the connection, allowing for 270-degree rotation. Turning it right locks the connection.

Image: Detail of the top connection point, showing the knob rod and the adjacent spring clip mechanism.
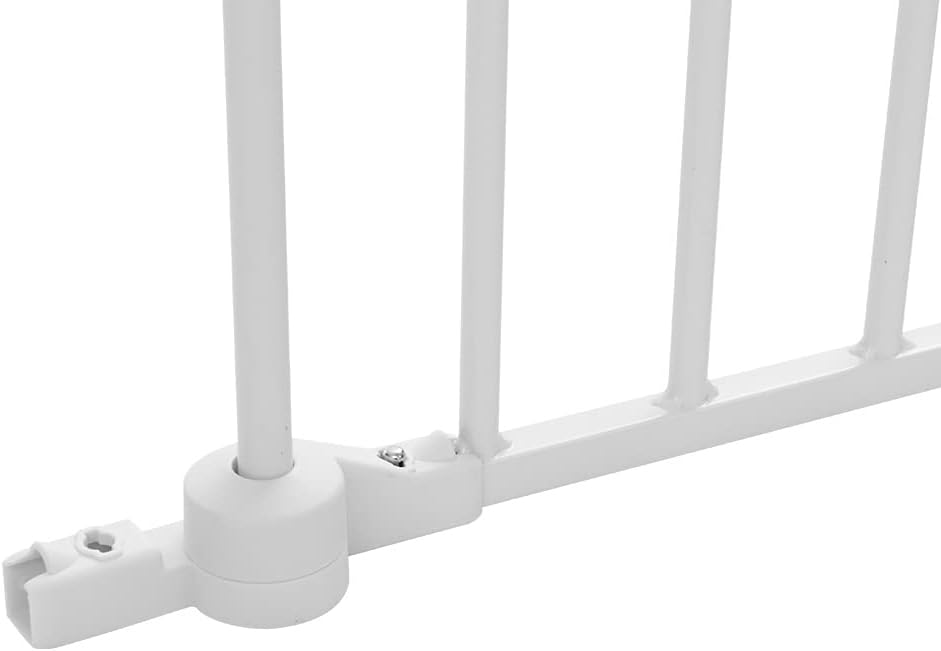
Image: Detail of the bottom connection point, showing the corresponding hole and spring clip for secure attachment.
4.2 Video Guide: How to Extend Your Gates
Video: This video demonstrates the process of connecting the COMOMY gate extension to a multi-panel gate. It shows how to unlock and lock the knob rods, disassemble and connect panels, and form different configurations like a circular playpen or a wall-mounted barrier.
4.3 Connecting the Extension to a Multi-Panel Gate
There are two primary ways to connect the single-panel extension to your existing COMOMY multi-panel gate:
Method 1: Forming a Circular Enclosure
- Take out your existing multi-panel gate.
- Identify the end panels of your multi-panel gate. Ensure that one end has a "knob rod" and the other has a "spring clip" for connection.
- Important: A single-panel gate (extension) cannot be directly connected to a multi-panel gate if both ends lack the correct combination of a knob rod and a spring clip. The connection requires a knob rod from one panel to insert into a hole with a spring clip on the other.
- To connect the extension, you may need to remove the "Nailed wall rod" from the extension panel if it's present. Use a thin stick to press down the clip at the bottom to release the rod.
- Align the knob rod of one panel with the hole of the other panel and push them together until the spring clip engages.
- Once connected, turn the knob rod to the right to lock the shaft and secure the connection.

Image: A single COMOMY gate extension panel, ready for integration into a larger gate system.
Method 2: Nailing to the Wall (Requires Wall Mounts)
If you intend to create a barrier that attaches to a wall, you will need appropriate wall mounting hardware (sold separately or included with some COMOMY gate sets).
- Unlock the knob rod on the end of the gate extension that will connect to the wall. Turn it left to allow rotation.
- Remove the "Nailed wall rod" from the extension panel if it's present.
- Attach the appropriate wall mounting hardware to your wall according to the instructions provided with the wall mounts.
- Connect the gate extension to the installed wall mounts.
- Once connected, turn the knob rod to the right to fix the shaft and secure the gate extension to the wall.

Image: Example of white wall mounting hardware and screws, which may be required for wall installation of the gate extension.
5. Operation
The COMOMY Gate Extension itself does not have moving parts for opening or closing. Its primary function is to extend the width of an existing COMOMY gate system. The operation of opening and closing will depend on the main gate it is connected to.
To adjust the angle or configuration of the gate system, you will need to unlock the knob rods at the connection points, reposition the panels, and then re-lock them securely.
6. Maintenance
- Cleaning: Wipe the gate extension with a damp cloth and mild soap. Avoid abrasive cleaners or harsh chemicals that could damage the finish.
- Inspection: Periodically inspect all connection points, rods, and the gate frame for any signs of damage, rust, or loose components.
- Storage: If disassembling for storage, ensure all parts are clean and dry. Store in a cool, dry place away from direct sunlight.
7. Troubleshooting
| Problem | Possible Cause | Solution |
|---|---|---|
| Extension panel does not connect securely. | Knob rod not fully engaged or locked. Incorrect panel orientation. | Ensure the knob rod is inserted completely into the receiving hole and turned right to lock. Verify that the panels are aligned correctly. |
| Gate system feels unstable after adding extension. | Connections are loose. Insufficient support for extended width. | Check all knob rods and ensure they are securely locked. For wider configurations, consider additional wall mounts or supports if available for your main gate model. |
| Cannot remove a rod for connection. | Spring clip is not depressed. | Use a thin stick or tool to press down the spring clip at the base of the rod to release it. |
8. Warranty and Support
COMOMY is committed to providing high-quality products. If you encounter any difficulties with installation or have questions regarding your COMOMY Gate Extension, please contact our dedicated customer support team for assistance.
For warranty information and customer service, please refer to the contact details provided with your original COMOMY gate purchase or visit the official COMOMY website.