Introduction
This manual provides detailed instructions for the assembly, operation, and maintenance of your MONDAWE 12x20Ft Cedar Wood Hardtop Gazebo. Please read all instructions carefully before beginning assembly and retain this manual for future reference. This gazebo is designed to provide a spacious and durable outdoor living area, featuring a cedar wood frame and a galvanized steel double roof.

Image: The MONDAWE 12x20Ft Cedar Wood Hardtop Gazebo providing shade over a patio area, with a vehicle parked underneath.
Safety Information
Adhering to these safety guidelines is crucial for preventing injury and damage to the product.
- Ensure all parts are present and undamaged before assembly. Do not proceed with assembly if any parts are missing or broken.
- Assembly requires at least two adults. Do not attempt to assemble alone.
- Wear appropriate safety gear, such as gloves and eye protection, during assembly.
- Securely anchor the gazebo to the ground using the provided base plates and expansion screws to prevent wind damage.
- Regularly inspect the gazebo for loose connections or damage, especially after severe weather.
- Clear snow accumulation from the roof to prevent structural collapse. The galvanized steel roof holds up to 5-inch thick snow.
- Do not hang heavy objects from the gazebo frame or roof.
- Keep children and pets away from the assembly area.
Package Contents
Verify all components are present before starting assembly. Refer to the parts list provided in your product packaging. Key components typically include:
- Cedar Wood Posts and Beams
- Galvanized Steel Roof Panels
- Metal Connectors and Brackets
- Fasteners (screws, nuts, washers)
- Base Plates
- Mesh Curtains (if applicable to your model)
Assembly Instructions
Follow these steps carefully for proper assembly. It is highly recommended to watch the official assembly video for visual guidance throughout the process.
Official Assembly Video
This video demonstrates the step-by-step assembly process for the MONDAWE Cedar Wood Hardtop Gazebo, covering all major installation phases from base to roof.
Step-by-Step Guide
- Install Base Covers: Attach the base covers to the bottom of the wooden posts.
- Attach Base Sheets: Secure the base sheets (B6) to the posts using screws.
- Install Nuts (PP): Insert the nuts into the designated holes on the wooden beams.
- Assemble Inner Beams: Connect the inner short beams (08 and 10) and inner long beams (05, 06, 07) using screws.
- Assemble Outer Beams: Connect the outer short beams (03 and 04) and outer long beams (01 and 02) using screws.
- Screw Side Beams Together: Securely screw the inner and outer side beams together.
- Install Crossbeam Heel Posts: Attach the crossbeam heel posts to the main posts.
- Install Center Column: Secure the center column to the assembled beams.
- Install Crossbeam Heel Posts (Upper): Attach the upper crossbeam heel posts.
- Install Supports: Fasten the diagonal supports to the main structure.
- Install Canopy Track: Attach the canopy track to the frame.
- Install Diagonal Beam Connector: Secure the diagonal beam connectors.
- Connect Roof Frame Sections: Connect sections i1 and i2 with p1 for the roof frame.
- Install i1/i2 to i3: Connect the roof frame sections.
- Install Top Center Tube: Attach the top center tube (01) to the roof frame.
- Install Top Beam H1: Secure the top beam H1 to the roof frame sections.
- Install Top Diagonal Beam: Attach the top diagonal beam G1 to i3 and G5.
- Install Top Gable: Install the top gable sections (K9, K7, K8, K6, K10).
- Fix Top Beam H1: Ensure the top beam H1 is securely fixed.
- Install Beam Connector H2: Attach beam connector H2 to i1/i2.
- Install J2 and J1: Connect J2 and J1.
- Connect J1 and 1J with M1: Secure these connections.
- Install L1 to J2: Attach L1 to J2.
- Install Small Top Frame: Carefully lift and install the small top frame.
- Install H3 to H2/J1: Connect these components.
- Install Q2/F3/F4/K10: Attach these remaining roof frame components.
- Lay Small Top Sheet: Place the small top sheet onto the frame.
- Install Cover Plate S3/S4: Secure the cover plates.
- Install Small Roof Cover S1: Place the small roof cover.
- Fix Small Top Plate: Fasten the small top plate.
- Install K1/K2/K3/K4/K5: Attach these final roof components.
- Lay Big Top Sheet: Carefully place the large top roof sheets.
- Install Inclined Beam Cover Plate S2: Secure the inclined beam cover plate.
- Fix Big Top Plate: Fasten the large top plate.
- Install Mesh Curtains: Attach the mesh curtains to the tracks.
Operating Instructions
Using the Mesh Curtains
Your gazebo may include mesh curtains for insect protection and privacy. These can be easily opened or closed by sliding them along the integrated tracks. Secure them to the posts using the provided ties when not in use.
This video demonstrates the functionality of the mesh curtains, showing how they can be opened and closed for convenience.

Image: The gazebo with mosquito netting installed, providing an enclosed space for relaxation.
Integrated Hooks
The gazebo features integrated hooks on the ceiling for hanging lights or decorations. Ensure any hung items do not exceed the weight capacity of the hooks.

Image: An illustration highlighting the spacious interior of the gazebo, its pitched roof for rainwater drainage, and integrated hooks for hanging items.
Maintenance
Proper maintenance will extend the life and appearance of your gazebo.
- Roof Care: The galvanized steel roof is fade-proof and rust-resistant. Clean periodically with mild soap and water to remove dirt and debris. Ensure proper drainage to prevent water accumulation.
- Wood Frame Care: The fir wood frame is treated for corrosion resistance. Inspect the wood annually for any signs of wear or damage. Apply a wood sealant or stain as needed to maintain its appearance and prolong its lifespan.
- Snow Removal: In areas with heavy snowfall, regularly remove snow from the roof to prevent excessive weight buildup. The roof is designed to hold up to 5 inches of thick snow.
- Fastener Check: Periodically check all nuts and bolts to ensure they are tight. Re-tighten as necessary to maintain structural integrity.
- Curtain/Netting Care: If your model includes curtains or netting, clean them according to fabric care instructions. Store them indoors during harsh weather or off-season to extend their life.

Image: A visual representation of the gazebo's durability in both winter (snow load capacity) and summer (wind resistance) conditions.
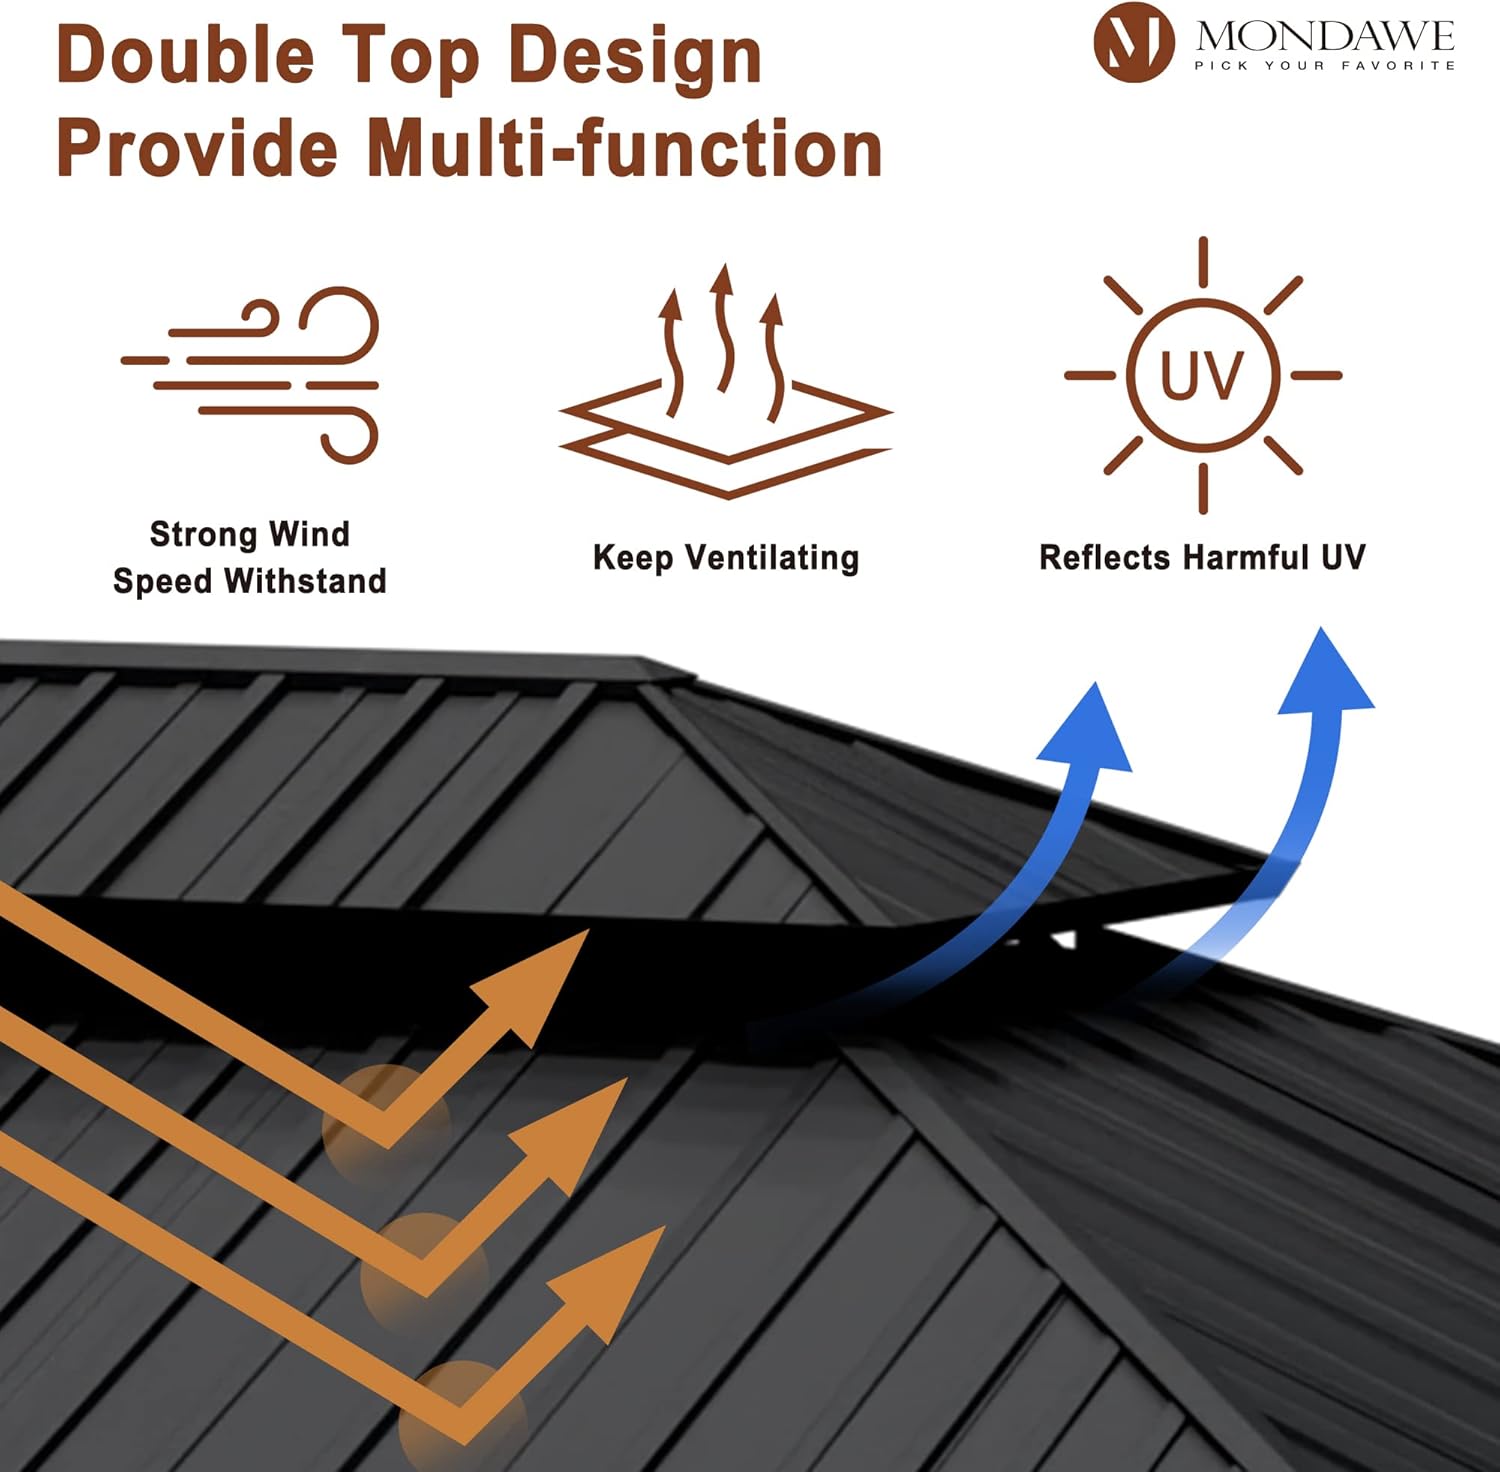
Image: An illustration detailing the benefits of the double-roof design, including strong wind resistance, ventilation, and UV reflection.
Troubleshooting
Here are solutions to common issues you might encounter:
- Gazebo Instability: Ensure all base plates are securely anchored to the ground. Check all frame connections for tightness.
- Water Leakage: Verify that all roof panels are correctly overlapped and secured. Check for any gaps or damaged seals.
- Difficulty with Assembly: Re-read the instructions and review the assembly video. Ensure all parts are oriented correctly before tightening fasteners. Do not force parts together.
- Wind Damage: If strong winds are expected, consider temporarily removing curtains/netting and ensuring the gazebo is firmly anchored.
Specifications
| Feature | Detail |
|---|---|
| Brand | MONDAWE |
| Model Number | MOM1220140 |
| Material | Cedar Wood, Galvanized Steel |
| Style | Modern |
| Product Dimensions (L x W x H) | 238.2"L x 141.8"W x 114.2"H |
| Water Resistance Level | Water Resistant |
| UV Protection | Yes |
| Occupancy | 12-16 people (approx. 240 sq ft shade area) |
| Assembly Required | Yes |

Image: A diagram illustrating the key dimensions of the 12x20Ft gazebo.
Warranty and Support
Protection Plans
Optional protection plans are available for your gazebo:
- 2-Year Protection Plan: $374.99 (one-time)
- 3-Year Protection Plan: $499.99 (one-time)
- Complete Protect: $16.99 (monthly, covers eligible past and future purchases)
Returns
This product is eligible for 30-day easy returns (refund/replacement).
Customer Support
For further assistance or inquiries, please contact Mondawe Inc. customer support. You can also visit the official MONDAWE store: