Introduction
This manual provides detailed instructions for the setup, operation, and maintenance of your TXL Atomic Clock (Model 3039-AC-W). Please read this manual thoroughly before using the device to ensure proper function and longevity.
Product Features
- Automatic time and date update via atomic signal for zero error.
- 14.2-inch large digital display with easy-to-read numbers.
- Adjustable backlight with two brightness levels (High/Low) and an Off option for night visibility.
- Battery-operated design for flexible placement on walls or tabletops.
- Multi-function modes: Clock, Alarm (with 3 settings), and Countdown Timer (0-29 hours, 59 minutes, 59 seconds).
- Displays indoor temperature in Celsius (°C) or Fahrenheit (°F).
- Displays day, month, and date.
- Supports 12-hour or 24-hour time display formats.
- Automatic Daylight Saving Time (DST) adjustment.
- Four selectable time zones: PST, MST, CST, EST.
Package Contents
- 1 x TXL Atomic Clock (Model 3039-AC-W)
- 4 x AA Batteries
- Instruction Manual
Setup
1. Battery Installation
The clock requires 4 AA batteries for operation. Locate the battery compartment on the back of the clock.

Image: Rear view of the clock, highlighting the battery compartment and control buttons.
Insert 4 AA batteries, ensuring correct polarity (+/-). For energy saving, an insulating tape might be present on the battery terminals; remove it before installation.
2. Initial Power-On and Atomic Signal Reception
After battery installation, the clock will automatically attempt to receive the atomic time signal. This process may take several minutes to a few hours depending on your location and environmental conditions.

Image: The clock displaying time, day, date, and temperature, with an atomic signal icon.
Ensure the clock is placed away from large metal objects or electronic devices that might interfere with the signal.
3. Placement Options
The clock can be placed on a tabletop using its fold-out backstand or mounted on a wall using the two keyholes provided.

Image: Demonstrates the clock mounted on a wall and standing on a table.
Operating Instructions
1. Button Functions Overview
The control buttons and switches are located on the back of the clock. Refer to the image below for identification.
Image: Detailed view of the clock's rear panel, showing buttons like SNOOZE, SET, +/12/24, -/°C/°F, Alarm Set, Timer, and backlight switches.
- SNOOZE: Activates snooze function for alarms.
- SET: Enters setting mode for time, date, and alarm.
- +/12/24: Adjusts values up in setting mode; toggles between 12-hour and 24-hour time display.
- -/°C/°F: Adjusts values down in setting mode; toggles between Celsius and Fahrenheit temperature display.
- Alarm Set: Enters alarm setting mode.
- Timer: Activates and sets the countdown timer.
- Backlight Switch (High/Low/Off): Controls backlight brightness.
- PMCE Switch: Selects time zone (Pacific, Mountain, Central, Eastern).
2. Time and Date Display
The clock automatically sets the time and date via the atomic signal. You can switch between 12-hour and 24-hour formats by pressing the +/12/24 button.
To change the temperature unit between Celsius (°C) and Fahrenheit (°F), press the -/°C/°F button.
The clock displays time, day, month, date, and indoor temperature.
3. Backlight Function
The clock features an adjustable backlight. Use the Backlight switch on the back of the clock to select between High, Low, or Off brightness levels.
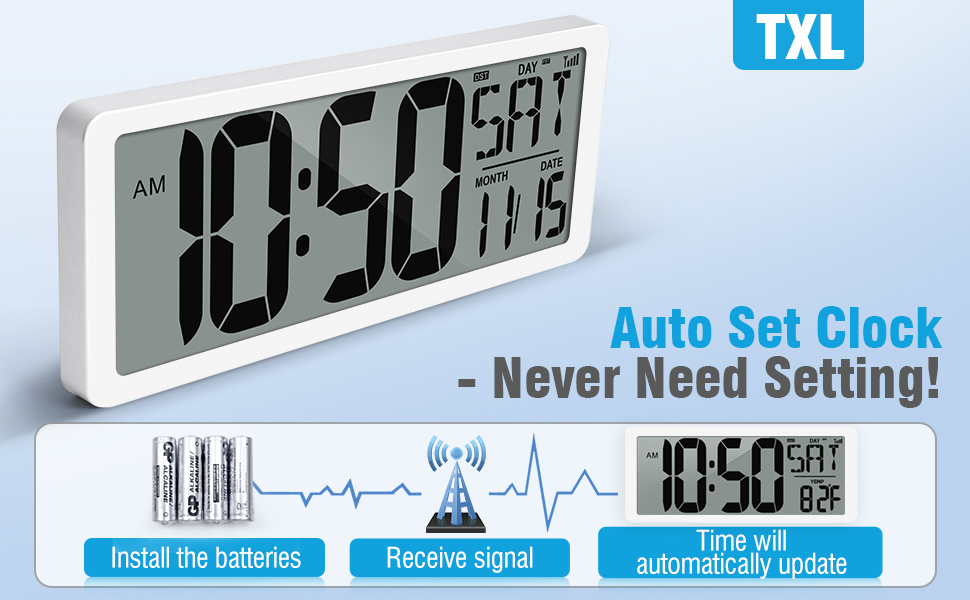
Image: Comparison of the clock's display with high and low backlight settings in a dim environment.
4. Setting the Alarm
The clock supports up to 3 alarm settings (for weekdays, weekends, or everyday).
- Press the Alarm Set button to enter alarm setting mode.
- Use the + and - buttons to adjust the alarm hour and minute.
- Press Alarm Set again to confirm each setting and move to the next.
- Select the alarm frequency (e.g., everyday, weekdays, weekends).
- Press SET to exit alarm setting mode.
When an alarm sounds, press the SNOOZE button to temporarily silence it. The alarm will sound again after a few minutes. To turn off the alarm completely, press any other button.
5. Using the Countdown Timer
The timer function allows for countdowns from 0 to 29 hours, 59 minutes, and 59 seconds.
- Press the Timer button to activate the timer mode.
- Press SET to enter timer setting mode.
- Use the + and - buttons to set the desired hours, minutes, and seconds.
- Press SET to confirm each value.
- Press Timer again to start the countdown.
- To pause/resume the timer, press Timer. To reset the timer, press and hold the Timer Reset button (often combined with Timer min or sec button, refer to the back panel image).
6. Time Zone Selection
Use the PMCE switch on the back of the clock to select your desired time zone: Pacific (P), Mountain (M), Central (C), or Eastern (E).

Image: The clock's display with a graphic illustrating the four US time zones.
Maintenance
- Clean the clock's display and casing with a soft, dry cloth. Avoid abrasive cleaners or solvents.
- Replace batteries when the display dims or functions become erratic. Always replace all batteries at once with new ones of the same type.
- If the clock will not be used for an extended period, remove the batteries to prevent leakage.
Troubleshooting
No Display or Erratic Behavior
Issue: The display is blank or showing incorrect information.
Solution:
- Check battery installation and ensure polarity is correct.
- Replace old batteries with new ones.
- If the clock stops working or buttons cease to function, perform a reset. Locate the small reset button (often a small recessed hole) on the back of the clock and press it with a toothpick or a thin, non-metallic object.
Atomic Time Signal Issues
Issue: The clock is not synchronizing with the atomic time signal or shows an incorrect time.
Solution:
- Ensure the clock is placed in an area with good signal reception, away from electronic interference (e.g., TVs, computers, large metal structures).
- Try repositioning the clock to a different location.
- Allow sufficient time (up to 24 hours) for the clock to receive the signal, especially during initial setup or after battery replacement.
- Verify the correct time zone is selected using the PMCE switch on the back.
Backlight Not Working
Issue: The backlight does not illuminate.
Solution:
- Check the Backlight switch on the back of the clock and ensure it is set to "High" or "Low", not "Off".
- Ensure batteries are fresh and correctly installed.
Specifications
| Feature | Detail |
|---|---|
| Brand | TXL |
| Model Number | 3039-AC-W |
| Display Type | Digital |
| Product Dimensions | 14.2"W x 5.9"H |
| Power Source | Battery Powered (4 AA batteries included) |
| Special Features | Adjustable Brightness, Calendar Display, Large Display, Multiple Time Zone, Temperature Display |
| Material | Acrylonitrile Butadiene Styrene (ABS) |
| Mounting Type | Wall Mount, Tabletop |
| Operation Mode | Atomic |
Warranty and Support
For warranty information or technical support, please refer to the contact details provided with your purchase documentation or visit the official TXL website.
Product Video
Large Display Clock Overview
Video: A demonstration of the TXL Atomic Clock's large display and features in operation.