1. Introduction
Thank you for choosing the AMZCHEF CE-HD3219B3E 2-Zone Ceramic Hob. This appliance is designed for efficient and convenient cooking. Please read this instruction manual carefully before installation and use to ensure safe operation and optimal performance. Keep this manual for future reference.
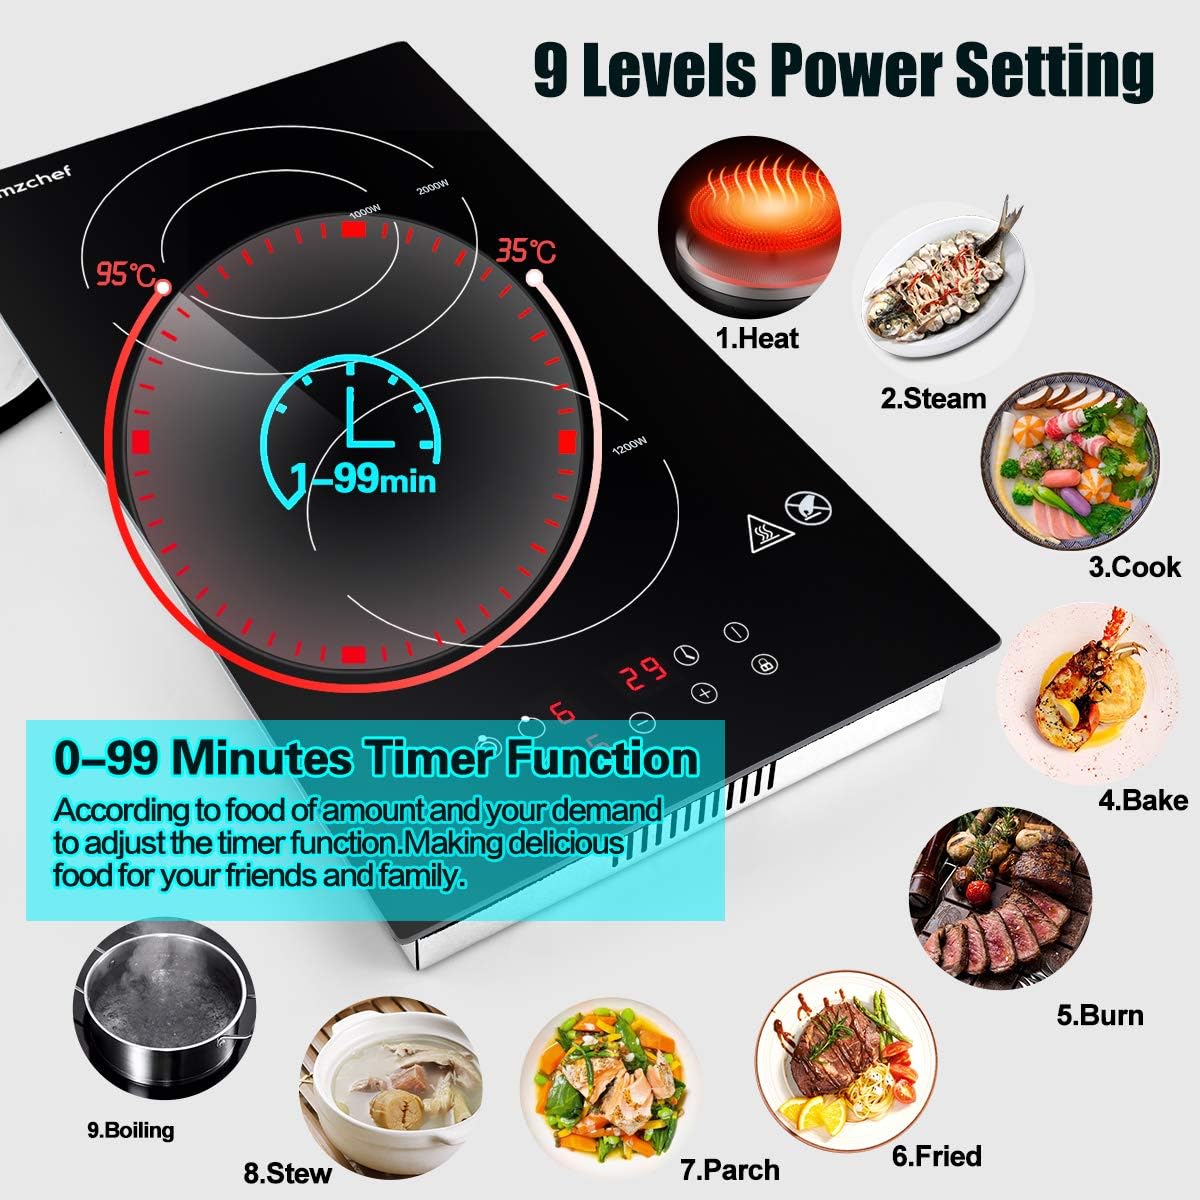
Image 1.1: Top-down view of the AMZCHEF 2-Zone Ceramic Hob.
2. Safety Instructions
Always follow basic safety precautions when using electrical appliances to reduce the risk of fire, electric shock, burns, or injury.
- Electrical Safety: Ensure the hob is connected to a properly grounded 220-240V AC power supply with a suitable circuit breaker. Do not use extension cords or adapters.
- Hot Surface Warning: The ceramic surface and surrounding areas become very hot during and after use. Do not touch hot surfaces. Use oven mitts or pot holders. The 'H' indicator signifies a hot surface.
- Child Safety Lock: Activate the child lock to prevent accidental operation by children.
- Overheat Protection: The hob is equipped with an automatic overheat protection system that will shut down the unit if temperatures become excessively high.
- Cookware: Use only appropriate cookware. Ensure pots and pans have flat bottoms and are centered on the heating zones.
- Ventilation: Ensure adequate ventilation around the appliance, especially if built-in.
- Cleaning: Disconnect from power before cleaning. Allow the hob to cool completely before cleaning.
- Flammable Materials: Keep flammable materials away from the hob during operation.
3. Product Overview
The AMZCHEF CE-HD3219B3E ceramic hob features two heating zones and a touch control panel for easy operation.
3.1 Components
- Ceramic Glass Surface: Durable, heat-resistant, and easy to clean.
- Heating Zones: Two independent heating zones. One zone offers 2000W (outer) / 1000W (inner) power, and the other offers 1200W.
- Touch Control Panel: Intuitive controls for power, timer, and safety features.
- Indicator Lights: For power, heat level, timer, and hot surface warning.
3.2 Control Panel Layout

Image 3.1: Overview of the touch control panel features.
- ON/OFF/Mode Button: To power on/off the hob and select heating zones.
- Power Level Controls (+/-): To adjust heating intensity (9 levels).
- Timer Button: To set the cooking timer (0-99 minutes).
- Child Lock Button: To activate or deactivate the child safety lock.
- Hot Surface Indicator ('H'): Illuminates when a heating zone is hot, even after being turned off.
4. Setup and Installation
The AMZCHEF CE-HD3219B3E ceramic hob is designed for built-in installation but can also be used freestanding with the provided feet.
4.1 Dimensions and Cut-out
Ensure your countertop opening matches the specified cut-out dimensions for proper installation.
- Product Dimensions (L x W x H): 52 cm x 28.8 cm x 5.2 cm
- Cut-out Dimensions (L x W): 50 cm x 26.8 cm

Image 4.1: Built-in dimensions for installation.
4.2 Electrical Connection
The hob requires a 220-240V AC power supply. It comes equipped with a plug for direct connection to a suitable outlet. Consult a qualified electrician if you are unsure about the electrical requirements or installation process.
4.3 Freestanding Use
For freestanding use, attach the four rubber feet (if provided separately) to the designated holes on the underside of the hob. Ensure the hob is placed on a stable, heat-resistant surface.
5. Operating Instructions
Follow these steps to operate your ceramic hob.
5.1 Powering On/Off
- Press the ON/OFF/Mode button to turn on the hob. The display will show '0' or a similar indicator.
- To turn off, press the ON/OFF/Mode button again.
5.2 Adjusting Power Levels
The hob offers 9 power levels for precise temperature control.
- After powering on, select the desired heating zone by pressing its corresponding zone selection button (if applicable, or by pressing the ON/OFF/Mode button repeatedly until the desired zone is active).
- Use the + or - buttons to increase or decrease the power level from 1 to 9.

Image 5.1: Hob in operation with power level set.
5.3 Using the Timer Function
The timer can be set from 0 to 99 minutes.
- While a heating zone is active, press the Timer button.
- Use the + or - buttons to set the desired cooking time.
- The timer will count down, and the hob will automatically turn off the selected zone when the time expires.
Image 5.2: Timer function and power level settings.
5.4 Child Lock
The child lock prevents accidental operation.
- To activate: With the hob on or off, press and hold the Child Lock button for a few seconds until an indicator light or sound confirms activation.
- To deactivate: Press and hold the Child Lock button again for a few seconds.
5.5 Hot Surface Indicator ('H')
After a heating zone is turned off, the 'H' indicator will remain lit until the surface has cooled to a safe temperature. Do not touch the surface while 'H' is displayed.
6. Compatible Cookware
The AMZCHEF ceramic hob is compatible with all types of flat-bottomed cookware, unlike induction hobs which require magnetic materials.

Image 6.1: Examples of compatible cookware.
- Aluminum pots and pans
- Stainless steel pots and pans
- Ceramic pots and pans
- Glass pots and pans
- Copper pots and pans
- Cast iron pots and pans
Ensure the base of the cookware is flat and covers the heating zone adequately for efficient cooking.
7. Cleaning and Maintenance
Regular cleaning and maintenance will prolong the life of your ceramic hob.
- Before Cleaning: Always ensure the hob is turned off and completely cool. Disconnect from the power supply.
- Daily Cleaning: Wipe the ceramic surface with a damp cloth and a mild detergent. Dry thoroughly with a clean cloth.
- Stubborn Stains: For burnt-on food or stubborn stains, use a ceramic hob scraper or a specialized ceramic hob cleaner. Follow the product instructions for the cleaner.
- Avoid Abrasives: Do not use abrasive sponges, scouring pads, or harsh chemical cleaners, as these can scratch or damage the ceramic surface.
- Control Panel: Wipe the touch control panel gently with a soft, damp cloth. Avoid excessive moisture.
8. Troubleshooting
If you encounter issues with your ceramic hob, refer to the following table for common problems and solutions.
| Problem | Possible Cause | Solution |
|---|---|---|
| Hob does not turn on | No power supply; Child lock activated | Check power connection; Deactivate child lock |
| Heating zone not heating | Incorrect power level set; Cookware not suitable or improperly placed | Adjust power level; Ensure cookware is flat-bottomed and centered |
| Display shows 'H' | Surface is still hot | This is normal. Wait for the surface to cool down. |
| Hob shuts off automatically | Overheat protection activated; Timer expired | Allow hob to cool; Reset timer if needed. |
| Controls unresponsive | Control panel is wet; Child lock activated | Wipe control panel dry; Deactivate child lock. |
If the problem persists after attempting these solutions, please contact customer support.
9. Specifications
Technical specifications for the AMZCHEF CE-HD3219B3E Ceramic Hob.
| Feature | Specification |
|---|---|
| Model Number | CE-HD3219B3E |
| Brand | AMZCHEF |
| Product Dimensions (L x W x H) | 52 cm x 28.8 cm x 5.2 cm |
| Weight | 5.18 kg |
| Heating Elements | 2 |
| Power Source | Electric |
| Voltage | 220-240V AC |
| Wattage | 3200 Watts (Total) |
| Heating Zone 1 Power | 2000W / 1000W (Dual Zone) |
| Heating Zone 2 Power | 1200W |
| Power Levels | 9 |
| Timer Range | 0-99 minutes |
| Control Type | Touch Control |
| Installation Type | Built-in |
| Heating Surface Material | Vitroceramic Glass |
| Special Features | Child Safety Lock, Overheat Protection, Hot Surface Indicator |
| GTIN (UPC) | 701915427219 |
10. Warranty and Support
AMZCHEF is committed to providing quality products and customer service.
- Warranty Period: All AMZCHEF products come with a 2-year repair period from the date of purchase.
- Technical Support: Lifetime technical support is available for this product.
- Customer Service: For any inquiries, issues, or support needs, please contact AMZCHEF customer service. 24-hour premium service is provided.
Please retain your proof of purchase for warranty claims.