1. Important Safety Instructions
Read all instructions carefully before using the appliance and keep them for future reference. Failure to follow these instructions may result in electric shock, fire, or injury.
- Ensure the appliance is properly grounded.
- Do not operate the microwave oven when empty.
- Do not heat liquids or other foods in sealed containers as they are liable to explode.
- Do not use corrosive chemicals or vapors in this appliance.
- Always supervise children when they are near the appliance.
- Do not attempt to operate this oven if it is damaged, especially the door, door seals, or interior.
- Only use utensils suitable for microwave ovens. Metal containers are not suitable for microwave cooking.
- Clean the oven regularly and remove any food deposits.
- Do not immerse the power cord, plug, or the appliance in water or other liquids.
2. Product Overview
The Gorenje MO20A4BH is a 20-liter freestanding microwave oven equipped with a powerful 1200W output and an integrated grill function. It features a user-friendly control panel with a rotary dial and buttons for various cooking modes, including microwave, grill, and combination cooking. The interior is made of stainless steel for durability and easy cleaning, while the exterior boasts a sleek black glass finish.
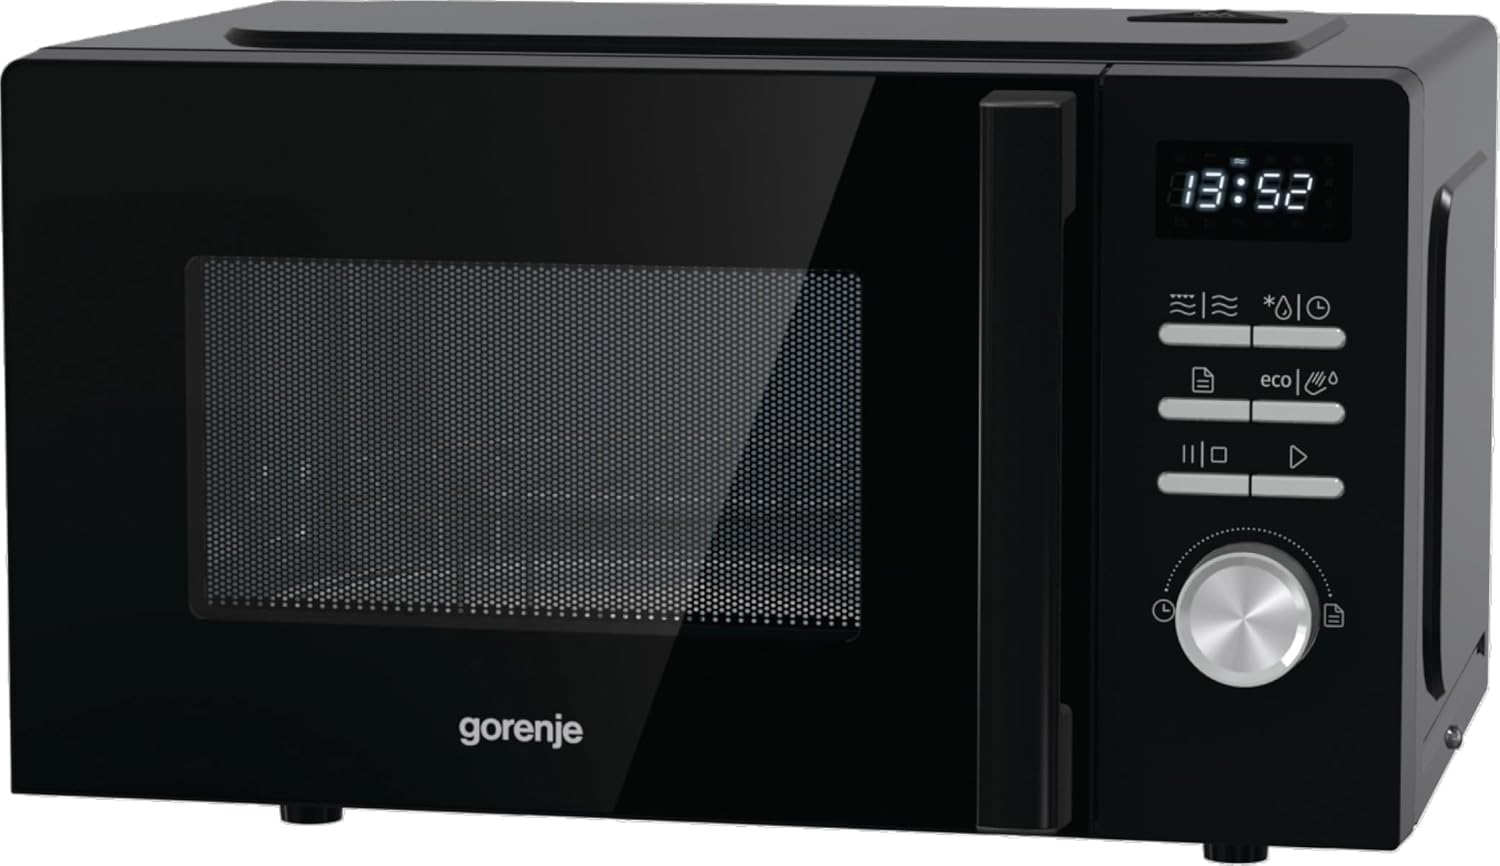
Figure 2.1: Front view of the Gorenje MO20A4BH microwave oven, showing the control panel, door, and display.

Figure 2.2: Side view of the Gorenje MO20A4BH microwave oven, highlighting its compact design.
3. Setup
3.1 Unpacking
- Carefully remove the microwave oven from its packaging.
- Remove all packaging materials, including any protective film or tape from the oven cavity and accessories.
- Check the oven for any damage, such as dents or a misaligned door. Do not operate if damaged.
3.2 Placement
- Place the oven on a flat, stable, heat-resistant surface that is strong enough to support its weight.
- Ensure adequate ventilation. Leave a minimum of 20 cm (8 inches) clearance above the oven, 10 cm (4 inches) at the rear, and 5 cm (2 inches) on each side. Do not block any ventilation openings.
- Keep the oven away from heat sources, strong magnetic fields, and areas with high humidity.
3.3 Turntable Installation
- Place the roller ring in the center of the oven cavity.
- Place the glass turntable on top of the roller ring, ensuring it sits securely.
3.4 Power Connection
- Plug the power cord into a properly grounded electrical outlet (230 Volts, 50 Hz).
- Do not use extension cords or adapters.
4. Operating Instructions
This section provides general guidance. Refer to the specific symbols on your appliance's control panel for precise functions.
4.1 Setting the Clock
- When the oven is first plugged in, the display will show '0:00'.
- Press the 'Clock' button (often represented by a clock icon).
- Rotate the control dial to set the hour. Press 'Confirm' or 'Start'.
- Rotate the control dial again to set the minutes. Press 'Confirm' or 'Start'.
4.2 Microwave Cooking
- Place food in a microwave-safe container on the glass turntable.
- Close the oven door securely.
- Press the 'Microwave' button (often represented by wavy lines).
- Rotate the control dial to select the desired power level (e.g., 100%, 80%, 50%).
- Rotate the control dial to set the cooking time.
- Press the 'Start' button to begin cooking.
4.3 Grill Function
- Place food on the grill rack (if provided) directly on the turntable.
- Close the oven door.
- Press the 'Grill' button (often represented by a zigzag line).
- Rotate the control dial to set the grilling time.
- Press the 'Start' button.
4.4 Combination Cooking
This mode combines microwave and grill functions for faster cooking and browning.
- Press the 'Combi' button (often represented by both wavy and zigzag lines).
- Select the desired combination mode (e.g., Combi 1, Combi 2) using the control dial.
- Set the cooking time using the control dial.
- Press 'Start'.
4.5 Defrost Function
The oven features an automatic defrost function.
- Press the 'Defrost' button (often represented by a snowflake icon).
- Select defrost by weight or time using the control dial.
- Enter the weight or time.
- Press 'Start'.
4.6 Timer Function
The timer can be used independently of cooking functions.
- Press the 'Timer' button.
- Rotate the control dial to set the desired time.
- Press 'Start'. The timer will count down and beep when finished.
4.7 Child Lock
To activate the child lock, press and hold the 'Stop/Cancel' button for approximately 3 seconds until a lock indicator appears on the display. To deactivate, repeat the process.
5. Maintenance and Cleaning
Regular cleaning and maintenance will ensure the longevity and optimal performance of your microwave oven.
5.1 General Cleaning
- Always unplug the oven before cleaning.
- Do not use abrasive cleaners, steel wool, or harsh chemicals.
5.2 Oven Interior
- Wipe the interior cavity immediately after use with a damp cloth to remove food splatters.
- For stubborn stains, place a bowl of water with lemon juice inside and microwave for 2-3 minutes. The steam will loosen the grime, making it easier to wipe clean.
- The stainless steel interior is designed for easy cleaning.
5.3 Oven Exterior
- Clean the exterior surface with a soft, damp cloth and mild detergent.
- Wipe the control panel gently with a dry cloth. Avoid excessive moisture.
5.4 Turntable and Roller Ring
- Remove the glass turntable and roller ring. Wash them in warm, soapy water or in a dishwasher.
- Dry thoroughly before placing them back in the oven.
5.5 Grill Element
- Allow the grill element to cool completely before cleaning.
- Wipe the grill element carefully with a damp cloth. Do not use abrasive materials.
6. Troubleshooting
If you encounter any issues, refer to the following common problems and solutions before contacting customer service.
| Problem | Possible Cause | Solution |
|---|---|---|
| Oven does not start | Door not closed properly Power plug not inserted Fuse blown or circuit breaker tripped | Close the door firmly Ensure plug is securely in outlet Check household fuse/circuit breaker |
| Food not heating | Incorrect power level or cooking time Improper dishware used | Adjust power level and time Use microwave-safe dishes |
| Turntable not rotating | Turntable or roller ring not positioned correctly Food too large or heavy | Re-position turntable and roller ring Use smaller dishes or reduce food quantity |
| Unusual noise during operation | Turntable or roller ring misalignment Foreign object in cavity | Check and adjust turntable/roller ring Inspect cavity for obstructions |
| Oven light not working | Bulb needs replacement | Contact qualified service personnel for bulb replacement |
7. Specifications
Technical data for the Gorenje MO20A4BH Microwave Oven.
| Feature | Specification |
|---|---|
| Brand | Gorenje |
| Model Number | MO20A4BH |
| Reference Number | 740291 |
| Capacity | 20 Litres |
| Power | 1200 Watts |
| Voltage | 230 Volts |
| Product Dimensions (L x W x H) | 35.3 x 45.5 x 26.1 cm |
| Weight | 10.3 Kilograms |
| Installation Type | Freestanding |
| Cooking Mode | Electric |
| Color | Black |
| Material (Exterior) | Glass |
| Interior Coating | Stainless Steel |
| Special Features | Self-cleaning, Timer, Turntable, Programmable, Shortcuts |
| Components Included | Grill |
| Defrost Function | Automatic Defrost |

Figure 7.1: Dimensions of the Gorenje MO20A4BH microwave oven (Length, Width, Height).
8. Warranty and Support
For warranty information, please refer to the documentation provided at the time of purchase. The warranty period and terms may vary by region and retailer.
For technical support, service, or spare parts, please contact your retailer or the official Gorenje customer service in your region. Ensure you have your model number (MO20A4BH) and serial number ready when contacting support.
Do not attempt to repair the appliance yourself. Unauthorized repairs can be dangerous and will void your warranty.


