Welcome to the HIDOES B3 Electric Dirt Bike user manual. This manual provides essential information for the safe and efficient operation, assembly, and maintenance of your new electric bike. Please read this manual thoroughly before your first ride to ensure proper usage and to maximize your riding experience.
The HIDOES B3 is a powerful 26-inch fat tire e-bike designed for adults, capable of speeds between 30-40mph and supporting riders up to 300+ lbs. It is built for heavy-duty off-road use, long-range commuting, and mountain biking, suitable for men, women, teens, and girls.
Figure 1: HIDOES B3 Electric Dirt Bike
2. Safety Guidelines
Your safety is paramount. Always wear a helmet and appropriate safety gear when riding. Adhere to local traffic laws and regulations. Be aware of your surroundings and ride defensively.
Pre-Ride Check: Before each ride, inspect tires, brakes, battery level, and all connections.
Weight Limit: Do not exceed the maximum recommended weight of 198.42 lbs (90 kg) to ensure safe operation and bike longevity.
Weather Conditions: Exercise caution when riding in wet or slippery conditions.
Battery Safety: Only use the provided charger. Do not attempt to modify the battery.
Children: This product is intended for adults. Keep out of reach of young children.
3. Key Components
The HIDOES B3 is engineered with high-quality components for performance and durability:
Motor: Equipped with a 1200W brushless DC motor, providing strong climbing ability and high-speed output.
Battery: Features a 48V/17.5Ah Lithium polymer battery, offering a riding range of 35-37 miles on a single charge (charging time 6-8 hours). The battery is removable and includes multiple protection features (overcurrent, under power, overcharge, high temperature, power-off).
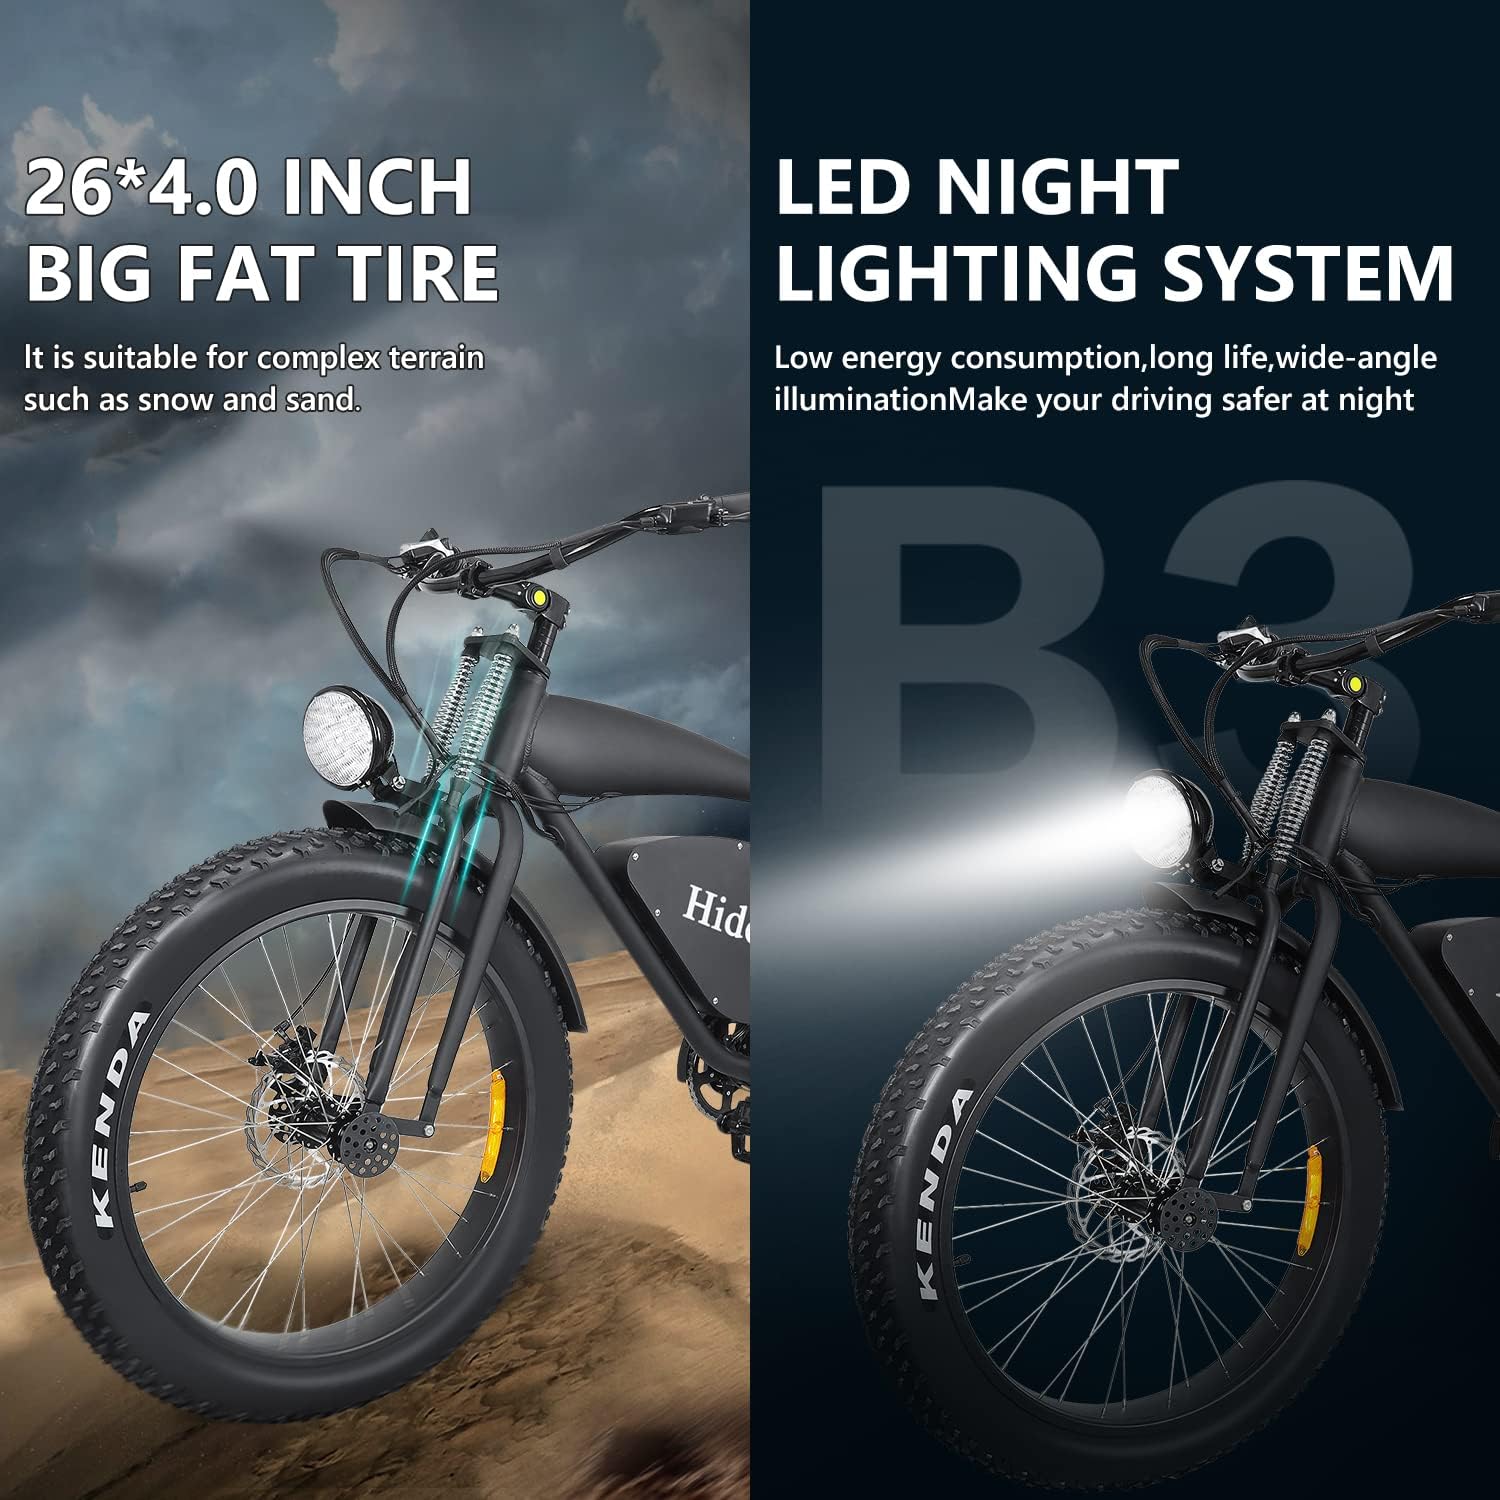
Tires: 26-inch off-road coarse fat tires with thickened steel pins for adaptability across various terrains including sand, mountains, dirt roads, snow, and grass.
Brakes: Combination of oil brakes and front and rear dual disc brakes for smooth, safe, and comfortable stopping power.
Lighting System: Integrated LED night lighting system with ultra-bright, wide-range long-distance illumination for improved visibility during night driving.
Display: LCD intelligent display instrumentation showing driving speed, power display, current gear, and total mileage.
Frame: Constructed from Aluminum Alloy for a strong and solid structure.
Figure 2: 1200W Brushless DC Motor
Figure 3: 48V/17.5Ah Lithium Polymer Battery with Protection Features
Figure 4: Oil Brake and Dual Disc Brakes System
Figure 5: 26-inch Fat Tires and Integrated LED Lighting
Figure 6: LCD Data Display Screen
4. Setup and Assembly
The HIDOES B3 electric bike requires some assembly upon arrival. Please follow these steps carefully. A tool kit and charger are included with your purchase.
4.1 Unboxing and Initial Inspection
Carefully remove the bike and all components from the packaging. Inspect for any damage during transit. Ensure all included components are present: user manual, tool kit, and charger.
4.2 Assembly Steps
Unpack Components: Remove all protective packaging and ties from the bike frame and wheels.
Install Front Wheel: Carefully align the front wheel with the fork and secure it using the quick-release mechanism or bolts as instructed. Ensure the disc brake rotor is correctly seated within the caliper.
Attach Handlebars: Mount the handlebars to the stem, ensuring they are centered and tightened securely. Connect any necessary cables (brakes, display, throttle) as per the instructions.
Install Pedals: Identify the left (L) and right (R) pedals. Thread them into the crank arms. Remember that the left pedal threads counter-clockwise. Tighten securely with a wrench.
Install Headlight: Attach the headlight to the designated mounting point on the front fork and connect its power cable.
Adjust Seat: Adjust the seat height to a comfortable and safe riding position.
Final Checks: Double-check all bolts, nuts, and quick releases for tightness. Ensure brakes are functioning correctly and tires are inflated to the recommended pressure.
4.3 Assembly Video Guide
For a visual guide on unboxing and assembly, please refer to the official video below:
Video 1: Hidoes B3 Electric Bike Unboxing and Assembly. This video demonstrates the step-by-step process of unboxing the bike, identifying components, and assembling the electric bike, including attaching the front wheel, handlebars, and pedals.
5. Operating Your HIDOES B3
The HIDOES B3 offers versatile riding options with its multiple modes and speed levels.
5.1 Riding Modes
Switch between three distinct riding modes to suit your needs:
Fitness Riding Mode: Intelligent power assist system is off. This mode relies solely on pedal power, similar to a traditional bicycle.
Leisure Boost Mode: Provides about 0-50% power output, offering assistance while still requiring pedaling effort.
Commuter Pure Electric Mode: Provides about 0-99% power output, allowing for throttle-only operation without pedaling.
Figure 7: Three Riding Modes of the HIDOES B3
5.2 Speed Levels
The bike features 7 gear speeds, adjustable via the switcher mounted on the right handlebar. This multi-gear adjustment allows for fine-tuning your ride for various terrains and desired speeds.
5.3 LCD Display Operation
The LCD intelligent display provides real-time information about your ride. Familiarize yourself with its functions to monitor your speed, battery level, current gear, and total mileage.
5.4 Riding Demonstrations
Observe the HIDOES B3 in action across different environments:
Video 2: This E-Bike Will Change How You Commute Forever! This short video highlights the HIDOES B3's suitability for commuting and general riding, showcasing its ease of use and versatility.
Video 3: Electric Bike HD-B3 in Action. This video demonstrates the HIDOES B3 electric bike navigating various terrains, emphasizing its off-road capabilities and robust design.
6. Maintenance
Regular maintenance ensures the longevity and safe operation of your HIDOES B3 electric bike.
Tire Pressure: Check tire pressure regularly and inflate to the recommended PSI (usually found on the tire sidewall).
Brake Inspection: Periodically check brake pads for wear and ensure brake levers provide firm and responsive stopping power. Adjust or replace as needed.
Chain Lubrication: Keep the chain clean and lubricated to ensure smooth gear changes and prevent rust.
Battery Care: Store the battery in a cool, dry place. Charge it regularly, even if not in use, to maintain its health. Avoid fully discharging the battery.
General Cleaning: Clean the bike regularly with a damp cloth. Avoid high-pressure washing directly on electrical components.
Fastener Check: Periodically check all bolts, nuts, and fasteners for tightness.
7. Troubleshooting
Here are some common issues and their potential solutions:
Problem
Possible Cause
Solution
Bike not powering on
Battery not charged, battery not properly seated, power cable loose.
Charge battery, ensure battery is fully inserted, check all electrical connections.
Motor not assisting
Incorrect riding mode, low battery, loose motor cable.
Switch to Leisure Boost or Pure Electric mode, charge battery, check motor cable connection.
Brakes feel weak
Worn brake pads, loose brake cable, air in hydraulic system (oil brakes).
Inspect/replace brake pads, adjust brake cable tension, consult a professional for hydraulic brake bleeding.
Unusual noises during ride
Loose components, dry chain, worn bearings.
Check all fasteners, lubricate chain, inspect bearings (professional service recommended).
8. Specifications
Feature
Detail
Model Name
HD-B3
Bike Type
Electric Bike
Age Range
Adult
Brand
AONIU
Number of Speeds
7
Color
Black
Wheel Size
26 Inches
Frame Material
Aluminum, Alloy Steel
Suspension Type
Rear, Front
Special Feature
Lightweight
Included Components
User manual x1, tool kit x1, charger x1
Size
Large
Brake Style
Disc
Specific Uses For Product
All Terrains
Item Weight
61.73 Pounds (27.99 kg)
Power Source
Electric Motor
Wattage
1200 watts
Lithium Battery Energy Content
840 Watt Hours
Maximum Weight Recommendation
198.42 Pounds (90 kg)
Assembly Required
Yes
UPC
767461123319
Figure 8: HIDOES B3 Electric Bike Dimensions (Note: Manual measurements may have slight errors)
9. Warranty and Support
For any questions, technical support, or warranty claims, please contact the seller or manufacturer directly. Refer to your purchase documentation for specific warranty terms and contact information.
You can also find additional information and support on the AONIU Store page: AONIU Store