1. Introduction
Thank you for choosing the Linsar 20L Dehumidifier. This manual provides essential information for the safe and efficient operation of your appliance. Please read it thoroughly before use and retain it for future reference.
1.1 Safety Information
- Always connect the dehumidifier to a grounded power outlet.
- Do not operate the unit with a damaged power cord or plug.
- Ensure the unit is placed on a stable, level surface to prevent water spillage.
- Keep the air inlet and outlet clear of obstructions.
- Do not insert objects into the unit's openings.
- Unplug the unit before cleaning or performing any maintenance.
- This appliance is not intended for use by persons with reduced physical, sensory or mental capabilities, or lack of experience and knowledge, unless they have been given supervision or instruction concerning use of the appliance by a person responsible for their safety.
2. Product Overview
The Linsar 20L Dehumidifier is designed to reduce humidity in rooms up to 20 m² (50 m³), extracting up to 20 liters of moisture per day. It features a 6-liter water tank, a touch control panel, and multiple operating modes.
2.1 Components


2.2 Key Features
- High Performance: Extracts up to 20 liters of moisture per day.
- Large Coverage: Suitable for rooms up to 20 m² (50 m³).
- Adjustable Humidity: Set desired humidity levels between 30% and 90%.
- Multiple Modes: Dehumidify, Fan, and Laundry Drying functions.
- User-Friendly Control: Intuitive LED touch screen with 24-hour timer.
- Large Water Tank: 6-liter capacity with water level indicator and full tank alert.
- Continuous Drainage: Option for direct drainage with included hose (approx. 50 cm).
- Memory Function: Retains settings after power interruption.
3. Setup
3.1 Unpacking
- Carefully remove the dehumidifier from its packaging.
- Remove all packing materials, including any tape or protective films.
- Inspect the unit for any signs of damage. If damaged, do not operate and contact customer support.
3.2 Placement
- Place the dehumidifier on a firm, level surface.
- Ensure there is at least 20 cm (8 inches) of clear space around the air inlet and outlet for proper airflow.
- Avoid placing the unit near heat sources, direct sunlight, or in areas exposed to splashing water.
- For optimal performance, close doors and windows in the room where the dehumidifier is operating.
3.3 Power Connection
Plug the power cord into a suitable grounded electrical outlet (230V AC).
4. Operating Instructions
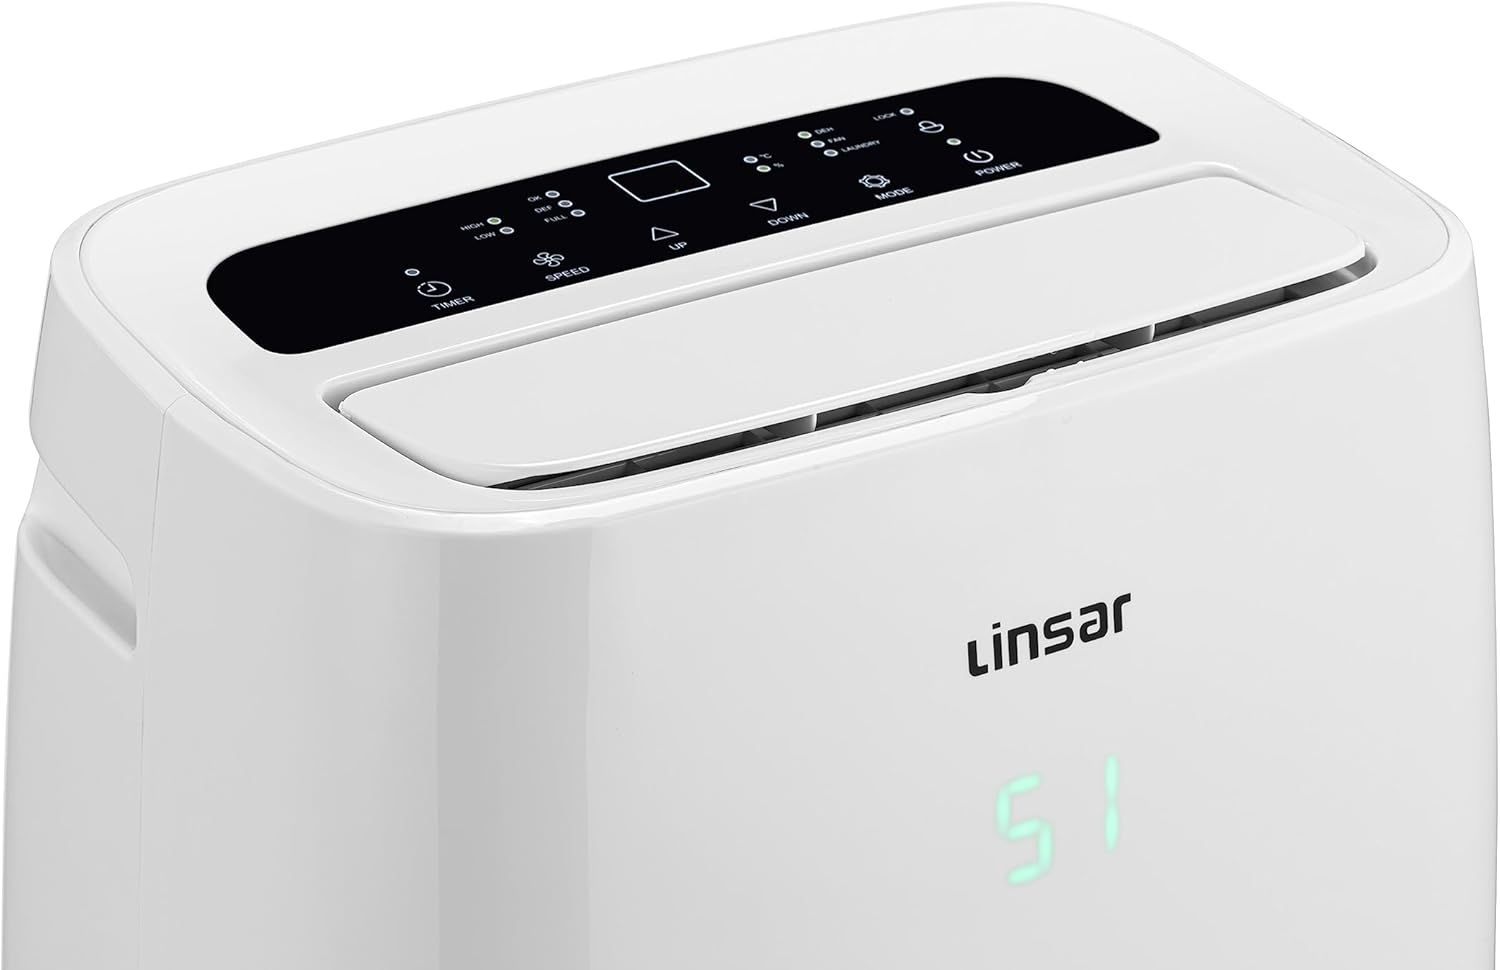
4.1 Control Panel Overview
The control panel features touch-sensitive buttons and an LED display to manage the dehumidifier's functions.
- POWER Button: Turns the unit ON or OFF.
- MODE Button: Cycles through operating modes (Dehumidify, Fan, Laundry).
- UP/DOWN Buttons: Adjust desired humidity level or timer settings.
- SPEED Button: Selects fan speed (High/Low).
- TIMER Button: Sets the auto-on or auto-off timer (1-24 hours).
- LOCK Indicator: Indicates if child lock is active (press UP and DOWN simultaneously for 3 seconds to activate/deactivate).
- DEF Indicator: Illuminates when the unit is defrosting.
- FULL Indicator: Illuminates when the water tank is full and needs emptying.
4.2 Dehumidification Mode
- Press the POWER button to turn on the unit.
- Press the MODE button until the "DEH" indicator lights up.
- Use the UP and DOWN buttons to set your desired humidity level (30% to 90%). The unit will operate until the set humidity is reached, then cycle on and off to maintain it.
- Press the SPEED button to select High or Low fan speed.
4.3 Fan Mode
In Fan Mode, the unit circulates air without dehumidifying.
- Press the POWER button to turn on the unit.
- Press the MODE button until the "FAN" indicator lights up.
- Press the SPEED button to select High or Low fan speed.
4.4 Laundry Drying Mode
This mode is designed to help dry clothes faster by continuously operating at a high fan speed and maximum dehumidification.
- Press the POWER button to turn on the unit.
- Press the MODE button until the "LAUNDRY" indicator lights up.
- The unit will operate continuously at high fan speed. Humidity settings are not adjustable in this mode.
4.5 Timer Function
The timer can be set for auto-on or auto-off within a 1-24 hour period.
- Auto-Off: While the unit is running, press the TIMER button. Use UP/DOWN to set the desired number of hours before the unit turns off.
- Auto-On: While the unit is off, press the TIMER button. Use UP/DOWN to set the desired number of hours before the unit turns on.
4.6 Continuous Drainage
For continuous operation without needing to empty the water tank, connect the included drain hose.

- Locate the continuous drain port on the side of the unit (refer to Image 6).
- Insert one end of the provided drain hose (approx. 50 cm long) firmly into the drain port.
- Ensure the other end of the hose is placed in a drain or a larger container, positioned lower than the drain port to allow gravity drainage.
- When using continuous drainage, the internal water tank will not fill, and the "FULL" indicator will not activate.
5. Maintenance
5.1 Emptying the Water Tank
When the water tank is full, the "FULL" indicator will light up, and the unit will stop operating. Empty the tank as follows:

- Gently pull out the water tank from the front of the unit (refer to Image 7).
- Carefully carry the tank to a sink or drain.
- Pour out the collected water.
- Slide the empty tank back into the unit until it clicks into place. The unit will resume operation.
5.2 Cleaning the Air Filter
A clean air filter ensures efficient operation. Clean the filter every two weeks or more frequently if used in dusty environments.
- Turn off and unplug the dehumidifier.
- Remove the filter cover from the rear of the unit (refer to Image 2).
- Gently pull out the air filter.
- Wash the filter with warm, soapy water. Rinse thoroughly and allow it to air dry completely before reinserting.
- Reinsert the dry filter and replace the filter cover.
5.3 Cleaning the Unit Exterior
- Wipe the exterior with a soft, damp cloth.
- Do not use abrasive cleaners or solvents, as these may damage the surface.
5.4 Storage
If storing the unit for an extended period:
- Empty the water tank and ensure it is clean and dry.
- Clean the air filter.
- Wrap the power cord neatly.
- Store the unit upright in a cool, dry place, away from direct sunlight and extreme temperatures.
6. Troubleshooting
| Problem | Possible Cause | Solution |
|---|---|---|
| Unit does not turn on. | No power supply. Power cord not properly connected. | Check power outlet. Ensure power cord is securely plugged in. |
| Unit is running but not collecting water. | Room humidity is already low. Air filter is clogged. Temperature is too low (below 5°C). | This is normal if humidity is below set level. Clean the air filter. Dehumidifiers are less effective in cold temperatures. |
| "FULL" indicator is on, but tank is not full. | Water tank not properly seated. Float switch malfunction. | Remove and reinsert the water tank firmly. Contact customer support. |
| Unit is noisy. | Unit not on a level surface. Air filter clogged. | Place on a flat, stable surface. Clean the air filter. |
| "DEF" indicator is on. | Unit is in defrost mode. | This is normal. The unit will automatically resume dehumidifying after defrosting. |
7. Specifications
| Feature | Specification |
|---|---|
| Brand | Linsar |
| Model | 20L Dehumidifier |
| Dehumidification Capacity | 20 Liters/day |
| Recommended Room Size | Up to 20 m² / 50 m³ |
| Water Tank Volume | 6 Liters |
| Power Consumption | 300 Watts |
| Voltage | 230 Volts (AC) |
| Noise Level | 30 Decibels |
| Dimensions (L x W x H) | 26 x 38 x 60 cm |
| Weight | 14 Kilograms |
| Material | Plastic |
| Special Features | Removable tank, 3 operating modes, 24h timer, memory function, continuous drain option. |
8. Warranty and Support
Information regarding warranty coverage and customer support is typically provided with your purchase documentation. Please refer to the warranty card or contact the retailer for details.
For technical assistance or inquiries, please contact Linsar customer support through their official website or the contact information provided with your product.