Introduction
This manual provides essential information for the safe and efficient operation of your DIGIQUEST COMODO 12000BTU Portable Air Conditioner. Please read it thoroughly before installation and use, and retain it for future reference.
The DIGIQUEST COMODO 12000BTU is a versatile 4-in-1 portable air conditioner offering cooling, heating, fan, and dehumidification functions. It is designed for residential use and suitable for rooms up to 26 m².
Safety Instructions
- Always ensure the unit is placed on a stable, level surface.
- Do not block air inlets or outlets. Maintain a minimum distance of 30 cm from walls or other objects.
- Ensure the power supply matches the unit's requirements (240 Volts).
- Do not operate the unit with a damaged power cord or plug.
- Keep children and pets away from the unit during operation.
- Do not insert objects into the air vents.
- Unplug the unit before cleaning or maintenance.
- This appliance uses R290 (Propane) refrigerant, which is flammable. Handle with care and ensure proper ventilation.
Product Overview
The DIGIQUEST COMODO 12000BTU is a compact and portable unit designed for ease of use and mobility.
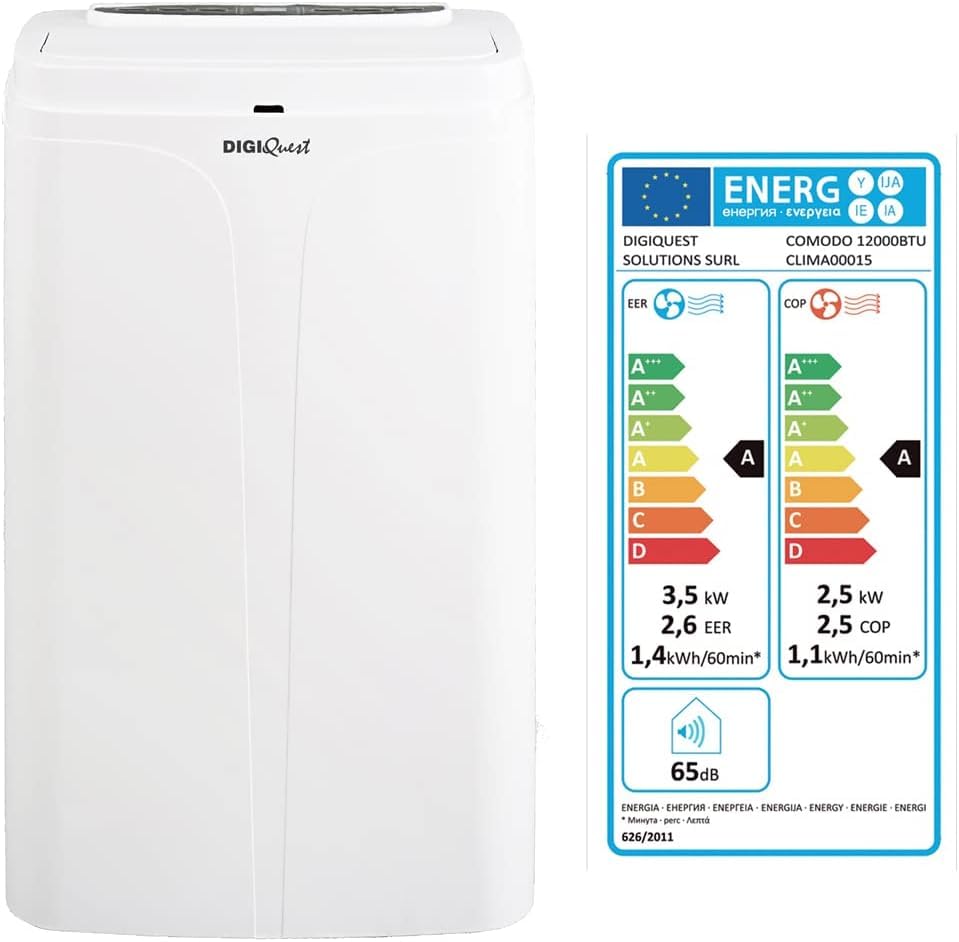
Figure 1: Front view of the DIGIQUEST COMODO portable air conditioner.

Figure 2: Rear view of the unit, highlighting the exhaust and drainage ports.
Key Features:
- 4-in-1 Functionality: Cooling, Heating, Fan, and Dehumidifier.
- Cooling Capacity: 12000 BTU (3.5 kW).
- Heating Capacity: 8500 BTU (2.5 kW).
- Dehumidification Capacity: Up to 56 liters per day.
- Fan Speeds: 3 levels, airflow up to 400 m³/h.
- Portability: Equipped with 360° swivel wheels for easy movement.
- Control: LED display and remote control.
- Timer: 24-hour programmable timer.
- Night Mode: For quiet and energy-efficient operation.
- Filter: Washable anti-dust filter.
Setup and Installation
Unpacking:
Carefully remove the air conditioner and all accessories from the packaging. Check for any damage during transit. Retain the packaging for future storage or transport.
Placement:
Place the unit on a firm, level surface. Ensure there is at least 30 cm of clear space around the unit to allow for proper airflow. Do not place near heat sources or in direct sunlight.
Window Kit Installation:
The included window kit is essential for exhausting hot air (during cooling) or cold air (during heating) outside.

Figure 3: Window sliding kit components.
- Attach the exhaust connector to one end of the 1.5m expandable hose.
- Attach the window air intake adapter to the other end of the expandable hose.
- Insert the exhaust connector into the exhaust outlet on the rear of the air conditioner.
- Adjust the window sliding kit to fit your window opening. Secure it to prevent air leakage.
- Insert the window air intake adapter into the opening of the window sliding kit.
- Ensure the hose is extended as straight as possible to minimize airflow resistance.
Power Connection:
Plug the power cord into a grounded 240V electrical outlet. Do not use extension cords or adapters.
Operating Instructions
Control Panel:

Figure 4: Top control panel.
The control panel features an LED display and several buttons:
- POWER: Turns the unit on or off.
- MODE: Selects operating mode (Cool, Heat, Fan, Dehumidify).
- UP/DOWN Arrows: Adjusts temperature settings or timer duration.
- FAN: Selects fan speed (Low, Medium, High).
- TIMER: Sets the auto-on or auto-off timer (up to 24 hours).
Remote Control:
The unit can also be operated using the included remote control. Ensure batteries are correctly inserted. The remote control duplicates the functions of the main control panel.
Operating Modes:
- Cooling Mode: Select 'Cool' mode. Use UP/DOWN arrows to set desired temperature (typically 16°C - 30°C). Adjust fan speed as needed.
- Heating Mode: Select 'Heat' mode. Use UP/DOWN arrows to set desired temperature. Adjust fan speed as needed.
- Fan Mode: Select 'Fan' mode. The unit will circulate air without cooling or heating. Choose desired fan speed.
- Dehumidification Mode: Select 'Dehumidify' mode. The unit will remove moisture from the air. The fan speed is typically fixed in this mode. The 'Full Tank' indicator will illuminate when the water tank needs emptying.
Night Mode:
Activate Night Mode for quieter operation and reduced energy consumption, ideal for sleeping. In this mode, the fan speed is automatically set to low, and the temperature may adjust gradually.
Timer Function:
Press the TIMER button to set a specific time for the unit to automatically turn on or off. Use the UP/DOWN arrows to adjust the time in hourly increments up to 24 hours.
Maintenance
Regular maintenance ensures optimal performance and extends the lifespan of your air conditioner.
Cleaning the Air Filter:
The unit is equipped with a washable anti-dust filter. A dirty filter can reduce efficiency and airflow.
- Unplug the air conditioner from the power outlet.
- Locate and remove the air filter (refer to the diagram in the product overview for filter location).
- Wash the filter gently with lukewarm water and a mild detergent.
- Rinse thoroughly and allow it to air dry completely before reinstalling. Do not expose to direct sunlight.
- Reinstall the dry filter and plug the unit back in.
It is recommended to clean the filter every two weeks, or more frequently depending on usage and air quality.
Draining Water:
During dehumidification or cooling, water condensation collects inside the unit. When the internal tank is full, the 'Full Tank' indicator will light up, and the unit may stop operating.

Figure 5: Drainage hose.
- Unplug the unit.
- Place a shallow pan or container under the drainage port at the rear of the unit.
- Remove the drainage plug/cap.
- Allow all water to drain completely.
- Replace the drainage plug/cap securely.
- Plug the unit back in.
Storage:
If storing the unit for an extended period:
- Drain all water from the unit.
- Clean the air filter.
- Unplug the power cord and coil it neatly.
- Store the unit in a dry, cool place, preferably in its original packaging.
Troubleshooting
Before contacting customer support, please refer to the following common issues and solutions:
| Problem | Possible Cause | Solution |
|---|---|---|
| Unit does not turn on. | No power supply. Power cord not plugged in. Full water tank. | Check power outlet. Ensure power cord is securely plugged in. Drain the water tank. |
| Unit is not cooling/heating effectively. | Air filter is dirty. Window kit not properly installed. Room size too large. Doors/windows open. Temperature setting too high/low. | Clean the air filter. Ensure window kit is sealed. Verify room size is within 26 m². Close all doors and windows. Adjust temperature setting. |
| Unit is noisy. | Unit not on a level surface. Fan speed too high. | Place unit on a flat, stable surface. Reduce fan speed. (Note: 65dB is the specified noise level). |
| Water leakage. | Drainage plug not secure. Unit tilted. | Ensure drainage plug is tightly closed. Place unit on a level surface. |
| 'Full Tank' indicator is on. | Water tank is full. | Drain the water tank. |
Specifications

Figure 6: Product dimensions.
| Feature | Specification |
|---|---|
| Model Number | CLIMA00015 |
| Dimensions (L x W x H) | 42 x 36 x 72 cm |
| Weight | 3 kg |
| Cooling Capacity | 12000 BTU (3.5 kW) |
| Heating Capacity | 8500 BTU (2.5 kW) |
| Dehumidification Capacity | 56 Liters/day |
| Airflow Volume | 400 m³/h |
| Voltage | 240 Volts |
| Noise Level | 65 Decibels |
| Refrigerant | R290 (Propane) |
| Filter Type | Washable Anti-dust Filter |
| Energy Efficiency Class | A |
| SEER | 1 |
| Control Method | Remote Control, Control Panel |
| Number of Power Levels (Fan) | 3 |
| Application | Residential |
| Country of Origin | Italy |
Warranty and Support
Warranty Information:
This DIGIQUEST product comes with a limited warranty. Please refer to your purchase documentation or contact your retailer for specific terms and conditions regarding the warranty period and coverage.
Customer Support:
For technical assistance, troubleshooting beyond this manual, or warranty claims, please contact the retailer where you purchased the product or visit the official DIGIQUEST website for support contact information.