1. Introduction
Thank you for choosing the ELEGANT 1000 x 800mm Sliding Shower Door with Shower Tray and Waste. This manual provides essential information for the safe installation, operation, and maintenance of your new shower enclosure. Please read these instructions carefully before beginning installation and keep them for future reference.
2. Safety Information
- Always handle glass panels with extreme care. Tempered glass, while strong, can shatter if struck on the edges or corners.
- Wear appropriate personal protective equipment (PPE) including safety glasses, gloves, and sturdy footwear during installation.
- Ensure the installation area is clear and well-lit.
- If you are unsure about any part of the installation process, consult a qualified professional.
- Do not use abrasive cleaners or tools on glass or metal surfaces, as this can damage the finish.
- Ensure all fixings are securely tightened before using the shower enclosure.
3. Product Features
The ELEGANT Sliding Shower Door is designed with quality and user convenience in mind. Key features include:
- 8mm Easy Clean Safety Tempered Glass: BS EN 12150 and CE certified, designed to resist water marks and stains, simplifying cleaning.
- Quick Release Bottom Rollers: Allows for easy removal and cleaning of the door.
- High Quality Metal Rollers: Ensures smooth and quiet sliding operation.
- Stylish Chrome Plated Zinc Alloy Handle: Durable and aesthetically pleasing.
- Universal Fitting Design: Can be installed for left or right-hand opening.
- Waterproof Guaranteed: Passed multiple water proof tests.
- Concealed Fittings: Provides a clean, clear look with top cover caps.
- Cushioned Magnetic Seal: Prevents water leakage.
- Corrosion Resistant Polished Aluminium Frame: Creates a stable and safe structure.
- Stainless Steel Screws: Rust resistant and long-lasting.
- Endurance Tested Components: All hinges, rollers, and moving parts are fully tested for durability.
4. Kit Contents
Please verify that all components are present and undamaged before beginning installation.
- 1000x1900mm Sliding Glass Door Panel
- 1000x800x40mm Stone Shower Tray
- 90mm Shower Waste
- Aluminium Frame Profiles
- Roller Assemblies (Top and Bottom)
- Door Handle
- Magnetic Seals
- All necessary fixings and screws
- Installation Instruction Manual (this document)

Figure 4.1: Included 1000x800x40mm Stone Shower Tray and 90mm Shower Waste.
5. Setup and Installation
Installation of the ELEGANT shower enclosure requires careful attention to detail. It is recommended that two people perform the installation. Ensure you have all necessary tools before starting.
5.1 Tools Required (Not Included)
- Drill
- Spirit Level
- Measuring Tape
- Pencil
- Silicone Sealant Gun
- Screwdrivers (Phillips and Flathead)
- Safety Glasses and Gloves
5.2 Pre-Installation Checks
- Ensure the shower area walls are plumb and the floor is level.
- Confirm the dimensions of your installation space match the enclosure (1000mm x 800mm). Note the 20mm wall adjustment for both sides.
- Unpack all components and inspect for any damage. Report any issues immediately.
5.3 Installation Steps (General Guide)
- Shower Tray Installation: Position the shower tray (1000x800x40mm) in the desired location, ensuring it is level and properly connected to the 90mm waste drainage system. Apply silicone sealant around the base of the tray where it meets the floor and walls to ensure a watertight seal.
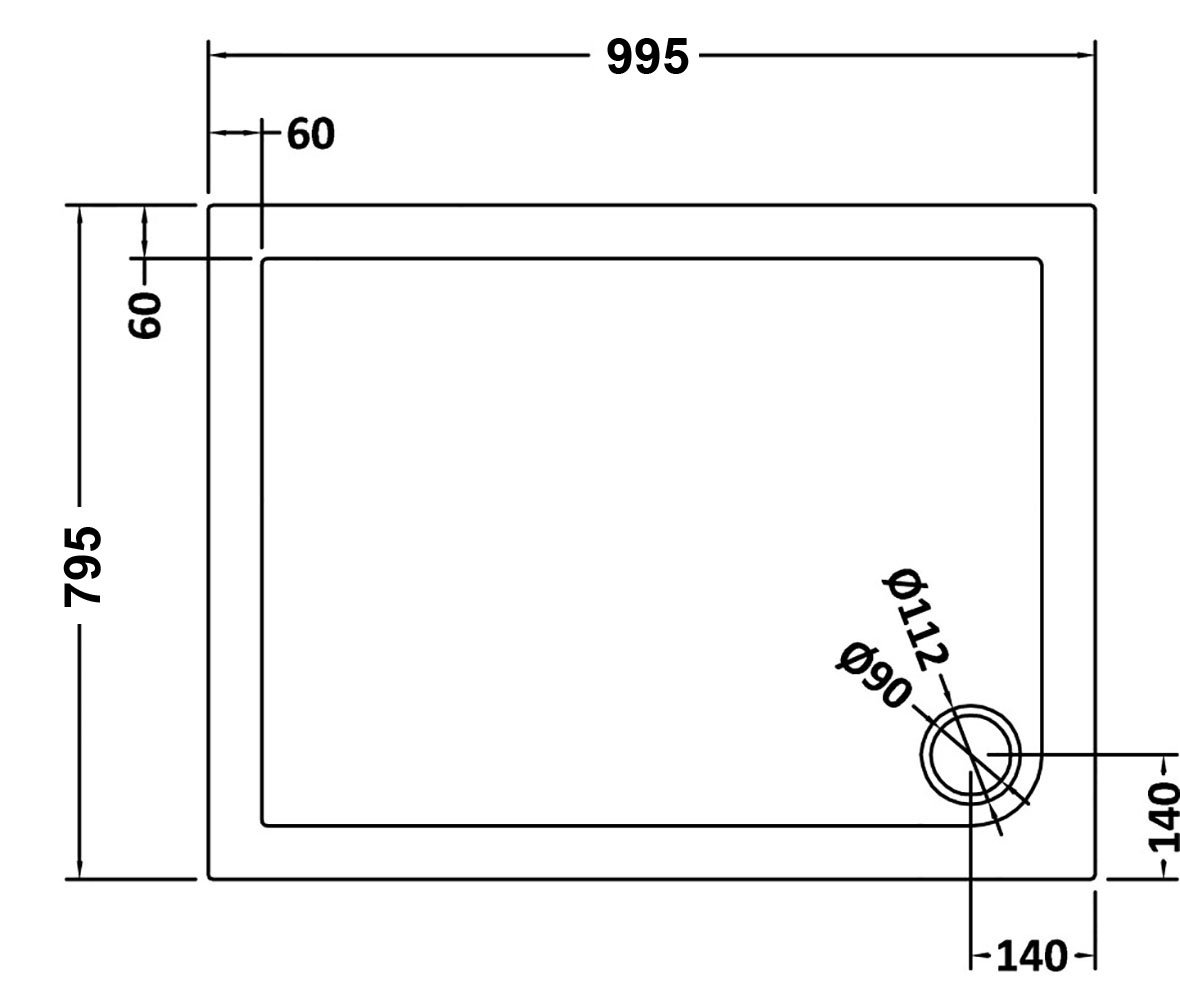
Figure 5.1: Dimensions of the 1000x800mm shower tray.
- Wall Profile Installation: Mark the position of the wall profiles on the walls, ensuring they are plumb using a spirit level. Drill pilot holes and secure the wall profiles using the provided fixings. Remember the 20mm wall adjustment for fine-tuning.
- Fixed Panel Installation: Insert the fixed glass panel into the wall profile and secure it according to the detailed instructions provided with the product.
- Sliding Door Assembly: Attach the top and bottom roller assemblies to the sliding door panel. Ensure the quick release bottom rollers are correctly installed for future maintenance.
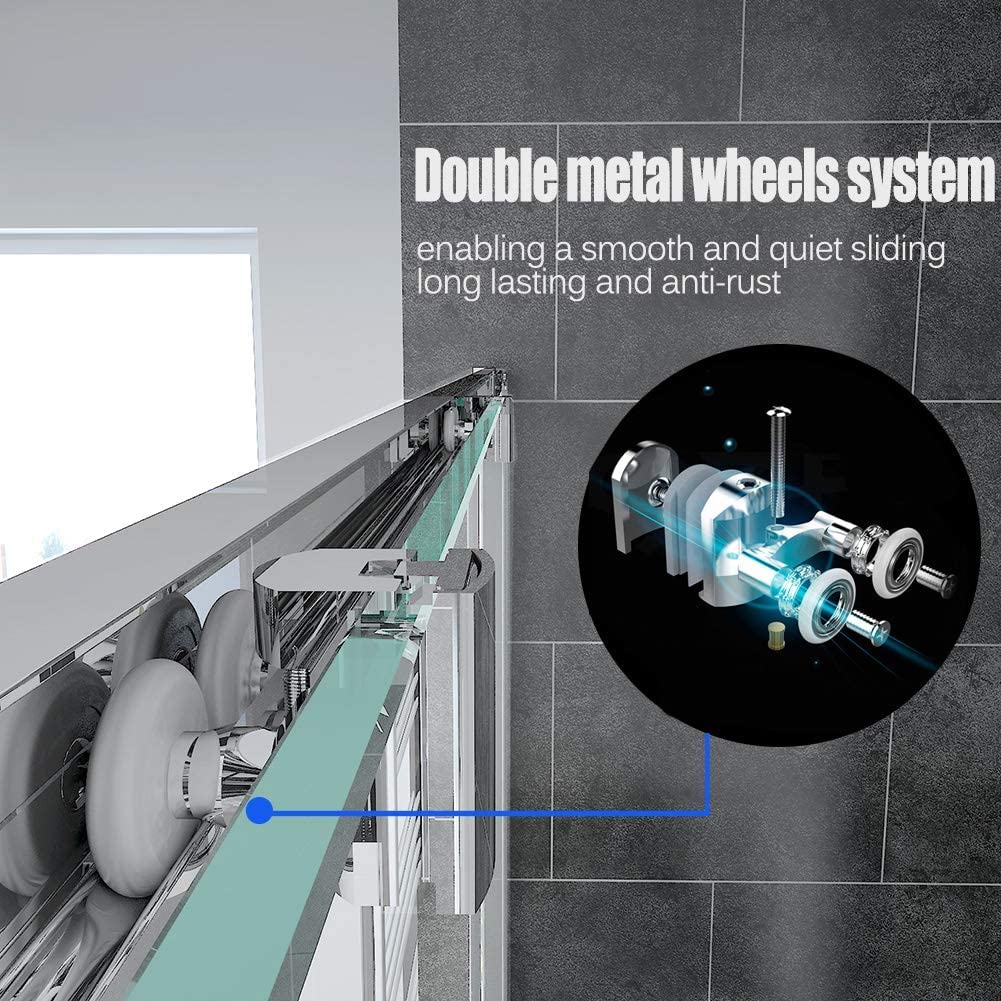
Figure 5.2: Illustration of the double metal wheels system ensuring smooth and quiet sliding.
- Door Panel Installation: Carefully lift and place the sliding door panel onto the top rail, then engage the bottom rollers into the bottom track. Test the sliding action to ensure it is smooth.
- Handle Installation: Attach the stylish chrome plated zinc alloy handle to the sliding door panel.

Figure 5.3: Detail of the chrome plated zinc alloy handle.
- Magnetic Seal and Gasket Installation: Install the cushioned magnetic seals and other gaskets along the edges of the door and fixed panel to ensure a watertight closure.
- Final Sealing: Apply a continuous bead of high-quality silicone sealant to all external joints where the frame meets the walls and the shower tray. Allow the sealant to cure completely (typically 24 hours) before using the shower.
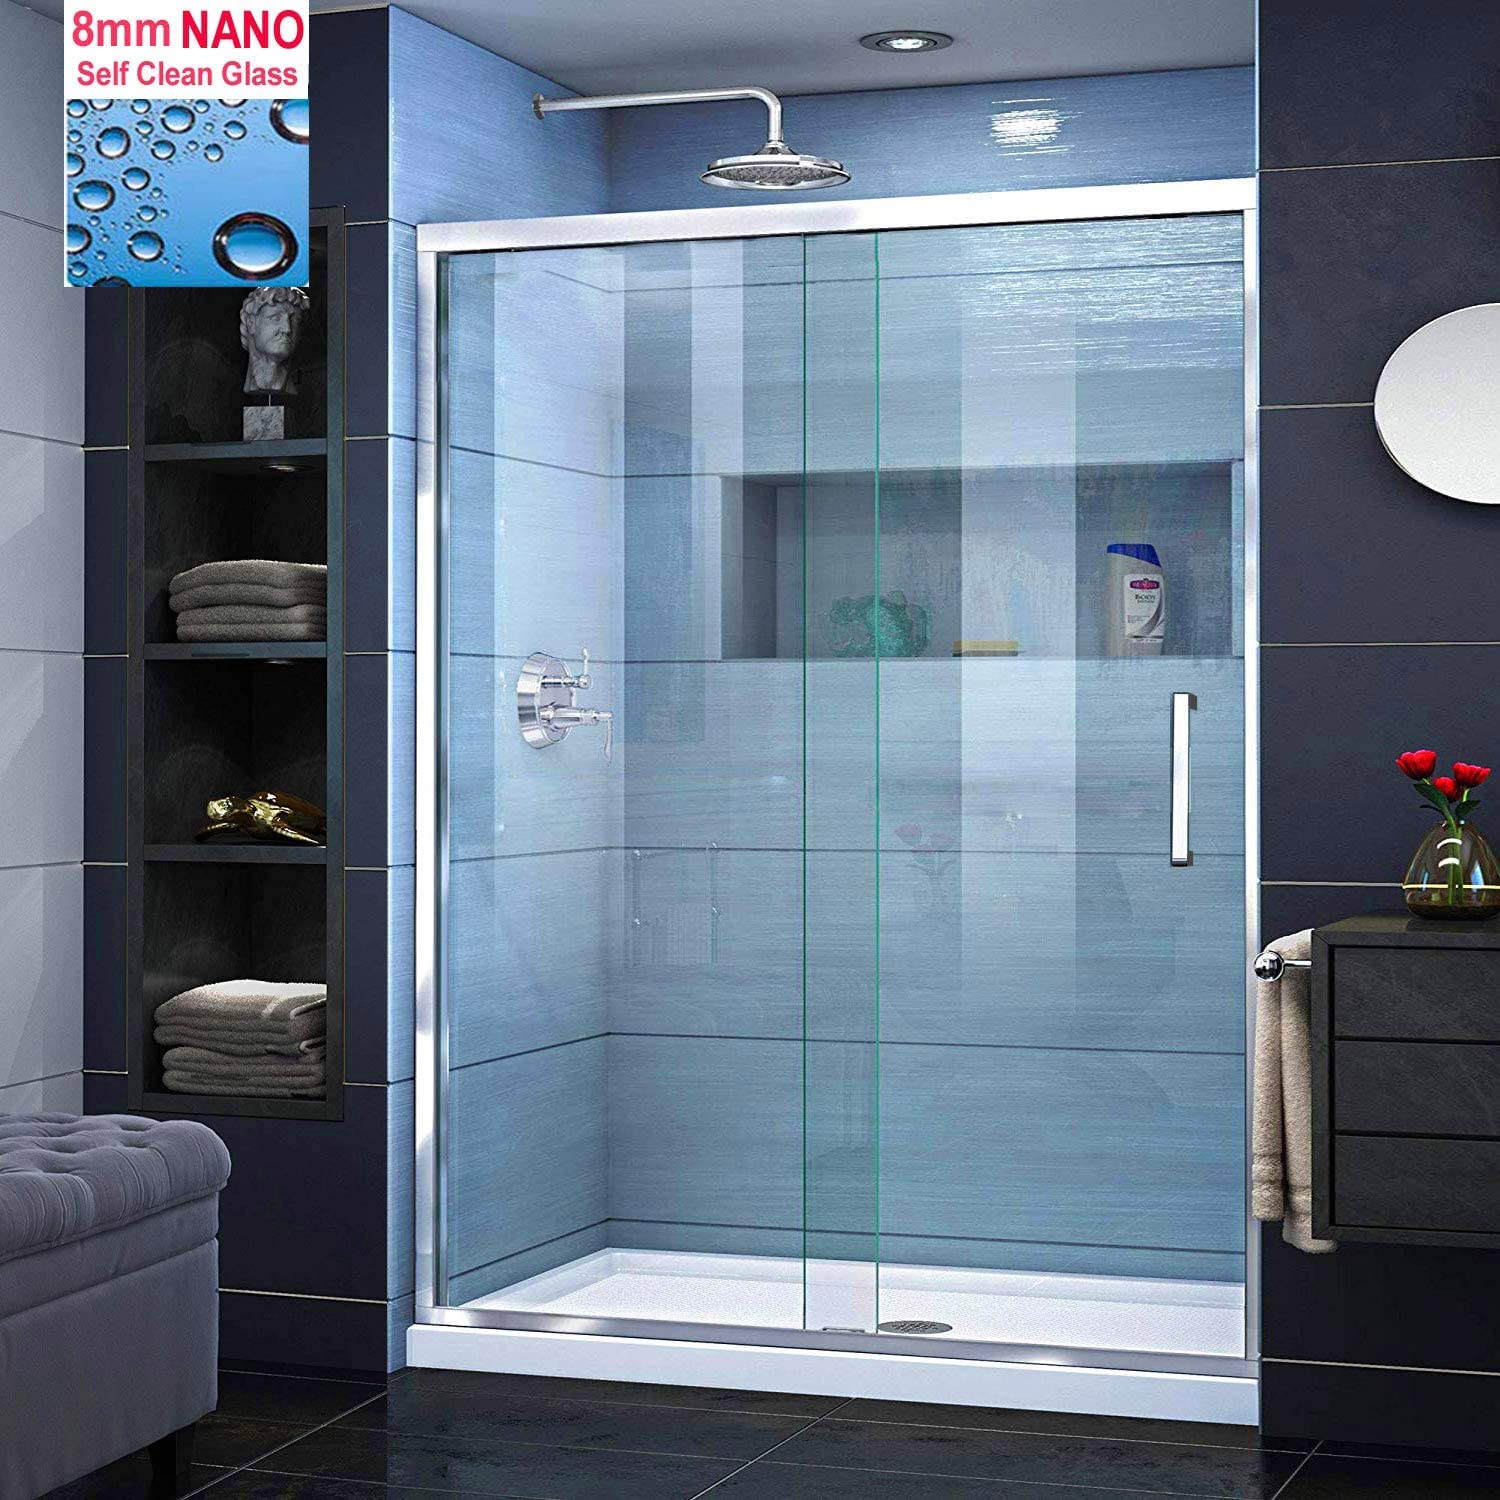
Figure 5.4: The ELEGANT Sliding Shower Door and Tray fully installed.

Figure 5.5: Dimensions of the 1000mm sliding shower door.
6. Operating Instructions
The ELEGANT Sliding Shower Door is designed for smooth and effortless operation.
- To open the door, gently pull the handle towards you and slide the door along its track.
- To close the door, slide it back until the magnetic seals engage, ensuring a secure and watertight closure.
- Avoid forcing the door if it encounters resistance. Check for any obstructions in the track.
7. Maintenance and Cleaning
Regular cleaning and maintenance will ensure the longevity and pristine appearance of your shower enclosure.
7.1 Glass Cleaning
- The 8mm easy clean glass coating significantly reduces water marks and soap scum build-up.
- For daily cleaning, simply wipe down the glass with a soft cloth or squeegee after each use.
- For deeper cleaning, use a mild, non-abrasive glass cleaner and a soft cloth. Rinse thoroughly with water.
- DO NOT use abrasive cleaners, scouring pads, or harsh chemicals (e.g., bleach, acid-based cleaners) as these can damage the easy clean coating and glass surface.

Figure 7.1: The 8mm NANO Self Clean Glass coating repels water and grime more effectively than normal glass.
7.2 Roller and Track Cleaning
- The quick release bottom rollers allow for easy access to the bottom track for cleaning. Gently disengage the rollers as per the product's specific mechanism (refer to detailed installation guide if needed).
- Clean the rollers and tracks regularly to prevent the build-up of soap scum and debris, which can impede smooth operation. Use a soft brush or cloth and mild soapy water.
- Ensure rollers are re-engaged correctly after cleaning.

Figure 7.2: Demonstrating the quick release bottom rollers for easy cleaning access.
7.3 Frame and Handle Cleaning
- Wipe down the polished aluminium frame and chrome plated handle with a soft, damp cloth.
- Dry thoroughly to prevent water spots.
- Avoid abrasive cleaners or harsh chemicals that can damage the finish.
8. Troubleshooting
This section addresses common issues you might encounter with your shower enclosure.
| Problem | Possible Cause | Solution |
|---|---|---|
| Door does not slide smoothly. |
|
|
| Water leakage from enclosure. |
|
|
| Door does not close completely. |
|
|
9. Specifications
| Brand | ELEGANT |
| Model Number | SLR10A+SLR10B+SRT1080+W90 |
| Door Dimensions | 1000mm (width) x 1900mm (height) |
| Shower Tray Dimensions | 1000mm (length) x 800mm (width) x 40mm (height) |
| Glass Thickness | 8mm Tempered Safety Glass (BS EN 12150 & CE certified) |
| Wall Adjustment | 20mm for both sides (960-1000mm adjustment for 1000mm door) |
| Material | Glass, Aluminium, Zinc Alloy (handle), Stone (tray) |
| Colour | Chrome |
| Item Weight | 70 kg 800 g |
| Assembly Required | Yes |
10. Warranty Information
ELEGANT products are manufactured to high standards and undergo rigorous quality control. For specific warranty terms and conditions, please refer to the warranty card included with your purchase or visit the official ELEGANT website. Keep your proof of purchase for any warranty claims.
11. Customer Support
Should you require assistance with installation, have questions about your product, or need to report a missing or damaged part, please contact ELEGANT customer support.
- Online Support: Visit the official ELEGANT website for FAQs and contact forms.
- Email Support: Refer to your purchase documentation for the customer service email address.
- Phone Support: Refer to your purchase documentation for the customer service phone number.
When contacting support, please have your model number (SLR10A+SLR10B+SRT1080+W90) and proof of purchase readily available.


