1. Introduction
The TAXNELE STC-3028 is a versatile digital temperature and humidity controller designed for precise environmental management. It features a dual display for simultaneous monitoring of temperature and humidity, and can be configured to control both heating/cooling and humidification/dehumidification equipment. This manual provides essential information for the safe and effective installation, operation, and maintenance of your STC-3028 controller.
2. Product Overview
The STC-3028 controller integrates a high-accuracy sensor to measure both temperature and humidity. Its front panel features two digital displays, one for temperature (left) and one for humidity (right), along with control buttons for setting parameters. Output relays allow connection to external heating, cooling, humidifying, or dehumidifying devices.

Figure 2.1: Front view of the STC-3028 Temperature and Humidity Controller, showing the dual digital display and control buttons.
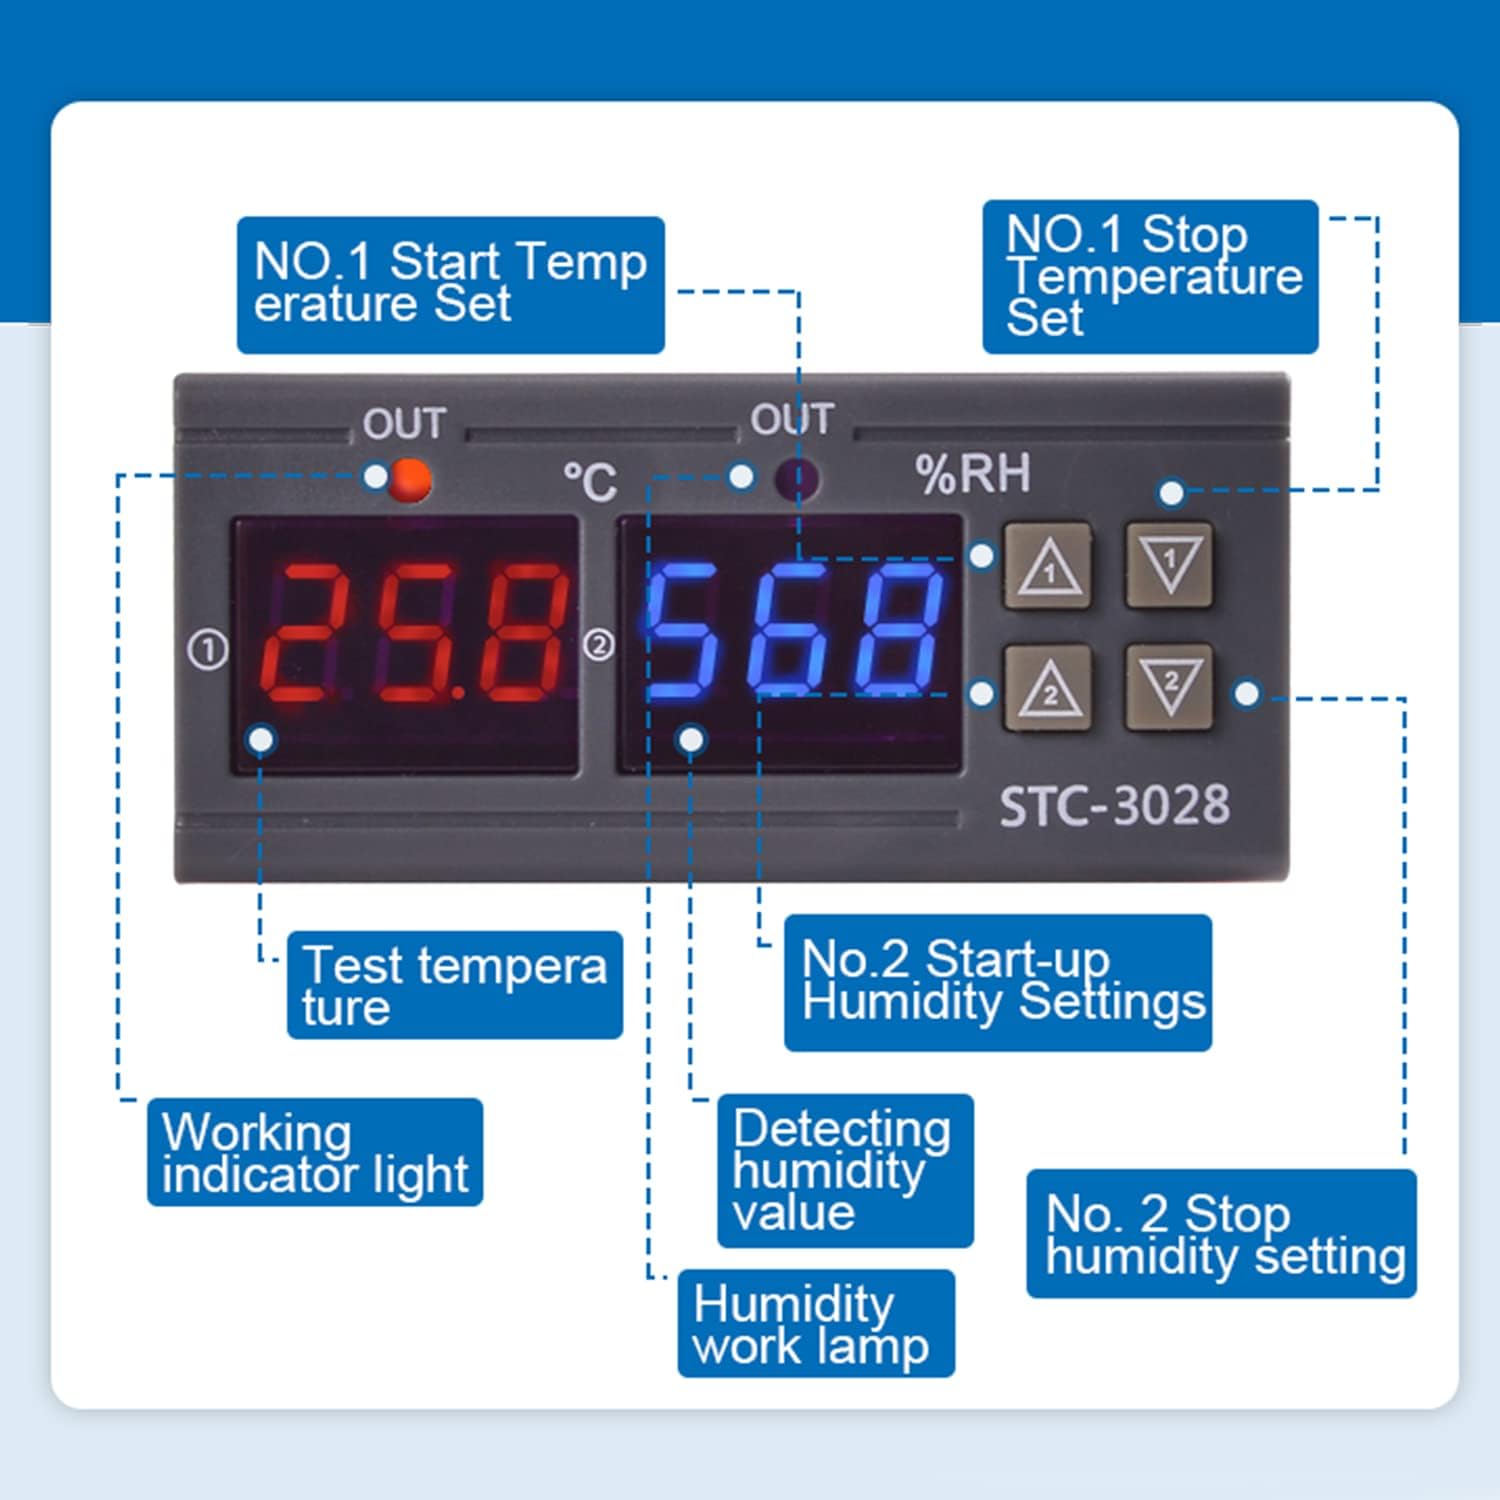
Figure 2.2: Detailed view of the STC-3028 display and control buttons, indicating the temperature display, humidity display, working indicators, and parameter setting buttons.
3. Specifications
| Parameter | Value |
|---|---|
| Model | STC-3028 |
| Input Voltage | DC 12V |
| Shell Material | PC and ABS Fireproof |
| Temperature Control Range | -50°C to 120°C |
| Humidity Control Range | 00%RH to 100%RH |
| Measurement Accuracy | ±0.1°C / ±0.1%RH |
| Control Accuracy | ±0.1°C / ±0.1%RH |
| Output Relay Contact Capacity | Max 10A |
| Sensor Length | 1 Meter |
| Controller Dimensions (L*W*D) | 75mm * 34mm * 85mm |
| Sensor Dimensions (L*W) | 2.17 in * 0.98 in |
| Sensor Cable Length | 40.35 in |
4. Installation
4.1 Mounting
The STC-3028 is designed for panel mounting. Ensure adequate space for ventilation and access to wiring terminals. Refer to the dimensions below for proper cutout size.

Figure 4.1: Dimensions of the STC-3028 controller and its integrated sensor, including cable length, for installation planning.
4.2 Wiring Diagrams
WARNING: Ensure power is disconnected before performing any wiring to prevent electric shock or damage to the device. All wiring should be performed by a qualified professional.
The STC-3028 offers two primary wiring configurations depending on whether the load uses an independent power supply or shares the controller's power supply.
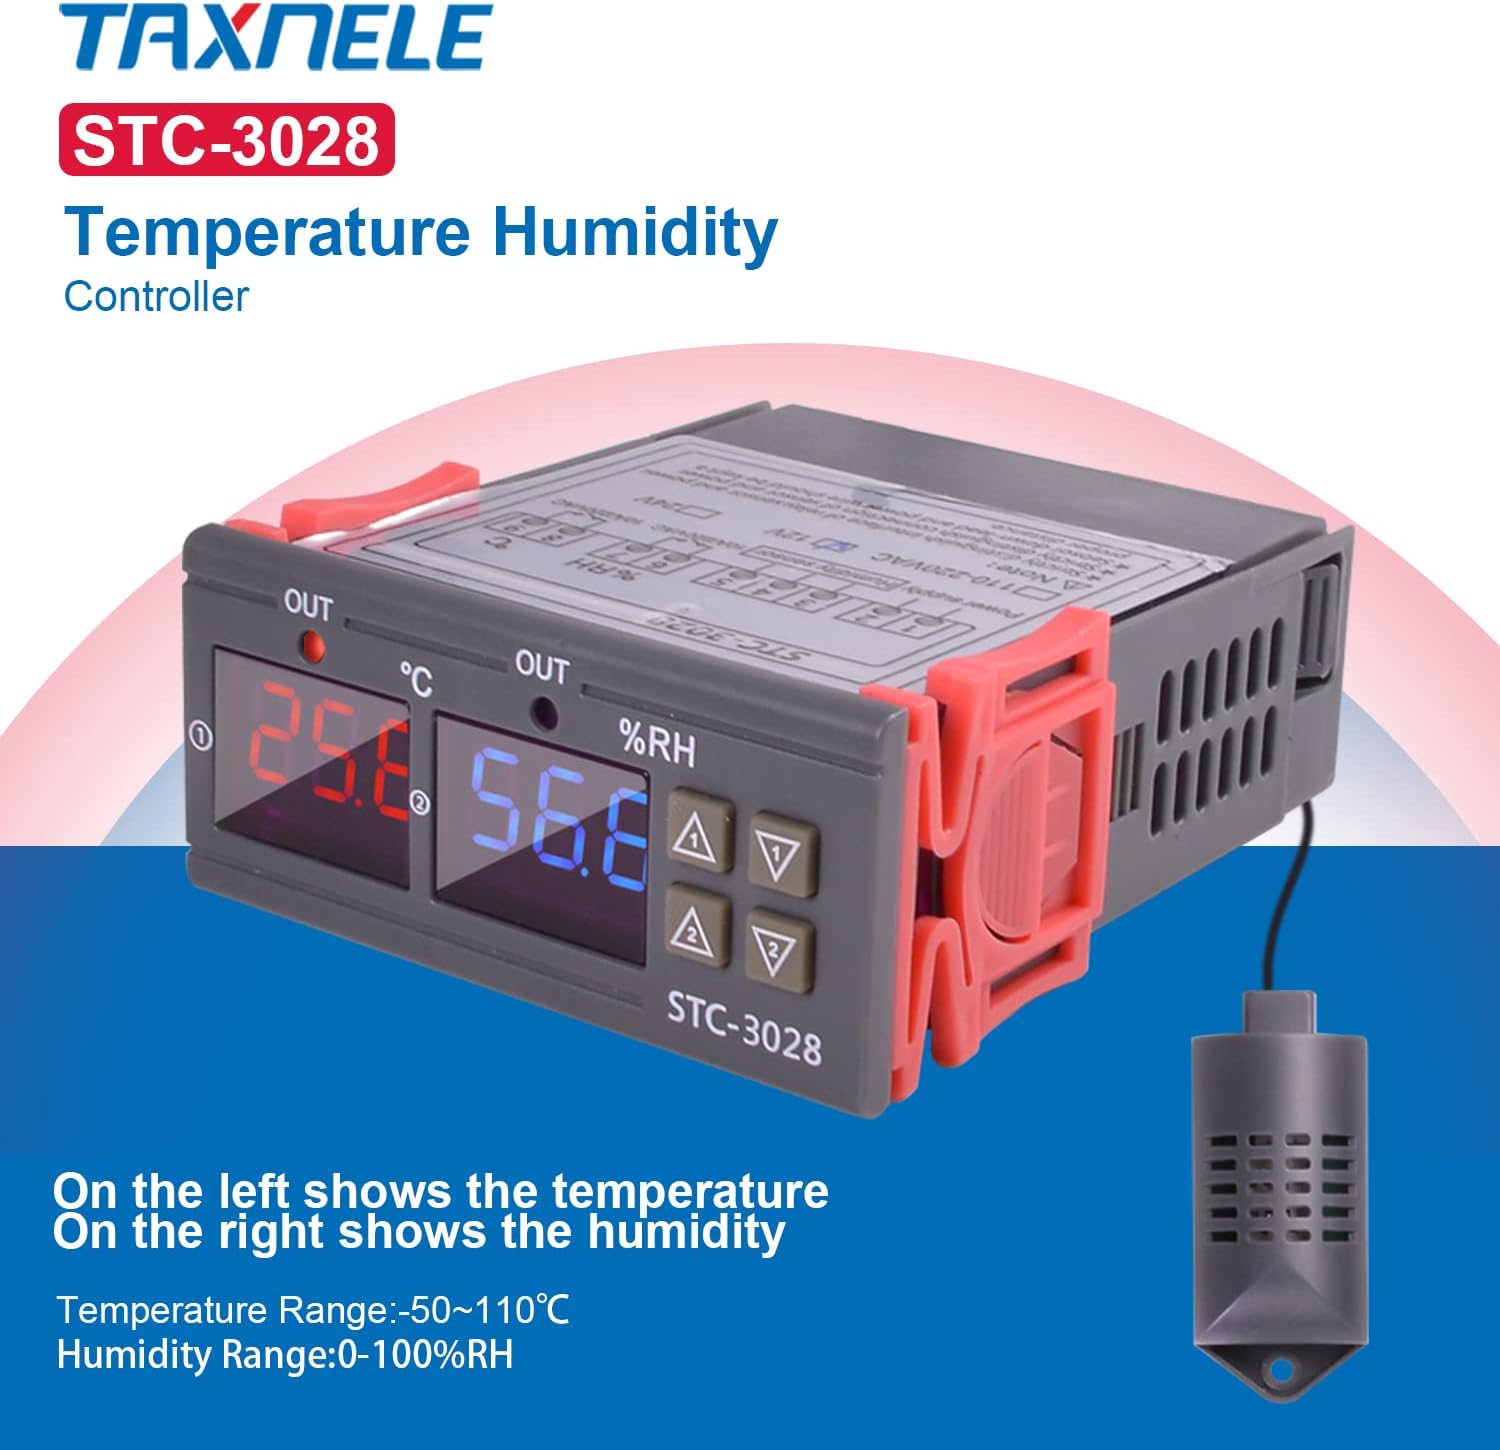
Figure 4.2: Wiring diagram for connecting the STC-3028 where the controlled load (e.g., heater, cooler) has its own independent power supply. The controller's power input (L, N) is separate from the load's power, and the controller's output terminals act as a switch for the load's circuit.

Figure 4.3: Wiring diagram for connecting the STC-3028 where the controlled load shares the same power supply as the controller. The controller's power input (L, N) also supplies power to the load through the controller's output terminals, which switch the live (L) connection to the load.
Ensure all connections are secure and correctly matched to the terminals. Incorrect wiring can damage the device or pose a safety hazard.
5. Operation
5.1 Power On/Off
Once wired correctly, apply power to the controller. The digital displays will illuminate, showing the current temperature and humidity readings.
5.2 Setting Temperature Parameters
- Set Startup Temperature: Press the "Up" button (labeled ▲1 or ▲ for temperature) once to display the current startup temperature. Long press the "Up" button for approximately 3 seconds until the display flashes. Use the "Up" and "Down" buttons to adjust the desired startup temperature. The setting will automatically save after a few seconds of inactivity.
- Set Stop Temperature: Press the "Down" button (labeled ▼1 or ▼ for temperature) once to display the current stop temperature. Long press the "Down" button for approximately 3 seconds until the display flashes. Use the "Up" and "Down" buttons to adjust the desired stop temperature. The setting will automatically save after a few seconds of inactivity.
5.3 Setting Humidity Parameters
- Set Startup Humidity: Press the "Up" button (labeled ▲2 or ▲ for humidity) once to display the current startup humidity. Long press the "Up" button for approximately 3 seconds until the display flashes. Use the "Up" and "Down" buttons to adjust the desired startup humidity. The setting will automatically save after a few seconds of inactivity.
- Set Stop Humidity: Press the "Down" button (labeled ▼2 or ▼ for humidity) once to display the current stop humidity. Long press the "Down" button for approximately 3 seconds until the display flashes. Use the "Up" and "Down" buttons to adjust the desired stop humidity. The setting will automatically save after a few seconds of inactivity.
5.4 Temperature and Humidity Correction (Calibration)
To correct or calibrate the temperature and humidity readings, press the "Up" and "Down" buttons simultaneously. Follow the on-screen prompts to adjust the offset if necessary. This feature allows for fine-tuning the sensor readings to match a known reference.
6. Maintenance
- Cleaning: Regularly wipe the controller's surface with a soft, dry cloth. Do not use abrasive cleaners or solvents, as they may damage the casing or display.
- Sensor Care: Keep the sensor clean and free from dust or debris. Avoid exposing the sensor to extreme physical shock or corrosive environments, which can affect its accuracy and lifespan.
- Connections: Periodically check all wiring connections to ensure they remain secure. Loose connections can lead to intermittent operation or device malfunction.
7. Troubleshooting
If you encounter issues with your STC-3028 controller, consider the following common troubleshooting steps:
-
No Display/Power:
- Check the power supply connection to the controller. Ensure it matches the specified 12VDC input.
- Verify that the power source is active and providing the correct voltage.
-
Incorrect Readings:
- Ensure the sensor is properly connected to the controller.
- Check if the sensor is clean and unobstructed.
- Perform a temperature and humidity correction (calibration) as described in Section 5.4 if you have a reliable reference instrument.
-
Load Not Activating:
- Verify that the wiring to the load is correct and secure, referring to Section 4.2.
- Check the set startup and stop parameters for temperature and humidity to ensure they are configured to activate the load under current conditions.
- Confirm that the load itself (e.g., heater, humidifier) is functional.
If these steps do not resolve the issue, please contact customer support for further assistance.
8. Warranty and Support
Specific warranty information for the TAXNELE STC-3028 controller is not provided within this manual. For details regarding warranty coverage, technical support, or service, please refer to the product packaging, the point of purchase, or contact TAXNELE customer service directly.


