
EDSARS CP27
10.26 Inch Car DVR with CarPlay/Android Auto Smart Screen User Manual
Model: CP27, CP06, CP08
Brand: EDSARS
Introduction
This user manual provides comprehensive instructions for the installation, operation, and maintenance of your new Car DVR Smart Screen. This device offers advanced features such as dual-camera recording, CarPlay, and Android Auto functionality, enhancing your driving experience and vehicle security.
Please read this manual thoroughly before using the product to ensure proper operation and to maximize its capabilities. Keep this manual for future reference.
Product Models
This product series includes three distinct models, all supporting dual-camera recording. Please verify your model before proceeding:
- CP27: 10.26-inch touch screen, designed as a dashboard car camera. Supports 4K+1080P recording with dual cams, CarPlay, and Android Auto functions.
- CP06: 11.26-inch touch screen, designed as a mirror car DVR. Supports 2K+1080P recording with dual cams, CarPlay, and Android Auto functions.
- CP08: 11.88-inch touch screen, designed as a mirror car DVR. Supports 2K+1080P recording with dual cams, CarPlay, and Android Auto functions.
Package Contents
Please check the box for the following items:
- 1x Mirror Car DVR Unit (or Dashboard Car Camera for CP27)
- 1x Rear Camera
- 1x Rear Camera Cable (5.6 meters in length)
- 1x Power Cable (Standard car charger with Type C connector)
- 1x User Manual (This document)
- 2x Rubber Rings (for mirror mounting, if applicable)
- Optional: Audio Player module (depending on chosen model)
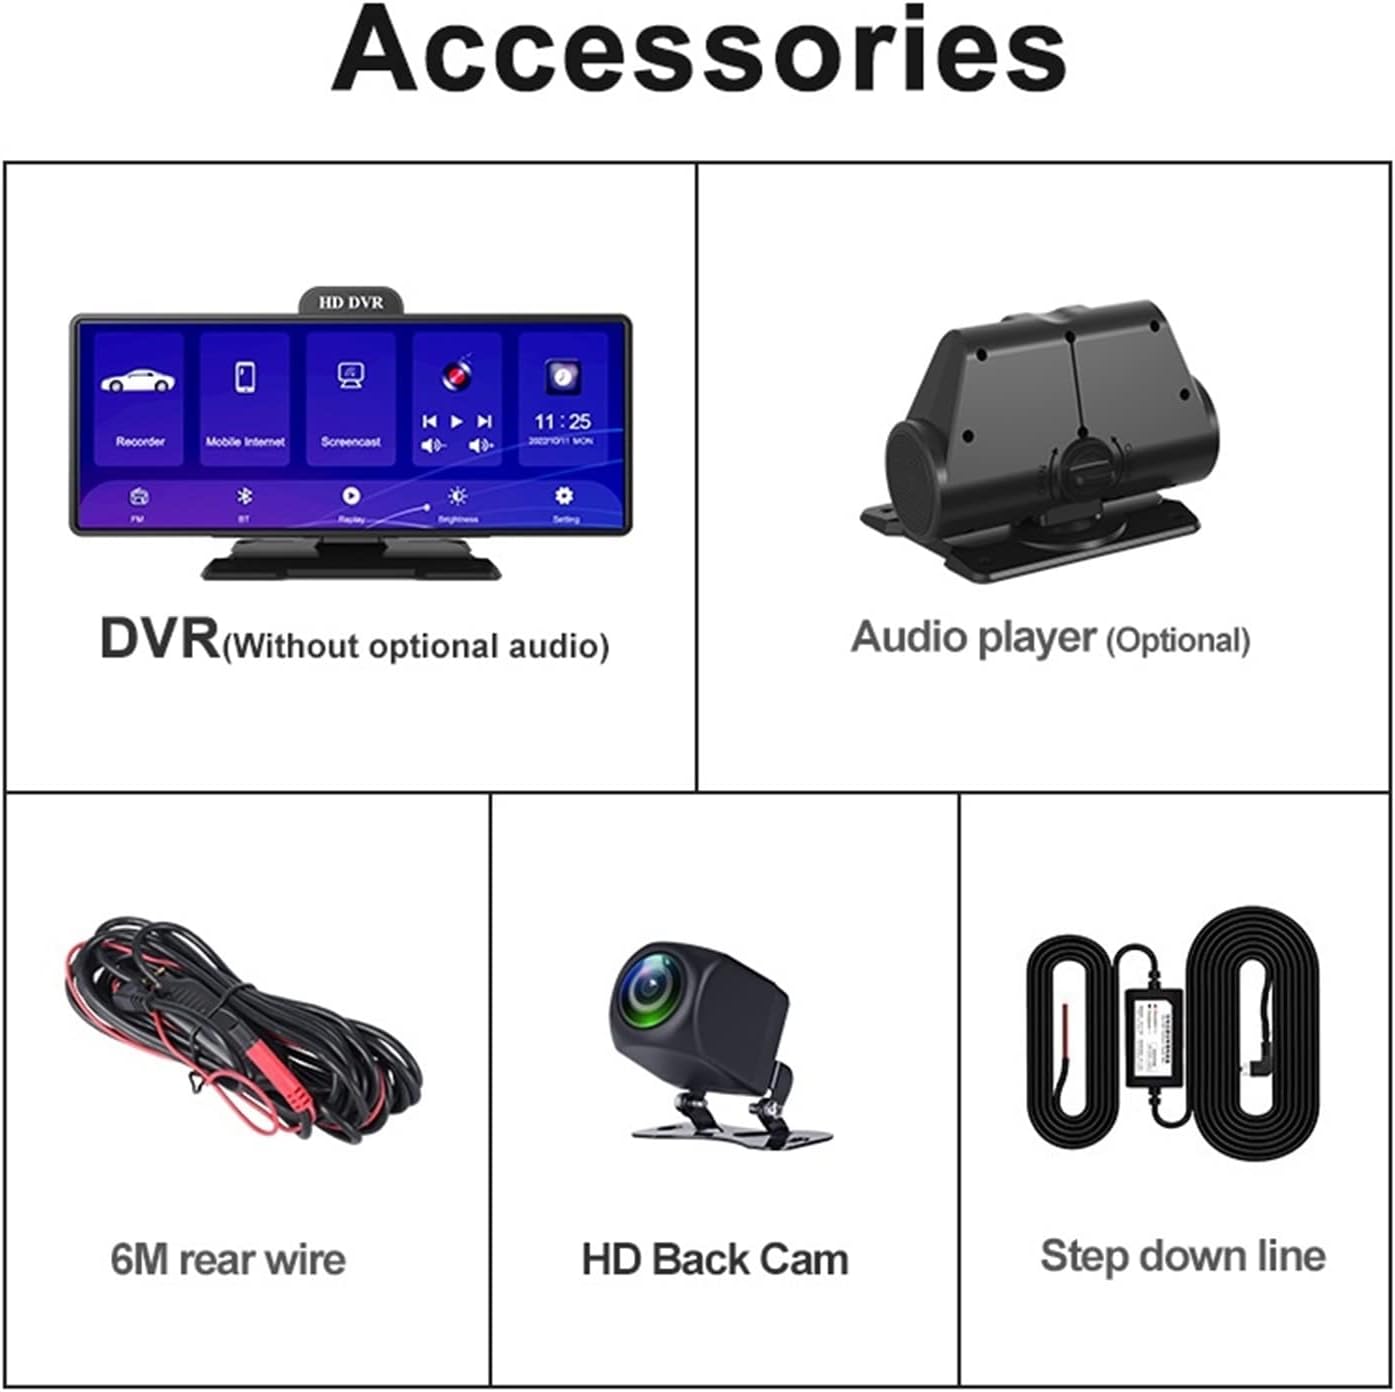
Figure 1: Included Accessories Overview
This image displays the complete set of accessories that come with the Car DVR system. It includes the main DVR unit (shown without the optional audio module), the separate audio player (optional), the 6-meter cable for the rear camera, the HD back camera itself, and the step-down power line.
Product Overview
The Car DVR Smart Screen is designed for ease of use and comprehensive vehicle monitoring. Below are key visual representations of the product and its features.

Figure 2: Main Screen Interface
This image shows the primary display of the Car DVR. The screen is split, with one side showing various application icons like Google Maps, YouTube Music, Spotify, and Phone, indicating its smart functionality. The other side displays a navigation map with route guidance, highlighting the device's integrated navigation capabilities.

Figure 3: Wireless Connectivity and System Components
This figure highlights the device's support for Android Auto and Wireless CarPlay. It shows a smartphone wirelessly connected to the DVR unit via Bluetooth and Wi-Fi, demonstrating seamless integration for navigation, music, and calls. The image also includes a view of the main DVR unit with its front camera and a separate rear camera, emphasizing the dual-cam recording capability.

Figure 4: DVR Style Options
This diagram illustrates the two main design choices for the DVR. The "ordinary style" shows a standard dashboard camera unit. The second option presents a DVR unit that includes an integrated audio player module, offering enhanced sound capabilities.

Figure 5: Optional Audio Player Module
This image provides a detailed view of the optional audio player module. It features a prominent speaker grille with illuminated accents and a control knob, indicating its function in enhancing the audio output of the DVR system.

Figure 6: Wireless Bluetooth Connection
This diagram illustrates how the Car DVR unit connects wirelessly to a mobile phone via Bluetooth. It shows the "host BT" (DVR) communicating with the "mobile phone BT," enabling audio streaming from the phone to the DVR system, such as playing music.
Setup and Installation
1. Mounting the DVR Unit
The DVR unit uses an adhesive mounting method for secure placement on your dashboard or rearview mirror (depending on model). Ensure the mounting surface is clean and dry before applying the adhesive.
- Clean the desired mounting area on your dashboard or rearview mirror with an alcohol wipe and let it dry completely.
- Peel off the protective film from the adhesive pad on the DVR mount.
- Firmly press the DVR unit onto the cleaned surface for at least 30 seconds to ensure strong adhesion.
- For mirror-mounted models (CP06, CP08), use the provided rubber rings to secure the unit over your existing rearview mirror.
2. Connecting the Power Cable
Connect the provided power cable to the DVR unit and your vehicle's 12V power outlet (cigarette lighter socket).
- Insert the Type C connector of the power cable into the corresponding port on the DVR unit.
- Plug the other end of the power cable (car charger) into your vehicle's 12V power outlet.
- Route the cable neatly to avoid obstructing your view or interfering with driving controls.
3. Installing the Rear Camera
The rear camera provides additional security and parking assistance. It is typically mounted at the rear of the vehicle.
- Mount the rear camera in a suitable location at the back of your vehicle, such as above the license plate or inside the rear window, ensuring a clear view.
- Connect the rear camera cable to the rear camera.
- Route the 5.6-meter rear camera cable from the back of the vehicle to the main DVR unit, connecting it to the designated input port.
- If connecting for reverse gear detection, consult a professional for wiring the reverse trigger wire to your vehicle's reverse light circuit.
Operating Instructions
1. Power On/Off
The device will automatically power on when your vehicle starts and power off when the ignition is turned off (if connected to a switched power source).
- To manually power on/off, press and hold the power button located on the unit.
2. Touch Screen Operation
The device features a responsive touch screen for intuitive control.
- Tap icons to open applications or settings.
- Swipe left/right to navigate between screens or menus.
- Use pinch-to-zoom gestures for maps or images where applicable.
3. CarPlay and Android Auto
Connect your smartphone wirelessly to access CarPlay (for iOS) or Android Auto (for Android devices).
- Ensure Bluetooth and Wi-Fi are enabled on your smartphone.
- On the DVR screen, navigate to the CarPlay/Android Auto icon and tap it.
- Follow the on-screen prompts to pair your phone via Bluetooth and establish the wireless connection.
- Once connected, you can use compatible apps for navigation, music, messaging, and calls directly from the DVR screen.
4. Recording Functions
The DVR continuously records footage from both front and rear cameras.
- Resolution: CP27 records at 4K (front) + 1080P (rear). CP06 and CP08 record at 2K (front) + 1080P (rear).
- Loop Recording: Older files are automatically overwritten when the memory card is full, ensuring continuous recording.
- G-Sensor: In case of a sudden impact or collision, the G-sensor automatically locks the current video file to prevent it from being overwritten.
- Time-Lapse Video: The device supports 24-hour continuous time-lapse recording, providing a condensed overview of events over a long period. This feature enhances security and convenience.

Figure 7: Time-Lapse Recording Feature
This image visually represents the time-lapse video recording capability. It shows a series of still frames from a video condensed into one, indicating the accelerated playback of events. Below the main screen, the rear camera and its connecting cables are depicted, suggesting their role in continuous monitoring.
5. Parking Assistance
When reversing your vehicle, the screen will automatically display the rear camera view with parking assist lines, making parking safer and easier.
- Ensure the rear camera is properly installed and connected.
- If the parking assist lines do not appear, check the wiring of the reverse trigger wire (if applicable).
6. Low Light Performance
The HD cameras are designed to capture clear and smooth images even in very dark light conditions, providing detailed video recordings day and night. This ensures your vehicle has a reliable guardian at all times.
Maintenance
- Cleaning: Use a soft, dry cloth to clean the screen and camera lenses. Do not use abrasive cleaners or solvents.
- Memory Card: Regularly format the memory card (at least once a month) to ensure optimal performance and prevent data corruption. Back up any important footage before formatting.
- Firmware Updates: Check the manufacturer's website periodically for firmware updates to improve performance and add new features.
- Temperature: Avoid exposing the device to extreme temperatures for prolonged periods, as this can affect its lifespan.
Troubleshooting
| Problem | Possible Cause | Solution |
|---|---|---|
| Device does not power on. | No power supply; loose connection; faulty power cable. | Check power cable connection to DVR and car outlet. Ensure car outlet is working. Try a different power source if available. |
| Recording stops or freezes. | Memory card full or corrupted; low-speed memory card. | Format the memory card. Use a high-speed (Class 10 or U3) memory card. Replace the memory card if necessary. |
| Rear camera not displaying. | Rear camera cable loose or damaged; incorrect connection. | Check all connections of the rear camera cable. Ensure it's plugged into the correct port on the DVR. |
| CarPlay/Android Auto not connecting. | Bluetooth/Wi-Fi off on phone; incorrect pairing; phone not compatible. | Ensure Bluetooth and Wi-Fi are on. Forget device on phone and re-pair. Check phone compatibility. |
| Poor video quality. | Dirty lens; protective film still on lens; low light conditions. | Clean camera lenses. Remove any protective film. Ensure adequate lighting where possible. |
Specifications
| Feature | Details |
|---|---|
| Screen Size | 10.26 inches (CP27), 11.26 inches (CP06), 11.88 inches (CP08) |
| Display Type | LCD, Touch Screen |
| Front Camera Resolution | 4K (CP27), 2K (CP06, CP08) |
| Rear Camera Resolution | 1080P (All models) |
| Connectivity | Wireless CarPlay, Android Auto, Bluetooth, Wi-Fi |
| Mounting Type | Adhesive Mount (CP27), Mirror Mount (CP06, CP08) |
| Included Components | User Manual, Charging Cable, Rear Camera, Rear Camera Cable |
| Control Method | Touch |
| Item Weight | 1 gram (main unit, approximate) |
Customer Support
For further assistance, technical support, or warranty inquiries, please contact your retailer or visit the official EDSARS website. Your satisfaction is our priority.
Ask a question about this manual
Ask about setup, troubleshooting, compatibility, parts, safety, or missing instructions. Manuals+ will review the question and use this page’s manual context to help answer it.