Introduction
The Ostark AS2X CA is a Full HD Digital Satellite Receiver designed for Free-to-Air (FTA) satellite television. This receiver supports DVB-S/S2/S2X standards and H.265 decoding, delivering 1080P high-resolution video. It features an Ethernet port, a built-in Conax card reader, Dolby Sound multimedia playback, and includes a USB Wi-Fi adapter for internet connectivity. This manual provides essential information for setting up, operating, and maintaining your Ostark AS2X CA receiver.
Safety Information
- Always use the original accessories provided with the package to prevent product damage.
- Do not expose the device to moisture or liquids.
- Ensure proper ventilation to prevent overheating.
- Do not attempt to open or repair the device yourself. Refer all servicing to qualified personnel.
- Keep the device away from direct sunlight and heat sources.
Package Contents
Please check the box for the following items:
- 1 x Ostark AS2X CA Digital Satellite Receiver
- 1 x Remote Control
- 1 x Power Adapter
- 1 x HDMI Cable
- 1 x USB Wi-Fi Adapter
- 1 x User Manual (this document)

Image: Contents of the Ostark AS2X CA receiver package, showing the receiver unit, remote control, power adapter, USB Wi-Fi dongle, and HDMI cable.
Product Overview
Front Panel
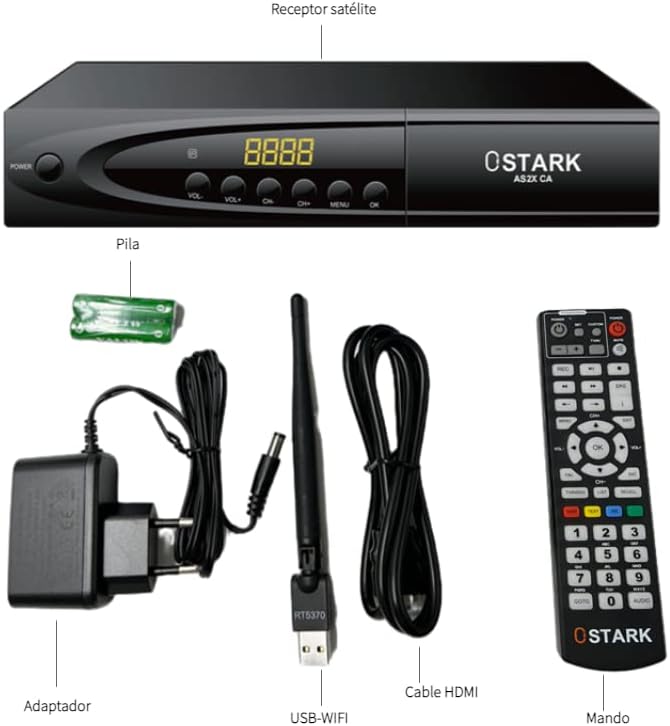
Image: Front view of the Ostark AS2X CA receiver, highlighting the power button, volume and channel controls, menu button, OK button, and the 4-digit display.
- POWER Button: Turns the receiver on or off (standby mode).
- VOL+/- Buttons: Adjusts the volume level.
- CH+/- Buttons: Changes the channel.
- MENU Button: Accesses the main menu.
- OK Button: Confirms selections.
- Display: Shows channel number, time, or other status information.
Rear Panel

Image: Rear view of the Ostark AS2X CA receiver, showing the LNB IN, SCART, Coaxial, HDMI, Ethernet, USB 2.0 ports, and DC IN.
- LNB IN: Connects to the satellite dish for DVB-S/S2/S2X signal input.
- SCART: Euro Scart connector for older TVs (CVBS only).
- COAXIAL: Digital audio output.
- HDMI: High-definition audio and video output for connecting to an HDMI-compatible display.
- ETHERNET: RJ45 port for wired internet connection.
- USB 2.0 (x2): For USB PVR, Timeshift, Media Player, and Wi-Fi/3G dongle.
- DC IN 12V: Connects the power adapter.
Remote Control
The included remote control allows full operation of the receiver from a distance. It features dedicated buttons for power, channel navigation, volume control, menu access, EPG, media playback, and more.
Setup
- Connect Satellite Dish: Connect the LNB cable from your satellite dish to the "LNB IN" port on the rear panel of the receiver.
- Connect to TV:
- For High Definition: Connect one end of the HDMI cable to the "HDMI" port on the receiver and the other end to an HDMI input on your television.
- For Standard Definition (older TVs): Connect a SCART cable to the "SCART" port on the receiver and to the SCART input on your television.
- Connect USB Wi-Fi Adapter: Insert the included USB Wi-Fi adapter into one of the "USB 2.0" ports on the rear panel.
- Connect Power: Connect the power adapter to the "DC IN 12V" port on the receiver, then plug the adapter into a power outlet.
- Power On: Turn on your television and select the correct HDMI or SCART input. Press the POWER button on the receiver or remote control to turn on the device.
- Initial Setup Wizard: The receiver may display an initial setup wizard. Follow the on-screen instructions to select your language, country, and perform a satellite scan to find available channels.
- For satellite scan, ensure your satellite dish is properly aligned to the desired satellite(s). The receiver supports DiSEqC1.0/1.1/1.2 and USALS.
- Network Setup (Optional): If you wish to use internet features like YouTube or IPTV, navigate to the Network settings in the main menu. Select Wi-Fi and connect to your wireless network using the USB Wi-Fi adapter, or connect an Ethernet cable to the "ETHERNET" port.
Operating Instructions
Basic Operation
- Channel Navigation: Use the CH+/- buttons on the remote or front panel to change channels. You can also enter channel numbers directly using the numeric keypad.
- Volume Control: Use the VOL+/- buttons on the remote or front panel to adjust the volume.
- Main Menu: Press the MENU button to access the main menu for settings, channel management, and multimedia functions. Use the arrow keys to navigate and OK to select.
- EPG (Electronic Program Guide): Press the EPG button on the remote to view the program guide, showing current and upcoming programs for up to 7 days.
Advanced Features
- USB PVR & Timeshift: Connect a USB storage device (flash drive or external hard drive) to a USB 2.0 port. You can record live TV programs (PVR) or pause and rewind live TV (Timeshift). Access these functions via the remote control buttons (REC, Play/Pause, etc.) or the multimedia menu.
- Media Player: The receiver supports multimedia playback from a connected USB storage device. You can play videos, music, and view photos. Navigate to the "Media Player" section in the main menu.
- Internet Applications: With the USB Wi-Fi adapter or Ethernet connection, you can access applications like YouTube and IPTV Xtream. Ensure your internet connection is stable.
- Parental Control: Set up parental locks to restrict access to certain channels or programs. This feature is usually found in the "System Settings" or "Parental Control" menu and requires a PIN.
Maintenance
- Cleaning: Use a soft, dry cloth to clean the exterior of the receiver. Do not use liquid cleaners or abrasive materials.
- Ventilation: Ensure the receiver has adequate ventilation. Do not block the ventilation openings.
- Firmware Updates: Periodically check the manufacturer's website for firmware updates. Updates can improve performance, add features, and fix bugs. Follow the instructions provided with the update carefully.
- Storage: If storing the device for an extended period, disconnect it from power and store it in a dry, dust-free environment.
Troubleshooting
| Problem | Possible Cause / Solution |
|---|---|
| No power |
|
| No signal / "No Signal" message on screen |
|
| No picture or sound (HDMI/SCART) |
|
| Remote control not working |
|
| Internet applications (e.g., YouTube) not working |
|
| Standby clock shows incorrect time |
|
Specifications
| Feature | Detail |
|---|---|
| Brand | Ostark |
| Model Number | AS2x |
| DVB Standards | DVB-S/S2/S2X |
| Video Decoding | MPEG-2/4 H.264, H.265 (1080P Full HD) |
| Connectivity | HDMI, Ethernet, USB, SCART, Coaxial |
| USB Ports | 2 (USB 2.0) |
| HDMI Ports | 1 |
| Audio Output Mode | Surround |
| Supported Audio Format | Dolby Digital |
| Voltage | 12 Volts (DC) |
| Flash Memory | 8MB |
| DDR2 RAM | 1GB |
| Product Dimensions (L x W x H) | 22 x 14 x 4 cm |
| Weight (including box) | 0.71 kg |
| Video Format Support | PAL-B/ NTSC-M/ PAL-N/ PAL-M |
| Special Features | USB Wi-Fi included, Ethernet, CA Conax Card Reader, USB PVR, Timeshift, Media Player, EPG, Parental Control, YouTube, IPTV Xtream, Unicable, DiSEqC1.0/1.1/1.2/USALS |
Warranty Information
Information regarding spare parts availability and guaranteed software updates for this product is not available at this time. For specific warranty terms and conditions, please refer to the documentation provided at the time of purchase or contact your retailer.
Support
If you encounter issues not covered in this manual or require further assistance, please:
- Consult the retailer where you purchased the product.
- Visit the official Ostark website for potential FAQs, support resources, or contact information.