1. Introduction
Thank you for choosing the Gmconn Pistol Red Laser Flashlight Combo, Model GM-1085. This device integrates a 650-lumen LED flashlight with a red laser sight, designed for tactical applications, low-light shooting, and aiming assistance. It features a compact, lightweight design and an adjustable rail system for broad compatibility with various pistols equipped with a standard Picatinny rail. This manual provides detailed instructions for proper installation, operation, maintenance, and safety to ensure optimal performance and longevity of your device.

Image 1.1: The Gmconn GM-1085 Pistol Red Laser Flashlight Combo, showcasing its integrated design with a red laser beam.
2. Safety Information
Please read and understand all safety warnings and instructions before using this product. Failure to follow these instructions may result in serious injury or property damage.
- Laser Safety: This product contains a Class IIIa laser with a peak intensity of <5 mW and a wavelength of 650 nm. Avoid direct eye exposure to the laser beam. Do not aim the laser at people or animals.
- Weapon Safety: Always follow all firearm safety rules. Ensure the firearm is unloaded and pointed in a safe direction before installing, adjusting, or performing maintenance on the laser/light combo.
- Battery Safety: The device uses a built-in rechargeable Lithium Polymer battery. Do not attempt to disassemble or replace the battery. Use only the provided charging cable and a 5V power charger. Do not use fast charging cables or adapters.
- Operating Environment: This device is not water resistant. Avoid exposure to water or excessive moisture.
- Children: Keep this product out of reach of children.
3. Package Contents
Verify that all items listed below are present in your package:
- 1x Pistol Laser/Light Combo (with built-in battery)
- 1x Slidable Rail Adapter
- 1x Backup Screw
- 1x Allen Wrench
- 1x Charging Cable
- 1x Coin Shape Screwdriver
- 1x User Manual (this document)

Image 3.1: All components included in the Gmconn GM-1085 product package.
4. Product Overview
4.1 Dimensions and Design
The GM-1085 is designed to be low profile and compact, measuring approximately 2.3 inches in depth, 1.1 inches in width, and 1.15 inches in height, with a weight of 1.58 ounces. This minimal footprint ensures it adds no significant bulk to your pistol.

Image 4.1: Detailed dimensions of the Gmconn GM-1085 unit.
4.2 Component Identification
Familiarize yourself with the various parts of the GM-1085:

Image 4.2: Key components labeled, including the charging port, power indicator, light switch button, windage adjustment, elevation adjustment, and slidable rail adapter.
- Charging Port: USB port for recharging the internal battery.
- Power Indicator: LED light indicating charging status.
- Light Switch Button: Activates and cycles through light/laser modes.
- L/R (Windage) Adjustment: Screw for horizontal laser adjustment.
- UP/D (Elevation) Adjustment: Screw for vertical laser adjustment.
- Slidable Rail Adapter: Allows adjustment for different pistol rail lengths.
5. Installation Guide
The GM-1085 is designed for pistols equipped with a standard Picatinny rail. Ensure your pistol has a compatible rail before installation.
5.1 Rail Compatibility
The device is compatible with Picatinny rails that have either a single slot or multiple slots. It is not compatible with pistols lacking a rail, those with non-standard slots, or non-21mm standard Picatinny rails.
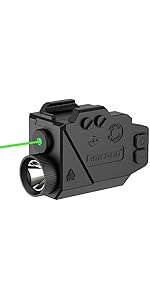
Image 5.1: Visual guide illustrating compatible and incompatible pistol rail types.
5.2 Mounting the Device
- Ensure Safety: Verify the firearm is unloaded and safe before proceeding.
- Adjust Rail Adapter: The GM-1085 features an adjustable rail system. Slide the rail adapter forward or backward as needed to align with your pistol's rail slot.
- Attach to Rail: Loosen the mounting screw on the GM-1085. Slide the unit onto the pistol's Picatinny rail until the adapter aligns with a rail slot.
- Secure Device: Tighten the mounting screw firmly using the provided Allen wrench. Ensure the device is securely attached and does not wobble.

Image 5.2: Examples of mounting the GM-1085 on compact and full-size pistols, demonstrating the adjustable rail feature.

Image 5.3: The slidable rail system allows for optimal positioning on various pistol frames.
6. Operating Instructions
6.1 Power On/Off and Mode Selection
The GM-1085 features a single light switch button for controlling power and cycling through modes.
- Single Press: Activates the device and cycles through the following modes: Laser only, Flashlight only (steady on), Laser + Flashlight (steady on), Flashlight Strobe, Laser + Flashlight Strobe.
- Long Press: Press and hold the button for approximately 2 seconds to turn the device off from any mode.

Image 6.1: Visual representation of the available operating modes: Laser sight, Flashlight (steady on/strobe), and Laser + Flashlight (steady on/strobe).
6.2 Laser Adjustment (Zeroing)
To ensure accuracy, the laser sight needs to be adjusted to align with your firearm's point of impact. This process is known as zeroing.
- Preparation: Secure your firearm in a stable rest. Set up a target at your desired zeroing distance.
- Activate Laser: Turn on the laser mode.
- Adjust Windage (L/R): Use the provided coin-shaped screwdriver to turn the L/R adjustment screw. Turning clockwise moves the laser point right; counter-clockwise moves it left.
- Adjust Elevation (UP/D): Use the provided coin-shaped screwdriver to turn the UP/D adjustment screw. Turning clockwise moves the laser point up; counter-clockwise moves it down.
- Test and Refine: Fire a few shots to determine the point of impact relative to the laser dot. Make small adjustments as needed until the laser dot aligns with the point of impact.
Note: Always perform zeroing at a safe shooting range and follow all range safety rules.
7. Charging the Device
The GM-1085 is powered by a built-in rechargeable battery. Recharge the device when the power indicator alerts you.
- Connect Cable: Insert the small end of the provided USB charging cable into the charging port on the bottom of the GM-1085.
- Connect to Power: Plug the other end of the USB cable into a 5V power charger (not included).
- Charging Indicator: The power indicator light will show the charging status. It will turn green when fully charged.
- Charging Time: Charging time may vary. Disconnect the cable once fully charged.
Important: This product does NOT support fast charging cables or fast charging adapters. Use only the cable included and a standard 5V power charger to prevent damage to the battery and device.
Image 7.1: Location of the USB charging port and power indicator on the GM-1085.
8. Maintenance
- Cleaning: Use a soft, dry cloth to clean the exterior of the device. Do not use abrasive cleaners or solvents. For the lens, use a lens cleaning cloth.
- Storage: Store the device in a cool, dry place away from direct sunlight and extreme temperatures.
- Battery Care: If storing for an extended period, ensure the battery is partially charged (around 50%) and recharge it every few months to maintain battery health.
- Inspection: Periodically check all screws and mounting points to ensure they remain tight.
9. Troubleshooting
| Problem | Possible Cause | Solution |
|---|---|---|
| Device does not turn on. | Battery is depleted. | Charge the device using the provided USB cable and a 5V charger. |
| Laser beam is not visible or dim. | Low battery; dirty laser emitter; environmental conditions (bright light). | Recharge the battery. Clean the laser emitter. Use in appropriate lighting conditions. |
| Flashlight is dim or not working. | Low battery; dirty flashlight lens. | Recharge the battery. Clean the flashlight lens. |
| Laser does not hold zero. | Device not securely mounted; adjustment screws loose; excessive recoil. | Ensure mounting screw is tight. Re-zero the laser. Check for proper rail fitment. |
| Device wobbles on rail. | Mounting screw loose; incorrect rail adapter position; incompatible rail. | Tighten mounting screw. Adjust slidable rail adapter. Verify pistol has a standard Picatinny rail. |
10. Product Specifications
| Feature | Specification |
|---|---|
| Model Number | GM-1085 |
| Light Source Type | LED |
| White Brightness | 650 Lumens |
| Laser Type | Red Laser, Class IIIa |
| Laser Wavelength/Intensity | <5 mW peak, 650 nm |
| Power Source | Built-in Rechargeable Lithium Polymer Battery |
| Voltage | 5 Volts (Charging) |
| Material | Polymer |
| Product Dimensions (LxWxH) | 2.3" x 1.1" x 1.15" |
| Item Weight | 1.58 Ounces |
| Water Resistance Level | Not Water Resistant |
| Mounting Type | Gun Mount (Picatinny Rail) |
11. Warranty and Support
The Gmconn GM-1085 Pistol Red Laser Flashlight Combo comes with a Limited Warranty. For specific details regarding warranty coverage, duration, and terms, please refer to the warranty card included in your package or contact Gmconn customer support.
If you encounter any issues or have questions not covered in this manual, please contact Gmconn customer support through the retailer's platform or the official Gmconn website for assistance.
Customer Support: Please visit the Gmconn Store on Amazon or refer to your product packaging for contact information.