Introduction
The ANDELI 3-in-1 Welding Machine is a versatile and portable welding solution designed for various applications. This multi-process welder supports Flux MIG, Lift TIG, and MMA (Stick) welding modes, operating on both 110V and 220V power supplies. Its compact design and user-friendly interface make it suitable for both beginners and experienced users for garage or small shop projects.
This manual provides essential information for the safe and efficient operation, setup, maintenance, and troubleshooting of your ANDELI welding machine. Please read it thoroughly before use.
Key Features
- 3-in-1 Multi-Process Welding: Supports Flux MIG, Lift TIG, and MMA (Stick) welding modes, offering flexibility for various welding tasks.
- Dual Voltage Capability: Operates on both 110V and 220V power inputs, adapting to different power sources.
- Large LED Digital Display: Provides clear and accurate data display for easy monitoring and adjustment of welding parameters.
- User-Friendly Control Panel: Simple interface with unified adjustment mode for quick mastery of operation.
- Integrated Wire Feeder: Ensures smooth wire feeding for consistent welding performance.
- Enhanced Safety Features: Includes automatic protection against overcurrent, overvoltage, and overheating for safe operation.
- Portable Design: Lightweight and compact, ideal for easy transport and use in various locations.

Figure 1: ANDELI 3-in-1 Welding Machine with included accessories.
Setup Instructions
1. Unpacking and Inspection
- Carefully remove all components from the packaging.
- Verify that all included components are present: 1 Mig welder, 2 protective mouths, 5 conductive nozzles, 5 welding rods, 1 slag hammer, 1 lb flux-cored wire, and 1 welding torch.
- Inspect the machine and accessories for any signs of damage during shipping. Do not operate if damaged.
2. Power Connection
- Ensure the welding machine is turned off before connecting to power.
- Connect the appropriate power plug (110V or 220V adapter) to a suitable power outlet. The machine automatically detects the voltage.
- Ensure the power source meets the machine's requirements (110V/220V).

Figure 2: The welding machine supports dual voltage operation (110V/220V).
3. Connecting Welding Accessories
- Ground Clamp: Connect the ground clamp cable to the negative (-) terminal on the front panel. Securely attach the ground clamp to the workpiece.
- MIG Torch: Connect the MIG torch cable to the positive (+) terminal and the wire feeder connection. Ensure it is securely fastened.
- MMA (Stick) Holder: For MMA welding, connect the electrode holder cable to the positive (+) terminal and the ground clamp to the negative (-) terminal.
- TIG Torch (Lift TIG): For Lift TIG welding, connect the TIG torch to the negative (-) terminal and the ground clamp to the positive (+) terminal.
4. Loading Flux-Cored Wire (for MIG)
- Open the wire spool compartment.
- Place the 1kg flux-cored wire spool onto the spindle.
- Feed the wire through the guide tube and into the wire feeder mechanism.
- Close the wire feeder tension arm and adjust tension as needed.
- Press the wire feed button (if available) or trigger the torch to feed the wire through the torch liner until it exits the nozzle.
Operating Instructions
1. Power On and Mode Selection
- Turn on the main power switch located on the back of the machine.
- The large LED display will illuminate.
- Select the desired welding mode (MIG, TIG, or MMA) using the mode selection button on the control panel.

Figure 3: The large LED digital display screen provides clear welding parameters.
2. Parameter Adjustment
- Use the main adjustment knob (red knob) to set the amperage (current) according to your welding requirements and material thickness.
- The machine features an intelligent mode for automatic matching of wire speed and voltage based on the selected current and wire size.
- Monitor the LED display for real-time parameter values.
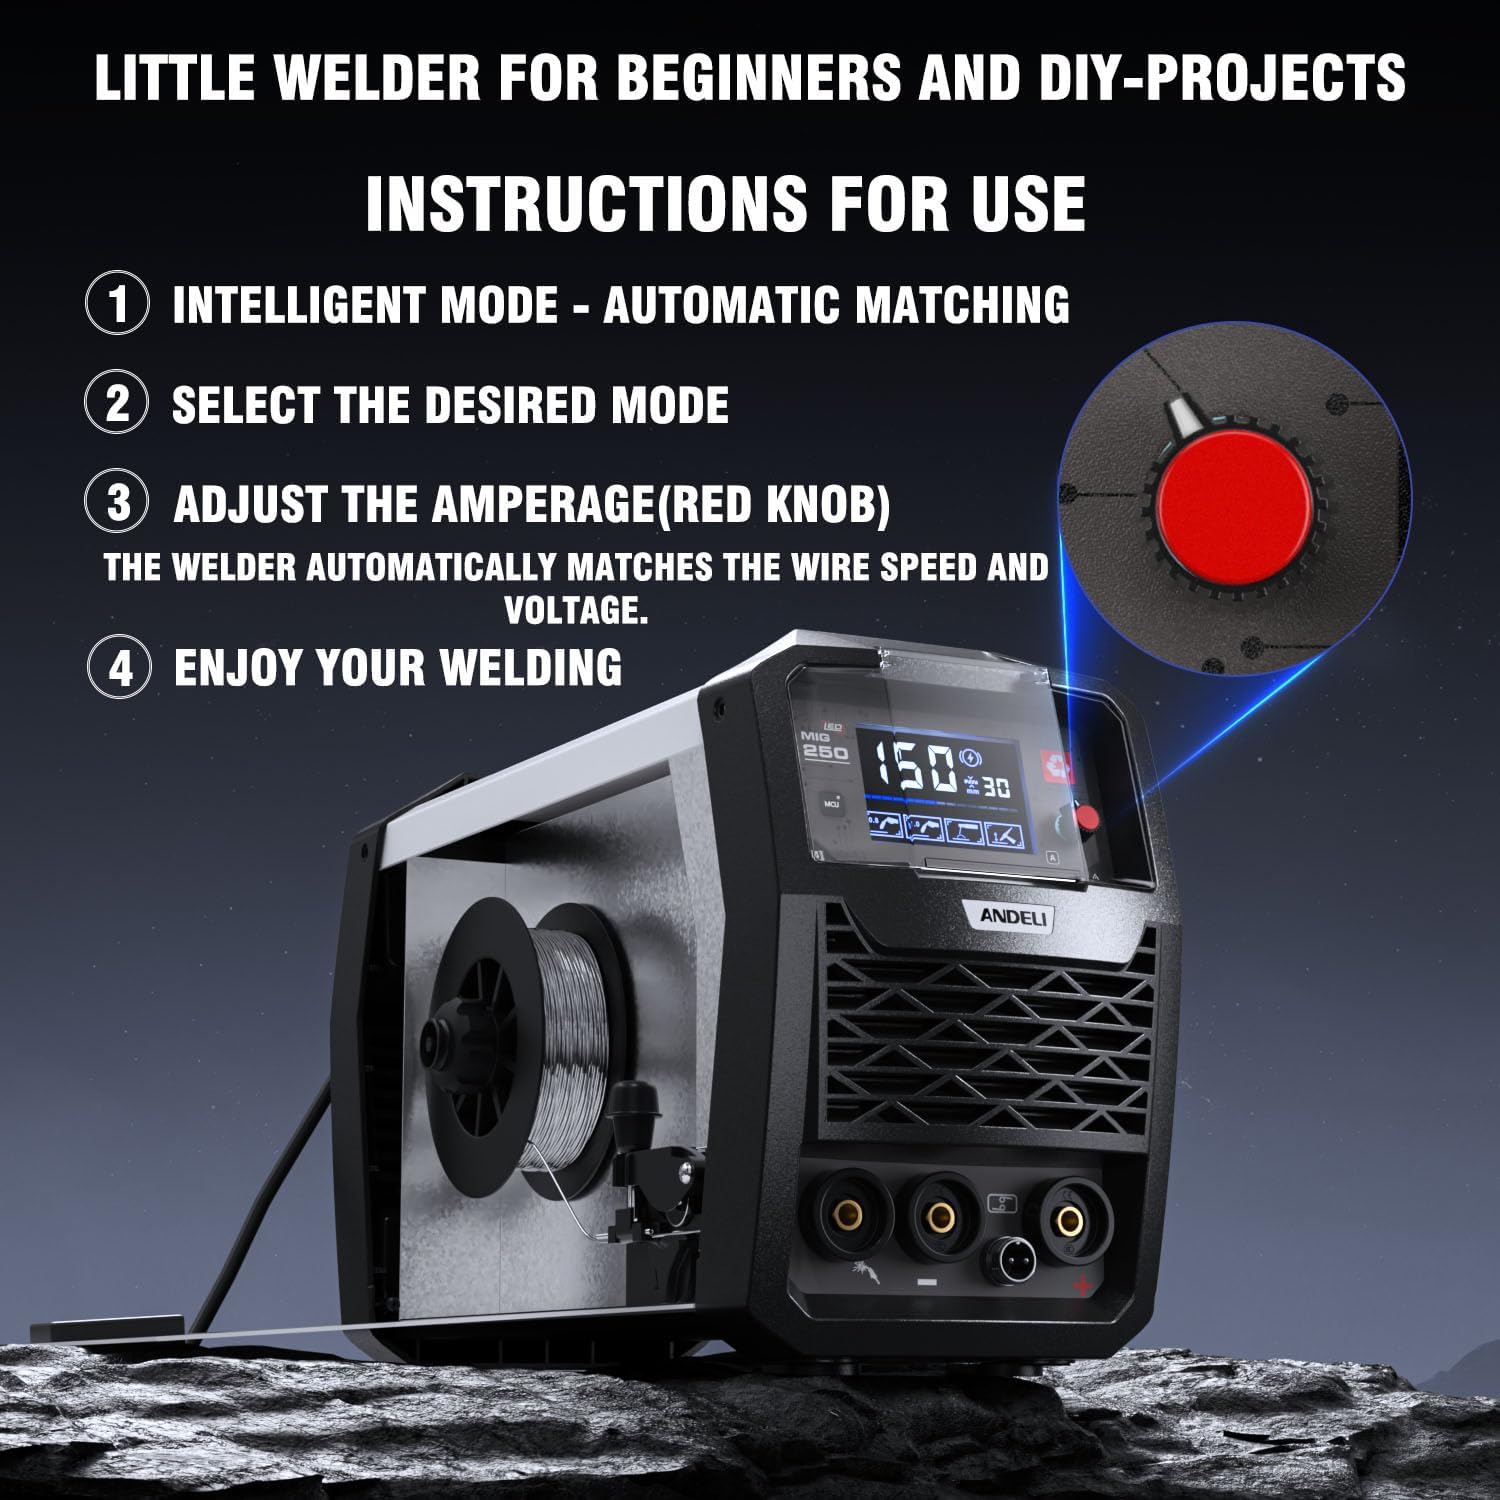
Figure 4: Adjusting amperage with the red knob and selecting modes.
3. Welding Process
- Ensure proper personal protective equipment (PPE) is worn, including welding helmet, gloves, and protective clothing.
- Position the ground clamp securely on the workpiece.
- For MIG Welding: Position the MIG torch nozzle close to the workpiece. Press the trigger to initiate the arc and feed wire. Maintain a consistent travel speed and torch angle.
- For Lift TIG Welding: Touch the tungsten electrode lightly to the workpiece to initiate the arc, then lift slightly to establish the arc. Maintain a short arc length.
- For MMA (Stick) Welding: Strike the electrode against the workpiece to initiate the arc, then maintain a consistent arc length and travel speed.
- After welding, release the trigger (MIG) or break the arc (TIG/MMA).

Figure 5: Visual representation of Flux MIG, Lift TIG, and Stick welding.
Maintenance
Regular maintenance ensures the longevity and optimal performance of your welding machine.
1. General Cleaning
- Disconnect the machine from the power supply before cleaning.
- Use a clean, dry cloth to wipe down the exterior of the machine.
- Periodically use compressed air to blow out dust and debris from the ventilation openings to ensure proper cooling.
2. Torch and Cable Inspection
- Inspect the welding torch, cables, and ground clamp for any signs of wear, cuts, or damage. Replace damaged components immediately.
- For MIG torches, regularly clean the contact tip and nozzle. Replace worn contact tips and nozzles as needed.
3. Wire Feeder Maintenance (for MIG)
- Check the wire feeder rollers for wear and cleanliness. Clean any accumulated debris.
- Ensure the wire liner is free from kinks or blockages that could impede wire feeding.
Troubleshooting
This section addresses common issues you might encounter with your welding machine.
| Problem | Possible Cause | Solution |
|---|---|---|
| Machine does not power on | No power from outlet; Power switch off; Internal fuse blown | Check power outlet and cable; Ensure power switch is ON; Contact service if fuse is suspected. |
| No arc / Weak arc | Poor ground connection; Incorrect settings; Worn contact tip (MIG); Incorrect electrode (MMA/TIG) | Ensure ground clamp is clean and secure; Adjust current/voltage settings; Replace contact tip; Use correct electrode type and size. |
| Wire feeding issues (MIG) | Wire spool tangled; Incorrect wire tension; Clogged liner; Worn drive rollers | Untangle wire; Adjust tension; Clean or replace liner; Inspect and replace drive rollers. |
| Overheat protection activated | Extended use; Blocked ventilation; High ambient temperature | Allow machine to cool down; Clear ventilation openings; Operate in a well-ventilated area. |

Figure 6: The machine features IP21 rating, overheating, and overload protection for enhanced safety.
Specifications
| Feature | Detail |
|---|---|
| Manufacturer | ADL |
| Model Number | Mig250led (MIG-250S) |
| Product Dimensions | 46.99 x 41.4 x 26.11 cm |
| Item Weight | 8.53 kg |
| Input Voltage | 110V/220V |
| Welding Modes | Flux MIG, Lift TIG, MMA (Stick) |
| Included Components | Flux core Mig welder, Mig gun cable assembly, adapter plug, flux core wire, contact tips (5), welding rod, ground clamp, electrode holder |
| ASIN | B0C61RC86V |
Warranty Information
Specific warranty details are not provided in the product information. Please refer to the product packaging or contact ANDELI customer support for detailed warranty terms and conditions.
Customer Support
For technical assistance, troubleshooting beyond this manual, or warranty inquiries, please contact ANDELI customer support. Refer to the contact information provided with your product packaging or visit the official ANDELI website.
Note: Always provide your product model number (Mig250led) and ASIN (B0C61RC86V) when contacting support for faster service.


