1. Introduction
Thank you for choosing the vidaXL Galvanized Steel Chicken Cage. This outdoor poultry house is designed to provide a secure and spacious environment for your chickens, hens, ducks, and other small animals. Constructed from durable galvanized steel, it offers stability and protection against various outdoor conditions. This manual provides essential information for the safe assembly, operation, and maintenance of your chicken cage.

Image 1: Overall view of the vidaXL Galvanized Steel Chicken Cage, showing the enclosed run and the solid-walled coop section.
2. Safety Information
- Read all instructions carefully before assembly and use.
- Ensure all components are securely fastened during assembly to prevent collapse or injury.
- Position the cage on a level, stable surface to prevent tipping.
- Regularly inspect the cage for any damaged parts, sharp edges, or loose connections. Repair or replace as necessary.
- Keep children and pets away from the assembly area.
- Wear appropriate safety gear, such as gloves, during assembly to protect hands from sharp edges.
- Verify that the gate is securely latched at all times to prevent animals from escaping and predators from entering.
- Always follow local laws and regulations regarding animal enclosures and their dimensions.
3. Package Contents
Before beginning assembly, ensure all parts are present and undamaged. If any parts are missing or damaged, contact vidaXL customer support.
- Galvanized steel frame panels
- Wire mesh panels
- Roof panels
- Gate assembly
- Assembly hardware (screws, nuts, bolts, washers)
- Instruction manual (this document)
4. Assembly Instructions
Assembly typically requires two people. Allow sufficient time and space for construction. Refer to the included diagrams for visual guidance.
- Prepare the Site: Choose a level, stable, and well-drained area for the chicken cage. Clear any debris or obstacles.
- Unpack Components: Carefully unpack all parts and lay them out. Verify against the package contents list.
- Assemble the Base Frame: Connect the bottom frame sections using the provided hardware. Ensure all connections are snug but do not overtighten initially.
- Attach Side Panels: Secure the galvanized steel side panels to the base frame. Pay attention to the orientation of panels, especially those with pre-drilled holes for the gate or internal features.
- Install Wire Mesh Sections: Attach the wire mesh panels to the designated areas of the frame, forming the enclosed run. Use the appropriate fasteners to ensure the mesh is taut and secure, leaving no gaps.
- Assemble the Gate: Attach the gate frame and mesh. Install the gate into its designated opening, ensuring it swings freely and aligns correctly.
- Install Gate Latch: Secure the gate latch mechanism. Test the latch to ensure it closes and locks firmly, preventing accidental opening.
- Attach Roof Panels: Install the roof panels over both the solid coop section and the wire mesh run. Ensure proper overlap for weather protection and secure them firmly to the frame.
- Final Tightening: Once all components are in place and aligned, systematically tighten all screws and bolts. Do not overtighten to avoid stripping threads or deforming panels.
- Inspect: Conduct a final inspection to ensure all parts are secure, there are no sharp edges, and the structure is stable.
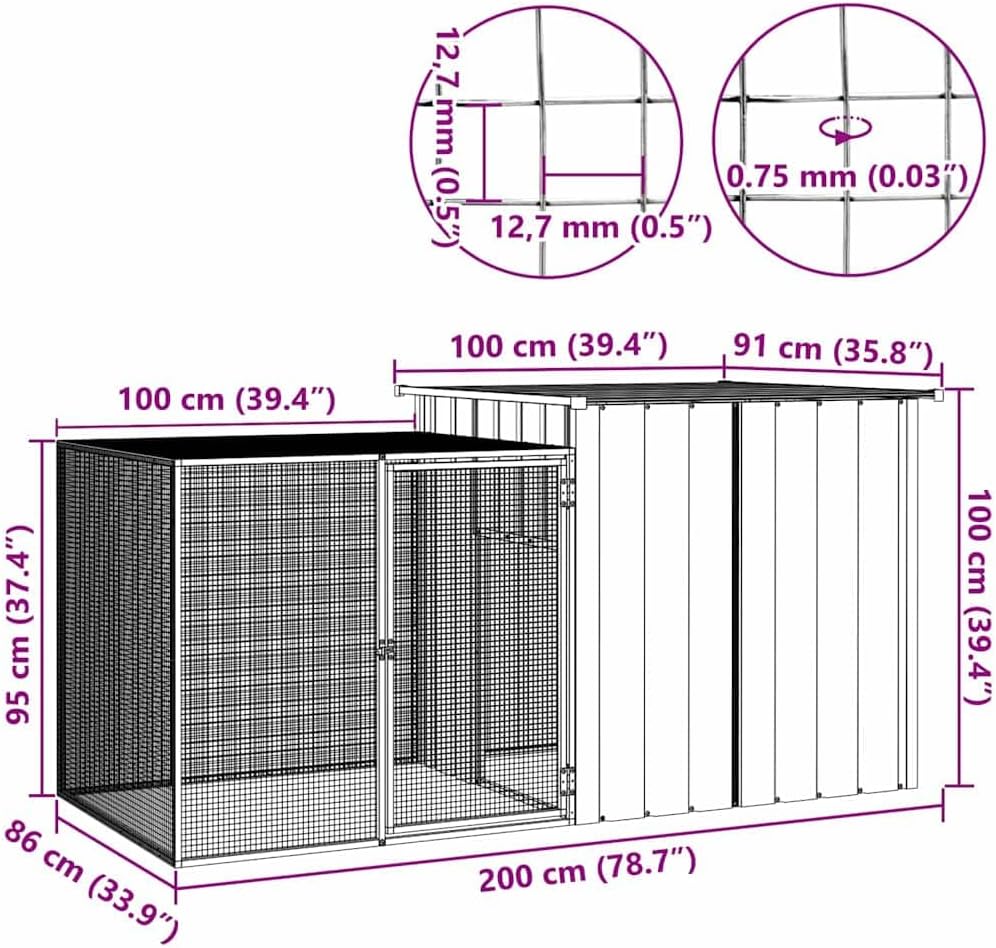
Image 2: Side view illustrating the wire mesh run and the solid-walled coop structure.
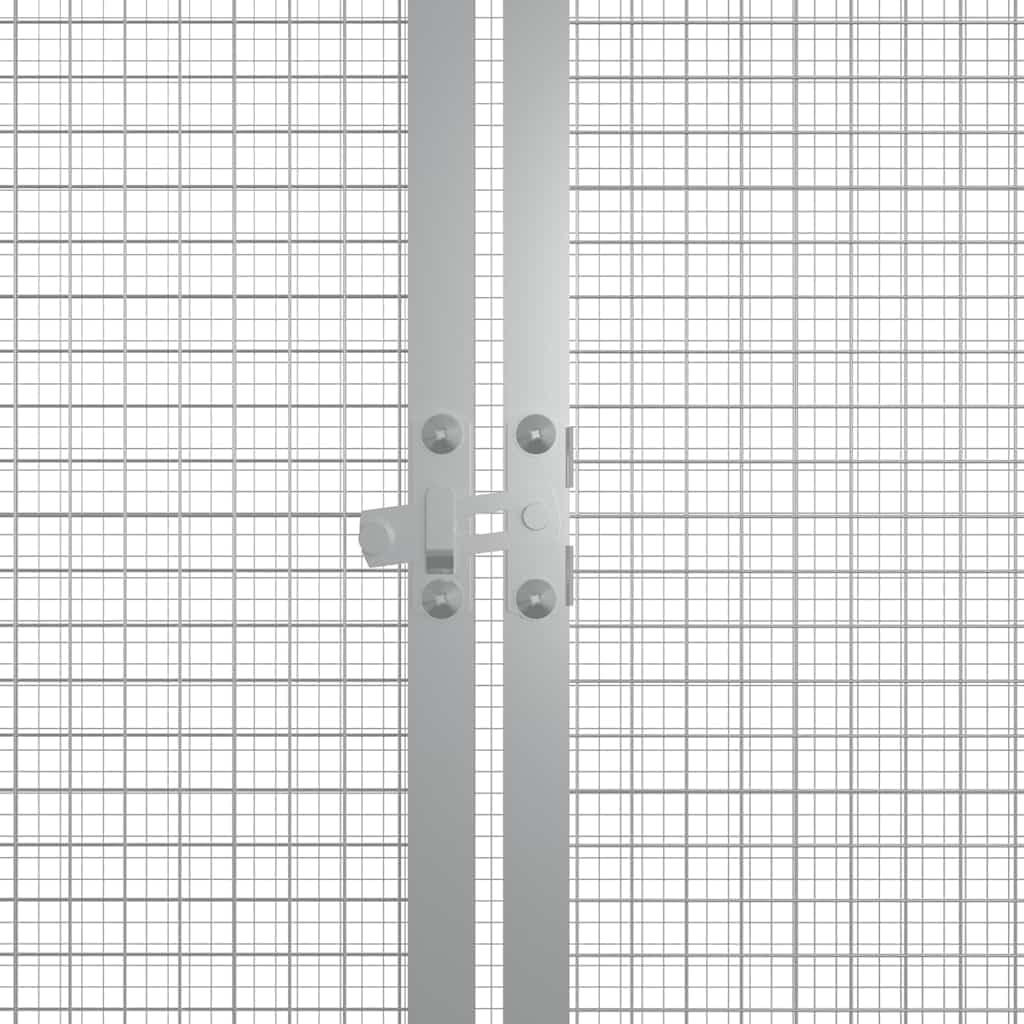
Image 3: Detail of the secure gate latch, designed for easy access and reliable closure.
5. Operation
- Placement: Position the cage in an area that provides adequate shade and protection from harsh weather conditions.
- Animal Introduction: Carefully introduce your poultry to the cage. Ensure they have access to food, water, and any necessary bedding or nesting boxes.
- Security: Always ensure the gate is fully closed and latched when animals are inside to prevent escape and protect against predators.
- Access: Use the large gate for easy access to feed, water, and collect eggs.
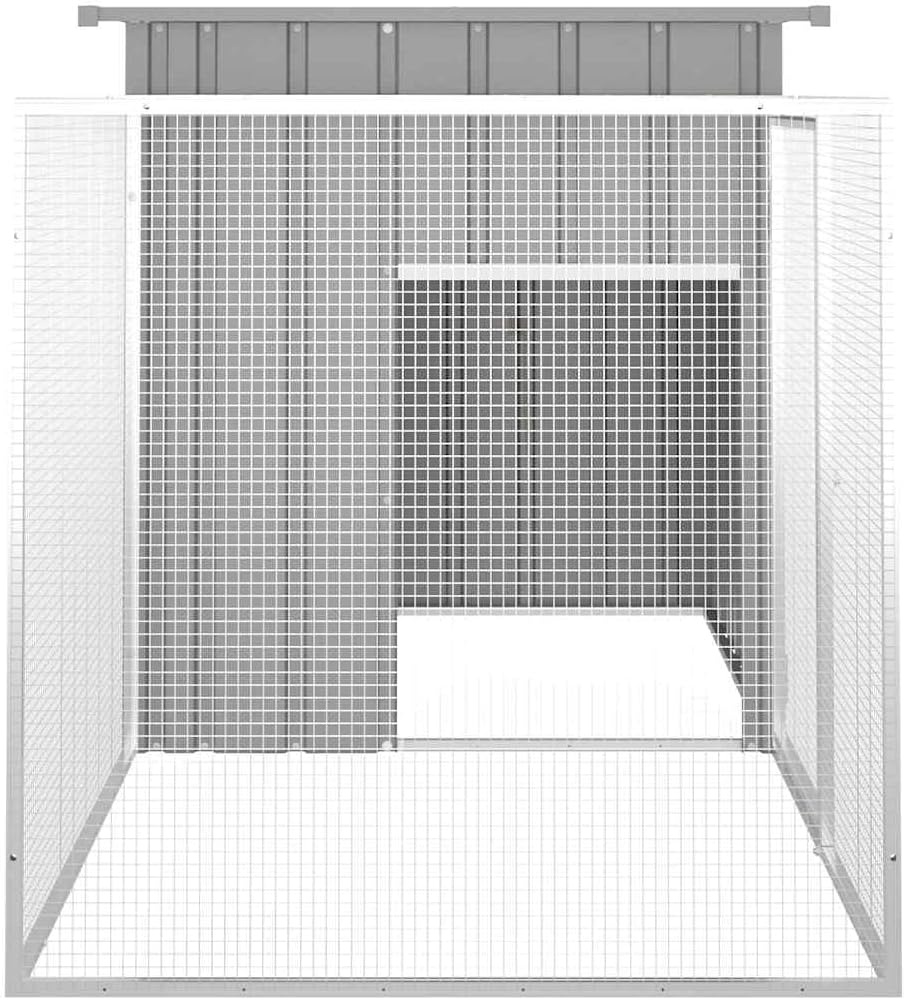
Image 4: Interior perspective, highlighting the roosting area and the opening connecting the run to the enclosed coop.
6. Maintenance
- Regular Cleaning: Clean the cage regularly to maintain hygiene for your poultry. Remove droppings, old feed, and soiled bedding.
- Inspection: Periodically inspect all parts of the cage for signs of wear, rust, or damage. Check for loose screws, bent wire mesh, or compromised structural integrity.
- Rust Prevention: Although made of galvanized steel, prolonged exposure to moisture can lead to rust. Address any signs of rust promptly with appropriate rust-treatment products.
- Gate Functionality: Ensure the gate hinges and latch operate smoothly. Lubricate if necessary.
- Environmental Checks: Regularly check the surrounding area for potential hazards or changes that might affect the cage's stability or security.
7. Troubleshooting
| Problem | Possible Cause | Solution |
|---|---|---|
| Cage feels unstable or wobbly. | Uneven ground; loose connections. | Relocate to a level surface or use shims. Tighten all assembly hardware. |
| Gate does not close properly. | Misalignment; bent hinges; obstructed latch. | Adjust gate alignment. Check hinges for damage. Clear any obstructions from the latch mechanism. |
| Wire mesh is loose or damaged. | Improper installation; wear and tear; animal activity. | Re-secure loose mesh with additional fasteners. Replace severely damaged sections. |
| Signs of rust appearing. | Prolonged moisture exposure; damaged galvanization. | Clean affected area, apply rust-inhibiting primer and paint. Ensure proper drainage around the cage. |
8. Specifications
- Model: 171546
- Brand: vidaXL
- Material: Galvanized Steel
- Color: Gray
- Overall Dimensions (L x W x H): 78.7" x 35.8" x 39.4" (200 cm x 91 cm x 100 cm)
- Item Weight: Approximately 45.6 lbs (20.75 kg)
- Gate Dimensions: 18.3" x 33.5" (approximate, based on feature bullets)
- Specific Uses: Outdoor poultry enclosure

Image 5: Detailed dimensional drawing of the chicken cage, including overall length, width, and height, as well as mesh size details.
9. Warranty Information
All products sold by vidaXL are covered by a legal guarantee of at least 2 years. For specific warranty terms and conditions, please refer to the purchase documentation or contact vidaXL customer service.
10. Customer Support
For further assistance, missing parts, or technical support, please contact vidaXL customer service through their official website or the retailer from whom you purchased the product. Please have your model number (171546) and purchase details ready when contacting support.
Website: www.vidaxl.com