1. Introduction
Thank you for choosing the ROCKBROS U Lock Bike U Lock with Cable. This heavy-duty anti-theft lock system is designed to provide robust security for your bicycle, e-bike, motorcycle, or scooter. Constructed from high-strength alloy steel with a silicone cover and a zinc alloy C-grade lock cylinder, it offers resistance against leveraging, cutting, and drilling. This manual provides essential information for the proper setup, operation, and maintenance of your lock.
2. Product Components
The ROCKBROS U Lock system includes the following items:
- U Lock: The primary locking mechanism, made of alloy steel with a silicone cover.
- Steel Cable: A 3.94 ft (approximately 120 cm) double-looped steel cable with a PVC shell for extended locking options.
- Mounting Bracket: For convenient attachment of the U lock to your vehicle's seat post.
- Keys: Three rust-resistant copper keys with complex serpentine slots.

Image 2.1: Overview of the ROCKBROS U Lock, including the U-lock body, mounting bracket, and three keys.
3. Setup
3.1 Mounting Bracket Installation
The included mounting bracket allows for secure and compact storage of the U lock on your bike frame during transport.
- Identify a suitable location on your bike's circular seat post. The bracket is compatible with seat posts up to 1.38 inches (35mm) in diameter.
- Attach the mounting bracket to the seat post using the provided hardware. Ensure it is tightened securely to prevent movement during cycling.
- Slide the U lock into the bracket until it clicks into place. Verify that the lock is firmly held by the bracket.

Image 3.1: The U lock attached to a bicycle seat post via the mounting bracket, demonstrating its portability and readiness for use.
4. Operating Instructions
4.1 Locking Your Vehicle with the U Lock
- Insert one of the provided keys into the lock cylinder.
- Turn the key to unlock the shackle (the U-shaped bar) from the crossbar.
- Position the U lock around your vehicle's frame and a secure, immovable object (e.g., a bike rack, lamppost). Ensure that both the frame and the object are encompassed by the shackle.
- Reinsert the shackle ends into the crossbar.
- Turn the key to lock the shackle in place. Remove the key.
4.2 Using the Steel Cable for Additional Security
The steel cable provides flexibility for securing additional components or for locking multiple items.
- Loop one end of the steel cable through your vehicle's wheels, helmet, or other accessories.
- Pass the other end of the cable through the first loop, creating a secure loop around the items.
- Secure the remaining free end of the cable by passing it through the U lock shackle before locking, or by looping it around another secure point and then through the U lock.

Image 4.1: The ROCKBROS U Lock and cable in use, demonstrating how to secure a bicycle to a fixed object.

Image 4.2: The U lock securing two bicycles, illustrating its versatility for multi-vehicle or multi-component locking.
5. Maintenance
Proper maintenance ensures the longevity and reliable performance of your ROCKBROS U Lock.
- Cleanliness: Periodically wipe down the U lock and cable with a damp cloth to remove dirt and grime. Avoid harsh chemicals.
- Lubrication: Apply a small amount of graphite lubricant or a silicone-based spray to the lock cylinder every few months, or if the key becomes difficult to turn. This helps maintain smooth operation and prevents corrosion.
- Silicone Cover: The silicone cover protects your vehicle's paint from scratches and adds an extra layer of weather resistance. Inspect it regularly for tears or damage.
- Storage: When not in use, store the lock in a dry environment to prevent rust, especially the key mechanism.
6. Troubleshooting
If you encounter issues with your ROCKBROS U Lock, consider the following:
- Key Difficult to Turn: Apply lubricant to the lock cylinder as described in the Maintenance section. Ensure the key is fully inserted and not bent or damaged.
- Shackle Stuck: Check for any debris obstructing the shackle's path into the crossbar. Ensure the lock is clean and lubricated. Avoid forcing the shackle.
- Mounting Bracket Loose: Re-tighten the screws on the mounting bracket to ensure it is securely fastened to the seat post.
For persistent issues not resolved by these steps, please contact customer support.
7. Specifications
Detailed specifications for the ROCKBROS U Lock (Model RKS610-BK):
| Feature | Detail |
|---|---|
| Brand | ROCKBROS |
| Model Number | RKS610-BK |
| Lock Type | Bike U Lock |
| Material | High strength alloy steel + silicone + zinc alloy lock core |
| U Lock Body Diameter | Approximately 0.84 inches (21.4mm) including silicone cover |
| Steel Diameter (U Lock) | Approximately 0.48 inches (1.2cm) |
| Item Dimensions (L x W x H) | 6.3 x 1.3 x 6.7 inches (16 x 3.4 x 17 cm) |
| Item Weight | Approximately 2.2 pounds (1 Kilogram) |
| Cable Length | 3.94 ft (approximately 120 cm) |
| Cable Diameter | 0.39 inches (10mm) |
| Mounting Bracket Compatibility | Circular seat posts with diameter ≤ 1.38 inches (35mm) |
| Recommended Uses | Bikes, e-bikes, motorcycles, scooters, electric scooters |
| Color | Black |
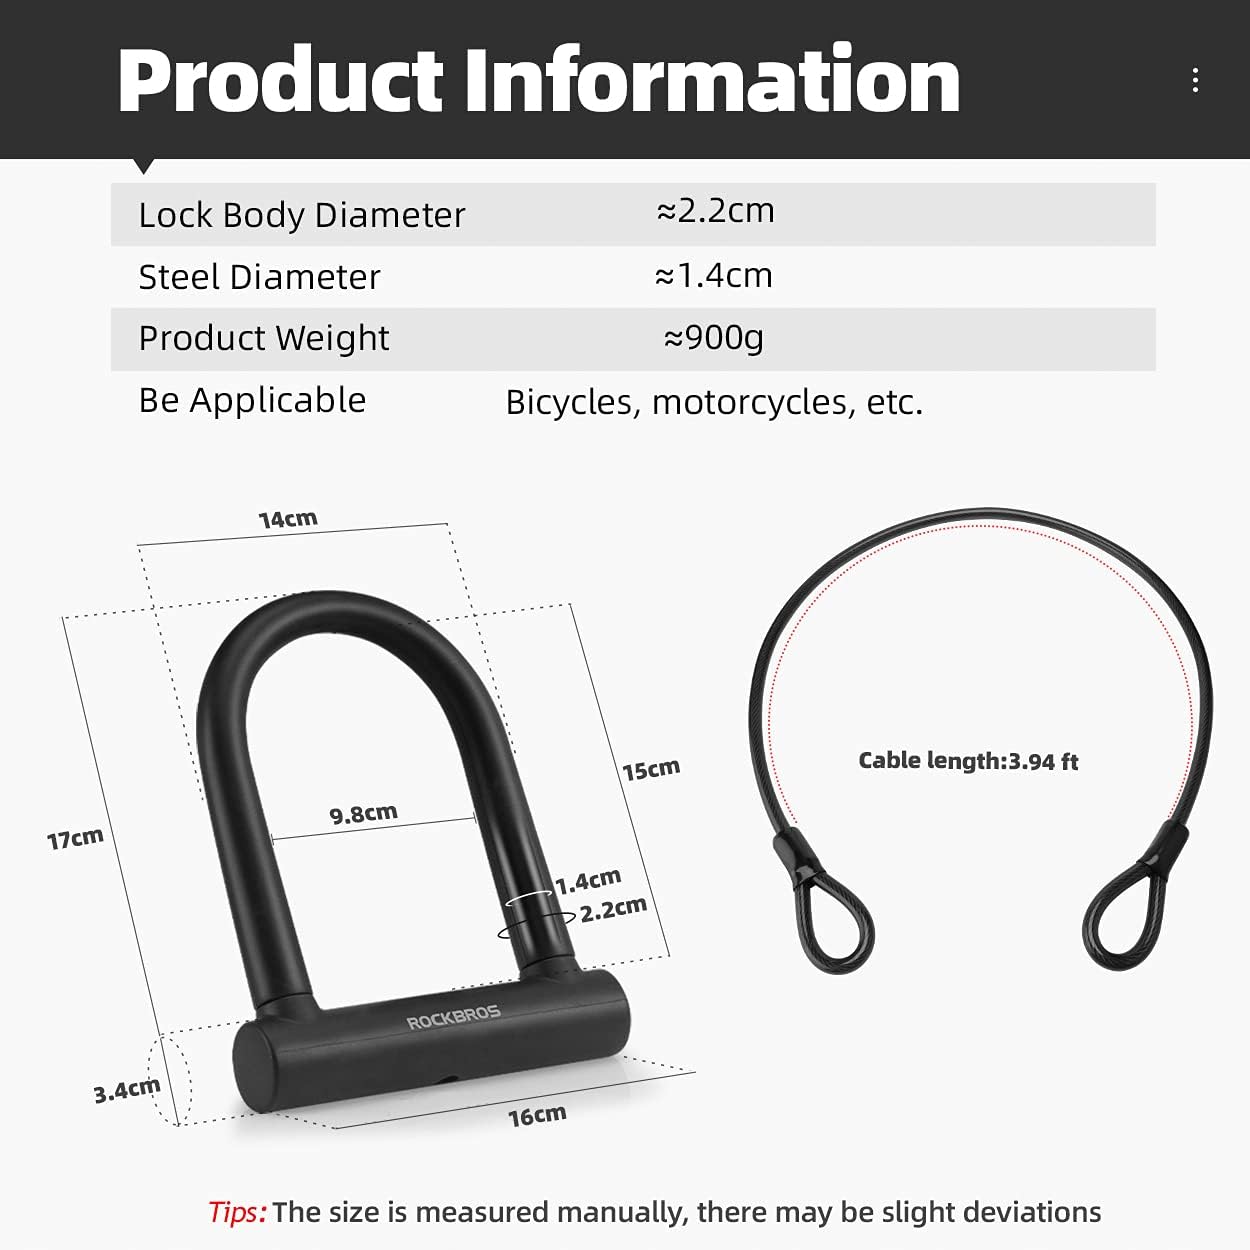
Image 7.1: Dimensional diagram of the U lock and cable, providing approximate measurements.
8. Warranty and Support
For warranty information or technical support regarding your ROCKBROS U Lock, please refer to the product packaging or contact ROCKBROS customer service directly. Contact details can typically be found on the official ROCKBROS website or through your point of purchase.
Online Support: Visit the official ROCKBROS website for FAQs and support resources.
Customer Service: Refer to your purchase documentation for specific contact information.