Introduction
This manual provides detailed instructions for the installation, operation, and maintenance of your Lightess 2PC LED Wall Sconces. Please read this manual thoroughly before using the product to ensure safe and optimal performance. Keep this manual for future reference.
Safety Information
To prevent injury or damage, please observe the following safety precautions:
- Do not disassemble, repair, or modify the product yourself. Refer all servicing to qualified personnel.
- Keep the product away from water, moisture, and high temperatures.
- Use only the provided USB charging cable and a compatible power adapter (5V) for charging.
- Ensure the installation surface is clean, dry, and stable before mounting the sconces.
- Do not look directly into the LED light source when it is on, as it may cause eye strain.
- Dispose of batteries according to local regulations. Do not expose batteries to excessive heat.
Package Contents
Verify that all items listed below are included in your package:
- 2 x Lightess LED Wall Sconces
- 2 x Magnetic Mounting Bases
- 2 x USB Charging Cables
- 1 x Remote Control
- Mounting Hardware (Screws and Wall Anchors)
- Adhesive Pads
- User Manual

Image: The image displays the complete package contents, including two white LED wall sconces, two magnetic mounting bases, two USB charging cables, one remote control, screws, wall anchors, and adhesive pads, along with the user manual.
Product Features
- 16 RGB Colors & 3 Color Temperatures: Offers a wide range of lighting options including 16 vibrant RGB colors and 3 adjustable white light color temperatures (2700K, 4000K, 5700K).
- Dynamic Lighting Modes: Features jumping, breathing, and twinkling effects for varied ambiance.
- 360° Free Rotating Magnetic Ball: Allows for flexible adjustment of the light direction. The light head can be easily detached and reattached from the magnetic base.
- Dual Control Methods: Operable via both touch control on the lamp and an included remote control.
- Adjustable Brightness: Offers 8 brightness levels via remote control and 3 levels (low, medium, high) via touch control.
- Built-in Rechargeable Battery: Cordless design with a built-in battery for portability and convenience.
- Timer Function: Remote control allows setting automatic shutdown timers (10min/30min/60min/120min).
- Versatile Application: Suitable for various indoor settings such as reading, working, bedside lighting, living rooms, hallways, and as an emergency light.

Image: This image showcases the two white LED wall sconces, the remote control, and visual representations of the color and brightness adjustment capabilities, highlighting the product's versatility.
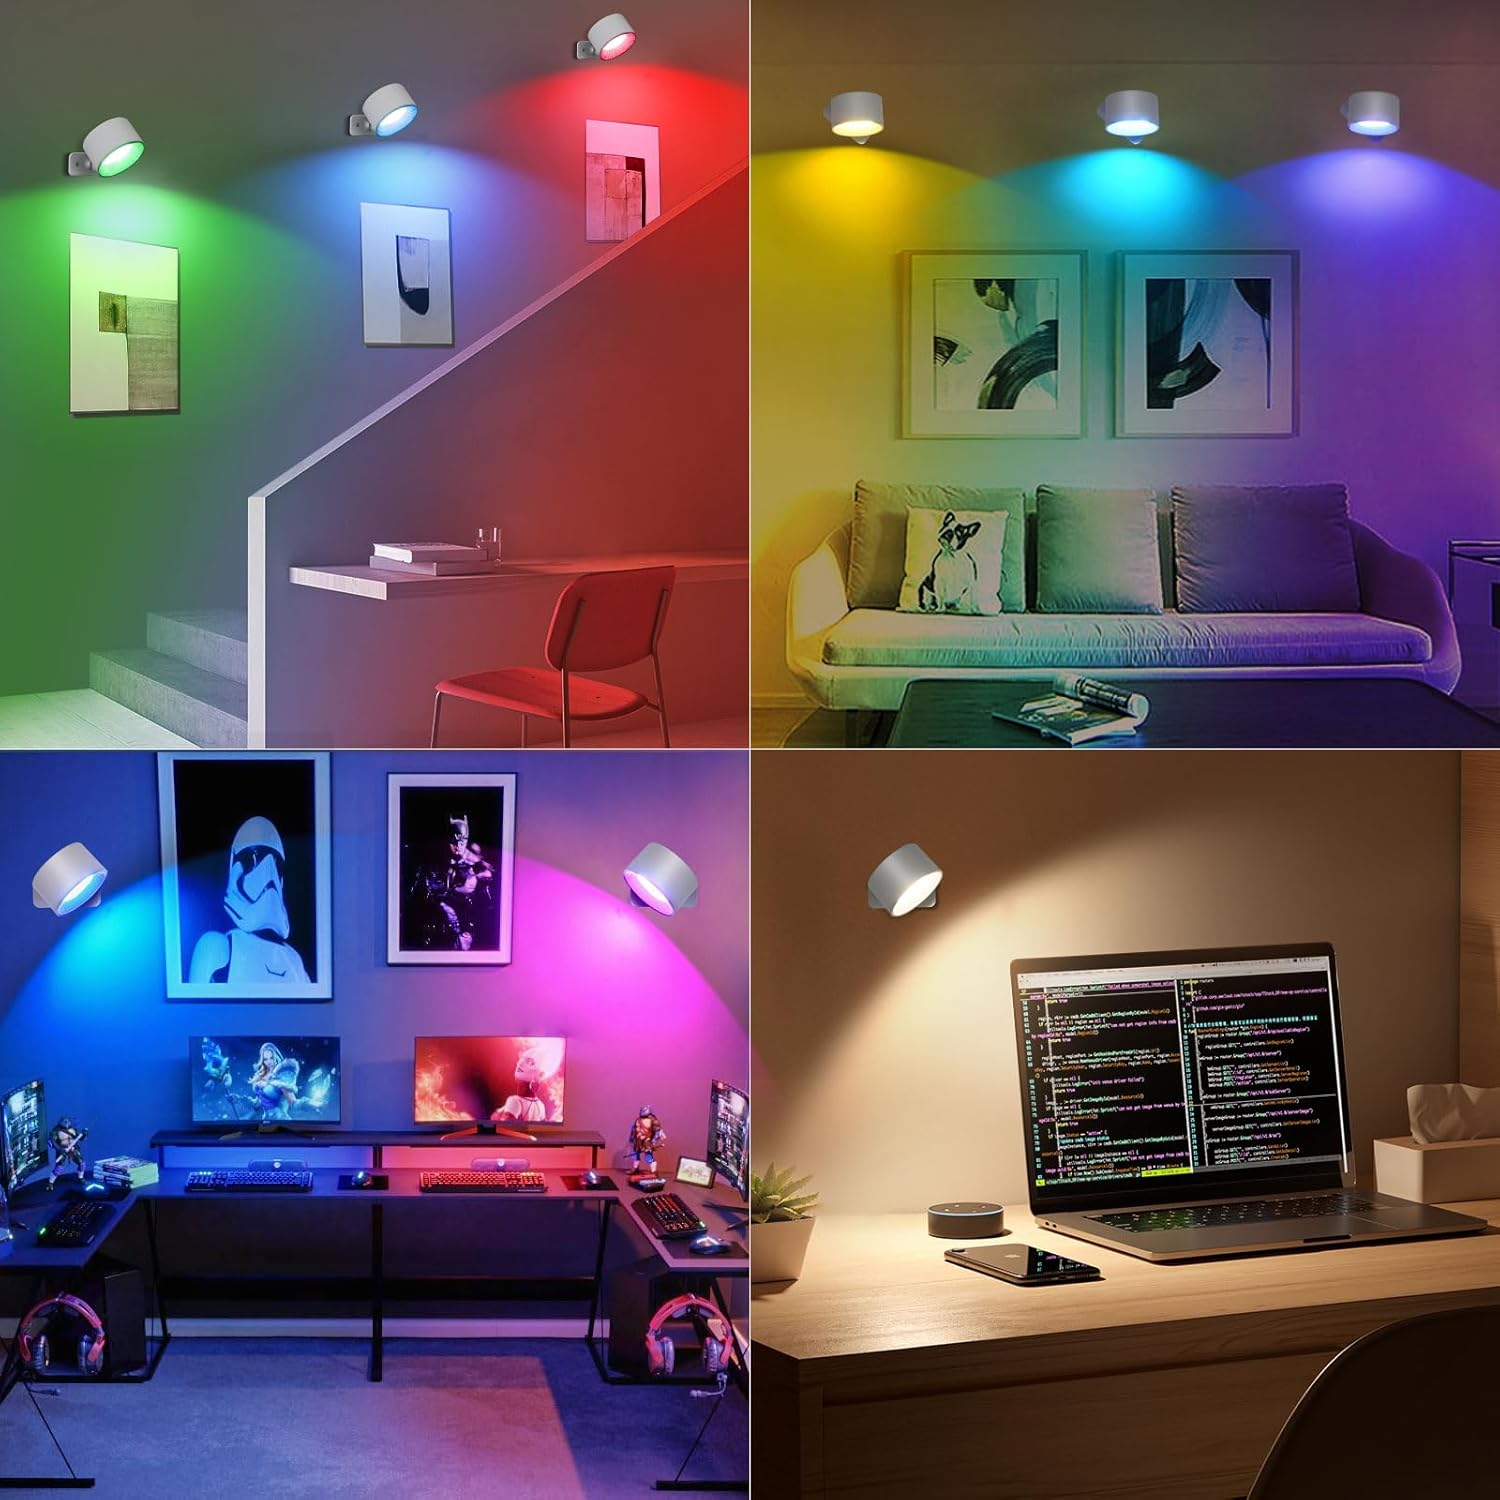
Image: This composite image demonstrates the wall sconces installed in different environments, including a staircase, living room, gaming setup, and a desk, illustrating their wide application and color-changing capabilities.
Setup and Installation
Your Lightess LED Wall Sconces offer two installation methods: adhesive mounting or screw fixation.
Method 1: Adhesive Mounting (for smooth, intact walls)
- Clean the desired wall surface thoroughly to ensure it is free of dust, dirt, and grease. Allow it to dry completely.
- Peel off the protective film from one side of the adhesive pad and firmly attach it to the back of the magnetic mounting base.
- Peel off the protective film from the other side of the adhesive pad.
- Press the magnetic mounting base firmly onto the cleaned wall surface for at least 30 seconds. Ensure a strong bond.
- Attach the LED wall sconce to the magnetic ball on the mounted base. The strong magnetic attraction will hold it in place.
Method 2: Screw Fixation (for non-adhesive walls or stronger hold)
- Choose the desired location on the wall.
- Mark the positions for the screw holes on the wall using the magnetic mounting base as a template.
- Drill pilot holes at the marked positions. Insert wall anchors if necessary (for drywall or plaster).
- Align the magnetic mounting base with the drilled holes and secure it to the wall using the provided screws.
- Attach the LED wall sconce to the magnetic ball on the mounted base.

Image: This image illustrates the two installation methods: "Installation mode 1" shows the use of 3M adhesive for intact walls, and "Installation mode 2" depicts screw fixation suitable for non-adhesive walls, emphasizing the strong magnetic attraction.
Operation
Your Lightess LED Wall Sconces can be controlled via touch or the included remote control.
Initial Power On
Before using the remote control, ensure the light is manually turned on using the touch button on the top of the lamp.
Touch Control
- Power On/Off: Gently touch the button at the top of the wall lamp to turn it on or off.
- Brightness Adjustment: Briefly press the touch button to cycle through three brightness levels: Low, Medium, and High.
- Color Temperature Adjustment: Press and hold the touch button for 2 seconds to switch between the three white light color temperatures (2700K, 4000K, 5700K).
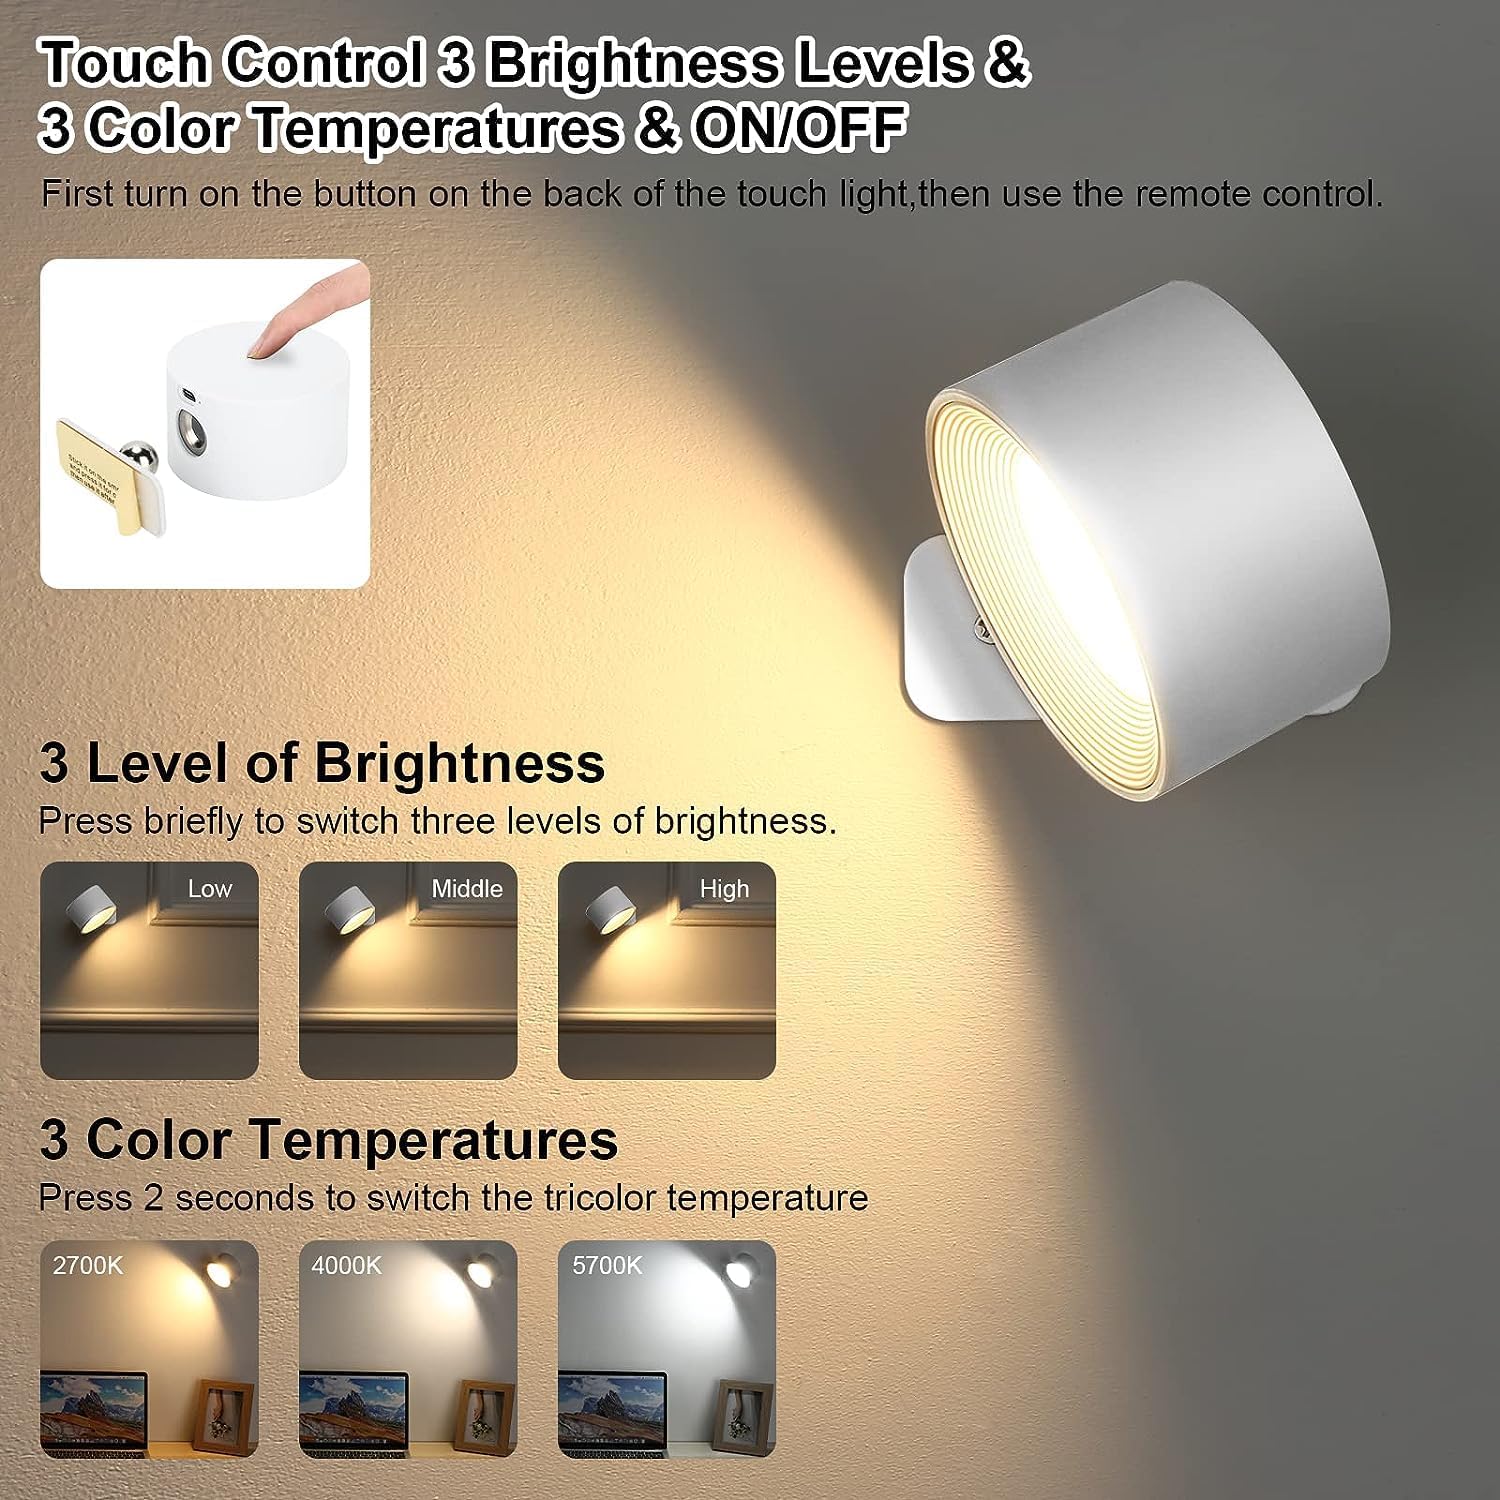
Image: This image details the touch control functionality, showing how to adjust brightness through three levels (Low, Middle, High) and switch between three color temperatures (2700K, 4000K, 5700K) by pressing the top button.
Remote Control
The remote control provides comprehensive control over the sconces.
- Power On/Off: Press the "ON" or "OFF" button.
- Brightness Adjustment: Use the brightness up/down buttons to select from 8 brightness levels.
- Color Selection:
- Press the dedicated color buttons for 16 RGB colors.
- Press the white light buttons for 3 adjustable color temperatures.
- Dynamic Modes: Select "Jumping", "Breathing", or "Twinkling" modes for special effects.
- Timer Function: Press the 10min, 30min, 60min, or 120min buttons to set the automatic shutdown timer.

Image: This image illustrates both the remote control and touch control options, showcasing the remote's layout with buttons for 19 colors (3 white, 16 RGB) and various functions, alongside the touch sensor on the lamp.
Charging
The Lightess LED Wall Sconces are equipped with a built-in rechargeable battery. When the light dims or stops working, it's time to recharge.
- Locate the USB charging port on the side of the sconce.
- Connect the provided USB charging cable to the sconce and to a compatible USB power source (e.g., computer USB port, wall adapter, power bank).
- The charging indicator light will illuminate during charging and turn off when fully charged.
- Charging Time: Approximately 3-4 hours for a full charge.
- Continuous Working Time: ≥5 hours (minimum) to ≥20 hours (maximum), depending on brightness and color settings.

Image: This diagram highlights key lamp details, including the USB charging port, the 360° free rotation magnetic ball, and the extra sticky mount, along with charging and working time specifications.
Maintenance
To ensure the longevity and optimal performance of your wall sconces, follow these simple maintenance guidelines:
- Cleaning: Wipe the surface of the sconce with a soft, dry cloth. Do not use abrasive cleaners or solvents, as they may damage the finish.
- Battery Care: If the sconce will not be used for an extended period, charge it fully before storage and recharge it every 3 months to maintain battery health.
- Magnetic Base: Ensure the magnetic ball and the corresponding recess on the lamp head are clean and free of debris for a secure connection.
Troubleshooting
If you encounter issues with your Lightess LED Wall Sconces, refer to the following common problems and solutions:
| Problem | Possible Cause | Solution |
|---|---|---|
| Light does not turn on. | Battery is depleted. Light is not manually turned on. | Charge the sconce fully. Ensure the touch button on the lamp is pressed to turn it on before using the remote. |
| Remote control is not responding. | Light is off or battery is low. Remote battery is depleted. Obstruction between remote and light. | Ensure the light is manually turned on and charged. Replace the remote control battery. Ensure clear line of sight to the light. |
| Light dims quickly or battery life is short. | Insufficient charging. High brightness/dynamic mode usage. Battery degradation over time. | Ensure the sconce is charged for the recommended 3-4 hours. Lower brightness settings or use static colors for longer battery life. Contact customer support if battery life significantly degrades prematurely. |
| Light head does not stay attached to the base. | Magnetic ball or recess is dirty. Base not securely mounted. | Clean the magnetic ball and the recess on the lamp head. Re-mount the base securely using either adhesive or screws. |
Specifications
| Feature | Detail |
|---|---|
| Brand | Lightess |
| Model Name | LED Wall Sconce |
| Model Number | 9943690 |
| Color | White-2 Pack |
| Material | Plastic |
| Product Dimensions | 2"L x 2"W x 2"H |
| Item Weight | 1.1 pounds (0.5 Kilograms) |
| Power Source | Battery Powered (Rechargeable Lithium Ion) |
| Voltage | 5 Volts |
| Wattage | 4.5 watts |
| Brightness | 350 Lumen |
| Light Source Type | LED |
| Color Temperature | 6000 Kelvin (Adjustable to 2700K, 4000K, 5700K) |
| Number of Light Sources | 2 |
| Control Method | Remote Control, Touch Control |
| Special Features | Adjustable Color Temperature, Color Changing, Dimmable, Portable, Timer |
| Average Life | 35000 Hours |
| Installation Type | Semi Flush Mount (Adhesive or Screw) |
| Batteries Required | Yes (1 Lithium Ion battery included per sconce) |
Warranty and Support
For warranty information or technical support, please contact Lightess customer service directly. Refer to the product packaging or the official Lightess website for contact details.
Please retain your proof of purchase for any warranty claims.