
SURAIELEC ULTD20D
SURAIELEC 200W Low Voltage Transformer User Manual
Model: ULTD20D
Brand: SURAIELEC
Important Safety Information
WARNING:
- This installation involves wiring through the building structure. There is a risk of fire. A special wiring method is required for installation in building structures.
- Always disconnect power before servicing.
- Not suitable for diving equipment.
- Do not use with a dimmer.
CAUTION:
- Only for installation in or on non-combustible materials.
- Non-combustible material spacing on mounting surface.
- Suitable for indoor and outdoor use.
- Please read the installation instructions before wiring for low-voltage landscape lighting and accessories only.
Product Overview
The SURAIELEC 200W Low Voltage Transformer is designed to convert 120-volt AC household current to a safe 12V AC or 15V AC low voltage current, ideal for landscape lighting systems. It features a digital timer and a photocell sensor for automated operation, along with multiple lighting modes to suit various needs. The robust 304 stainless steel construction ensures durability and weather resistance for both indoor and outdoor installations.

Figure 1: Front view of the SURAIELEC 200W Low Voltage Transformer with its enclosure open, showing the control panel and wiring compartment. The unit is made of stainless steel and includes a power cord.

Figure 2: Internal view highlighting the potted toroidal core for efficient and safe operation, and the built-in backup battery that maintains time and program settings during power outages.
Setup and Installation
Mounting the Transformer
The transformer is designed for wall mounting. Choose a suitable location that is close to a 120V AC power outlet and where the low-voltage cables can be easily routed to your landscape lights. Ensure the mounting surface is non-combustible.
- Identify a secure, flat surface for mounting.
- Use the two mounting holes on the back of the transformer as a template to mark drilling locations.
- Drill pilot holes and secure the transformer to the wall using appropriate screws and anchors (included).

Figure 3: Detailed diagram illustrating the transformer's dimensions (11.6" H x 6.1" W x 3.3" D), the two mounting holes (2" apart), the 1" tool-less grommet, the 5ft SJTW 18AWG power cord, and the 6ft photocell sensor cable. Mounting hardware is also shown.
Wiring Low Voltage Lights
Before wiring, ensure the transformer is unplugged from the main power outlet. The transformer offers selectable 12V AC and 15V AC multi-tap outputs to compensate for voltage drop on longer cable runs.
- Determine the total wattage of your landscape lights. Ensure it does not exceed the transformer's 200W capacity.
- Route your low-voltage landscape lighting cables from your fixtures to the transformer.
- Strip approximately 1/2 inch of insulation from the ends of your low-voltage cables.
- Connect the low-voltage cables to the appropriate terminals (12V, 15V, or COM) inside the transformer's wiring compartment. Use the 12V terminals for shorter runs or standard brightness, and the 15V terminals for longer runs or to compensate for voltage drop. The COM terminals are common returns.
- Ensure all connections are secure and tight.
- Close and secure the transformer's enclosure door.

Figure 4: View of the wiring terminals inside the transformer, showing the 15V, 12V, and COM (Common) outputs. The photo sensor cable connection point and the circuit breaker button are also visible.
Connecting the Photocell Sensor
The detachable photocell sensor allows for automatic dusk-to-dawn operation. Its 6-foot cable provides flexibility for optimal placement.
- Plug the photocell sensor cable into the designated port on the transformer's control panel.
- Mount the photocell sensor in a location that receives natural light, away from artificial light sources that could interfere with its operation (e.g., porch lights, streetlights).
Operating Instructions
The transformer features a digital display and control buttons for easy programming. The built-in battery backup ensures settings are retained during power outages.
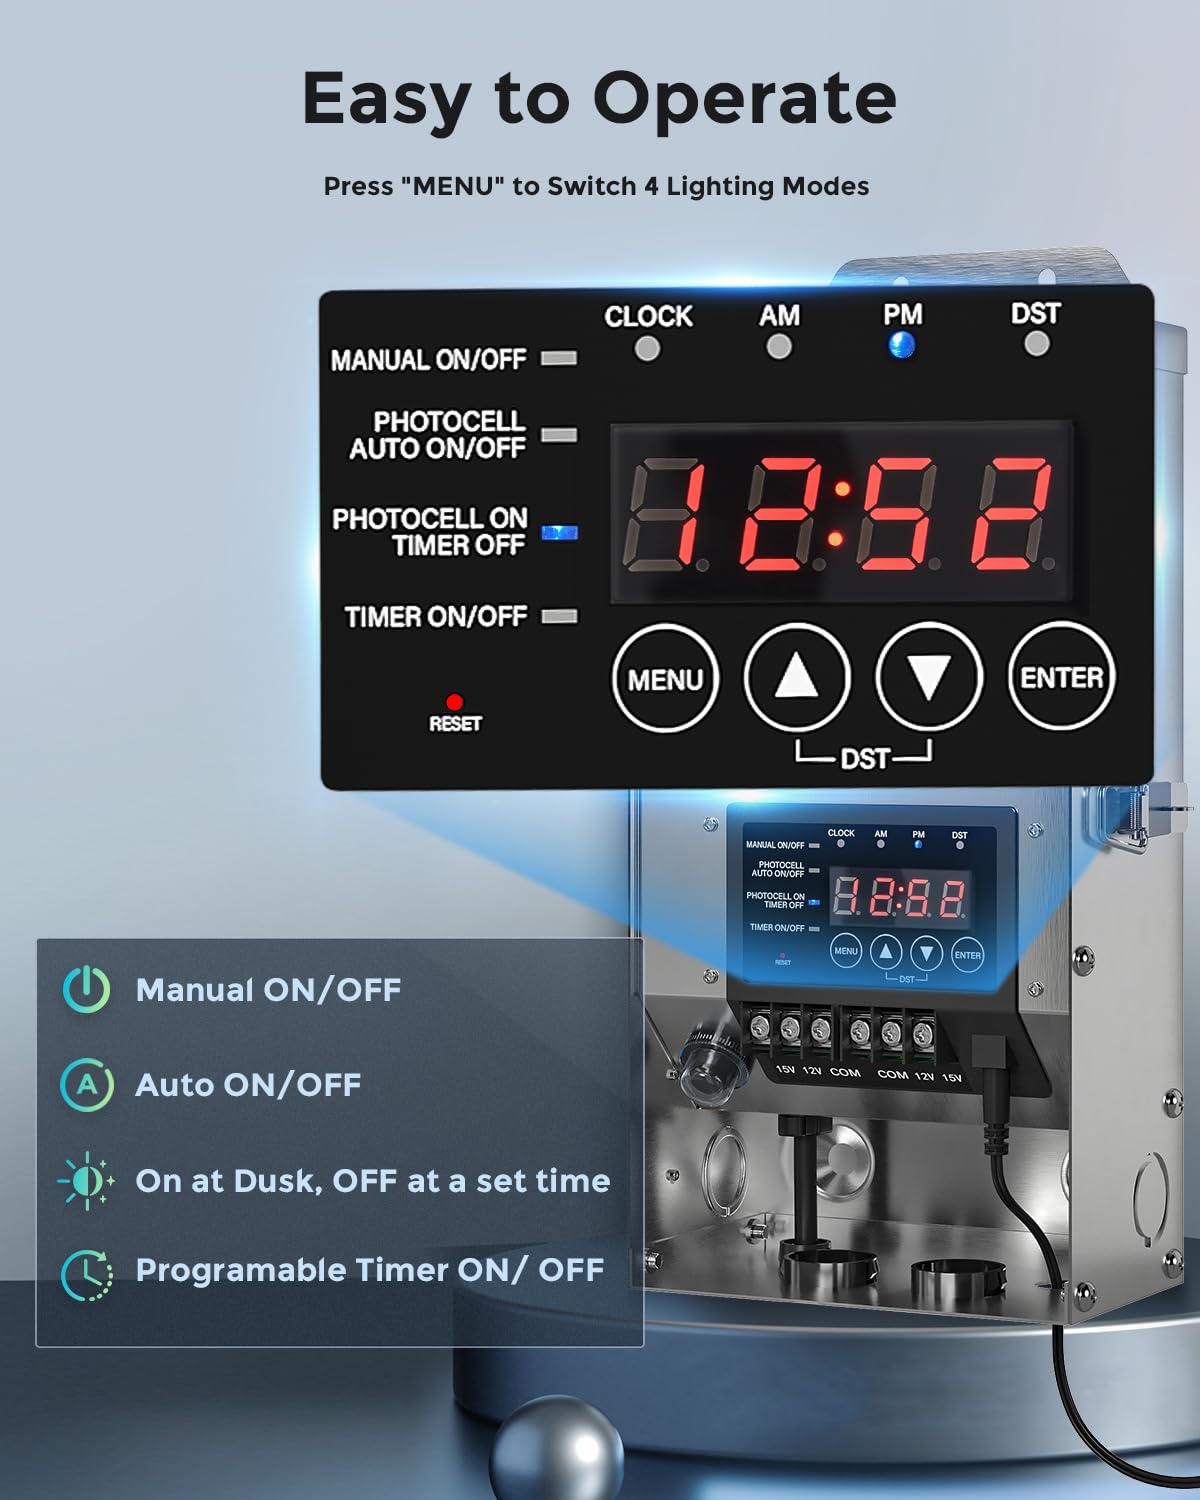
Figure 5: The digital control panel showing the display, MENU, RESET, UP, DOWN, and ENTER buttons. Indicators for CLOCK, AM, PM, and DST are also present, along with labels for the four lighting modes.
Control Panel Overview
- Digital Display: Shows current time and programming settings.
- MENU Button: Cycles through the four lighting modes and programming options.
- RESET Button: Restores factory settings.
- UP/DOWN Buttons: Adjust time and program values. Also used for DST (Daylight Saving Time) adjustment.
- ENTER Button: Confirms selections.
Setting the Clock
- Press the MENU button until the CLOCK indicator flashes.
- Use the UP/DOWN buttons to set the hour. Press ENTER to confirm.
- Use the UP/DOWN buttons to set the minute. Press ENTER to confirm.
- The clock is now set.
Selecting Lighting Modes
Press the MENU button repeatedly to cycle through the following four lighting modes:
- Manual ON/OFF:
Allows you to manually turn the lights ON or OFF. The transformer will remain in the selected state until manually changed again.

Indicator for Manual ON/OFF mode.
- Photocell Auto ON/OFF:
The lights will automatically turn ON at sunset and OFF at sunrise, based on the photocell sensor's detection of ambient light levels.

Indicator for Photocell Auto ON/OFF mode.

Figure 6: Visual representation of lights automatically turning on at sunset and off at sunrise using the photocell sensor.
- Photocell ON/Timer OFF:
The lights will turn ON at sunset and remain ON for a set duration (e.g., 4, 6, 8 hours) before turning OFF. This combines photocell activation with a timed shut-off.

Indicator for Photocell ON/Timer OFF mode.
- Programmable Timer ON/OFF:
Allows you to set specific ON and OFF times for your lights, independent of the photocell sensor. This is useful for precise scheduling.

Indicator for Programmable Timer ON/OFF mode.
Daylight Saving Time (DST) Adjustment
To adjust for Daylight Saving Time, press and hold the UP or DOWN button for a few seconds until the DST indicator illuminates. This will automatically adjust the time by one hour.
Maintenance
Regular maintenance ensures optimal performance and longevity of your SURAIELEC Low Voltage Transformer.
- Cleaning: Periodically wipe the stainless steel enclosure with a soft, damp cloth to remove dirt and debris. Avoid abrasive cleaners that could scratch the surface.
- Photocell Sensor: Ensure the photocell sensor lens is clean and free from obstructions (e.g., leaves, dirt, snow) to guarantee accurate light detection.
- Wiring Connections: Annually inspect all low-voltage wiring connections at the transformer and at the light fixtures to ensure they are secure and free from corrosion.
- Ventilation: Ensure the transformer's ventilation openings are not blocked to prevent overheating.
Troubleshooting
| Problem | Possible Cause | Solution |
|---|---|---|
| Lights do not turn on. |
|
|
| Lights stay on constantly or do not turn off. |
|
|
| Digital display is blank or flickering. |
|
|
Specifications
| Feature | Detail |
|---|---|
| Brand | SURAIELEC |
| Model Number | ULTD20D |
| Power Source | Corded Electric |
| Input Voltage | 120V AC |
| Output Voltage | Selectable 12V AC / 15V AC |
| Wattage | 200W |
| Current Rating | 1.67 Amps |
| Frequency | 60 Hz |
| Product Dimensions | 8.4D x 15.5W x 29.5H Centimetres (8.38 x 15.49 x 29.46 cm) |
| Item Weight | 4.76 kg |
| Mounting Type | Wall Mount |
| Material | 304 Stainless Steel |
| Certification | ETL |
| First Available Date | Aug. 23 2023 |
Warranty and Support
SURAIELEC stands behind the quality of its products. For warranty information, technical support, or any questions regarding your low voltage transformer, please contact SURAIELEC customer service. Refer to the product packaging or the official SURAIELEC website for the most current contact details.
When contacting support, please have your product model number (ULTD20D) and purchase date available.
Ask a question about this manual
Ask about setup, troubleshooting, compatibility, parts, safety, or missing instructions. Manuals+ will review the question and use this page’s manual context to help answer it.