Klighten A310/3-3000K
Klighten LED Wall Light Instruction Manual
Model: A310/3-3000K
1. Introduction
Thank you for choosing the Klighten 30W Minimalist Black LED Wall Light. This manual provides essential information for the safe and efficient installation, operation, and maintenance of your new lighting fixture. Please read this manual thoroughly before installation and retain it for future reference.

Figure 1.1: Klighten 30W Minimalist Black LED Wall Light.
2. Important Safety Instructions
WARNING: Risk of electric shock. Installation should only be performed by a qualified electrician.
- Always turn off the power at the main circuit breaker before beginning any installation or maintenance.
- Ensure the voltage supply matches the requirements of the fixture (220-240V AC, 50/60Hz).
- Do not modify the fixture in any way. Unauthorized modifications may void the warranty and pose safety risks.
- This product is rated IP65 for outdoor use, meaning it is protected against dust ingress and low-pressure water jets from any direction. However, avoid submerging the fixture.
- Keep children and pets away from the installation area.
- Handle the light fixture with care to prevent damage.
3. Product Specifications
| Feature | Specification |
|---|---|
| Model Number | A310/3-3000K |
| Brand | Klighten |
| Power Consumption | 30W |
| Color Temperature | 3000K Warm White |
| Material | High-quality Aluminum |
| Dimensions (L x W x H) | 30.8 x 10.8 x 11 cm (11.8 x 3.9 x 3.9 inches) |
| Ingress Protection (IP) Rating | IP65 (Waterproof) |
| Beam Angle | Adjustable 0-120° |
| Power Source | Corded Electric |
| Energy Efficiency Class | F (30 kWh/1000h) - EPREL Link |

Figure 3.1: Product dimensions and adjustable beam angle examples.

Figure 3.2: Energy Efficiency Label. For more details, visit the EPREL database.
4. Package Contents
Before installation, please verify that all components are present and undamaged:
- Klighten 30W LED Wall Light Fixture
- Mounting Hardware (screws, wall anchors)
- Hex Key (for beam angle adjustment)
- Instruction Manual (this document)
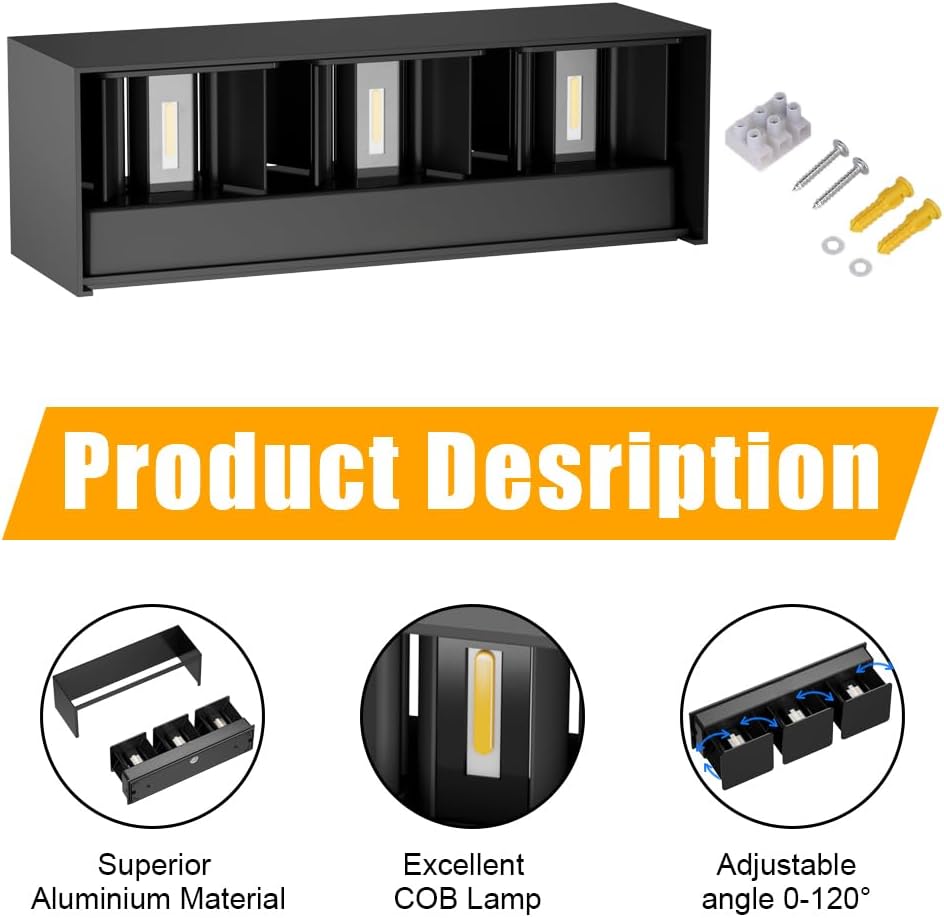
Figure 4.1: Components and included accessories.
5. Installation Guide
Professional installation is recommended for this product.
- Prepare the Installation Area: Ensure the power supply to the installation location is turned off at the circuit breaker. Use a voltage tester to confirm the power is off.
- Remove the Back Cover: Carefully pull out the screws securing the back cover of the light fixture. This will separate the mounting plate from the main light body.
- Attach the Back Cover to the Wall: Position the back cover on the desired wall location. Mark the drilling points through the holes on the back cover. Drill holes and insert wall anchors if necessary. Secure the back cover to the wall using the provided screws. Ensure it is firmly attached.
- Connect Wiring: Connect the household electrical wires to the corresponding wires on the light fixture. Ensure proper polarity (Live to Live, Neutral to Neutral, Ground to Ground). Use appropriate wire connectors and ensure all connections are secure and insulated.
- Attach the Wall Lamp: Align the main light body with the mounted back cover. Carefully push the light body onto the back cover, ensuring the wires are not pinched. Secure the light body to the back cover using the screws removed in step 2.
- Cover the Shade: Place the outer shade of the wall lamp over the main light body, ensuring it fits snugly and is properly aligned.
- Restore Power: Once installation is complete and all connections are secure, turn the power back on at the circuit breaker. Test the light fixture.
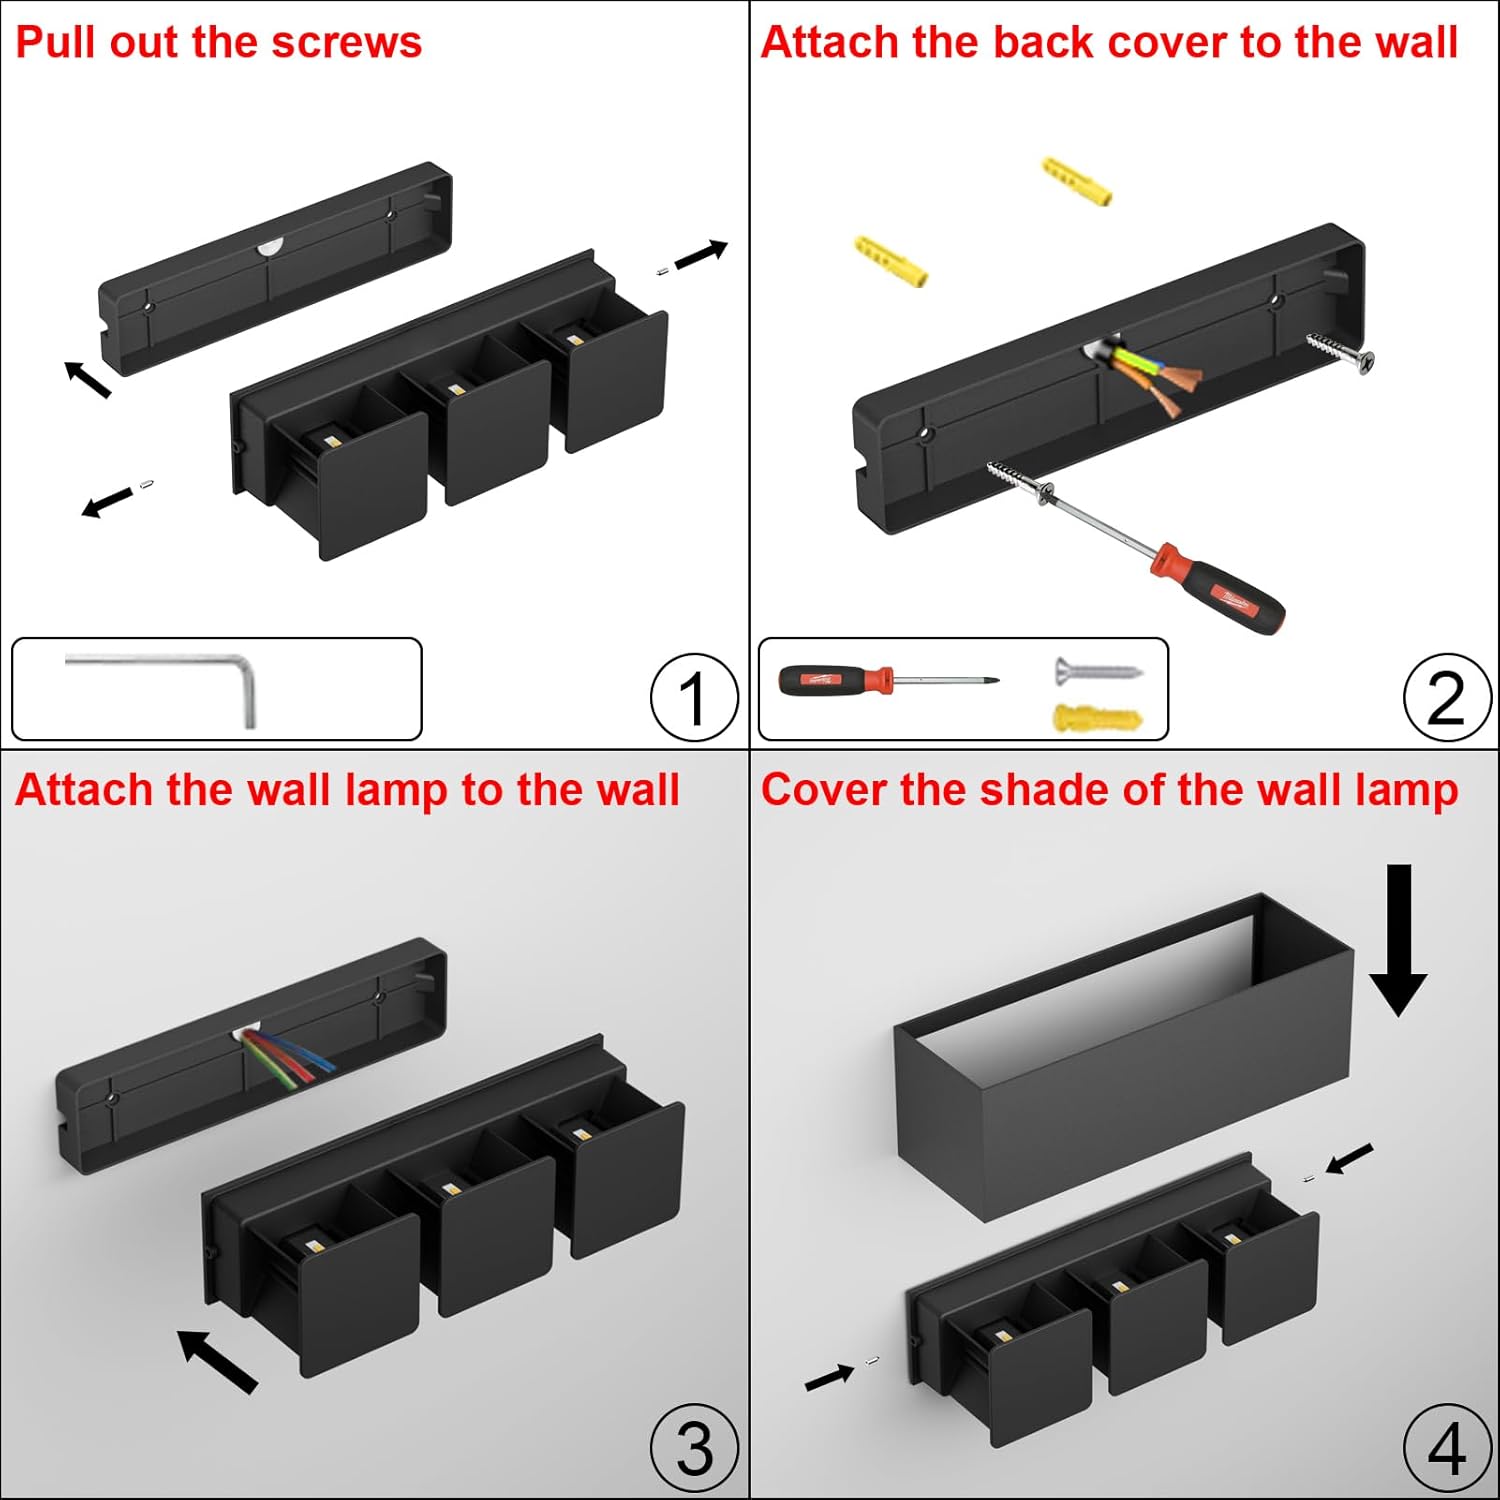
Figure 5.1: Step-by-step installation guide.
6. Operation
6.1 Turning On/Off
The Klighten LED Wall Light operates via a standard wall switch connected to its power supply. Simply toggle the switch to turn the light on or off.
6.2 Adjusting Beam Angle
This fixture features an adjustable beam angle, allowing you to customize the light distribution from 0 to 120 degrees. To adjust:
- Ensure the light is turned off and cool to the touch.
- Carefully remove the outer shade of the wall lamp.
- Locate the adjustable flaps inside the light fixture.
- Gently move the flaps to achieve your desired light pattern (e.g., narrow beam, wide spread, or asymmetric).
- Once adjusted, reattach the outer shade securely.

Figure 6.1: Adjustable Beam Angle Design.
7. Maintenance
Regular maintenance ensures the longevity and optimal performance of your Klighten LED Wall Light.
- Cleaning: Before cleaning, ensure the power is off and the fixture is cool. Wipe the fixture with a soft, damp cloth. Do not use abrasive cleaners, solvents, or harsh chemicals, as these may damage the finish or electrical components.
- Inspection: Periodically inspect the fixture for any signs of damage, loose connections, or wear. If any issues are found, consult a qualified electrician for repair.
- LEDs: The integrated LED light source is designed for long-term use and is not user-replaceable.
8. Troubleshooting
If you encounter issues with your Klighten LED Wall Light, refer to the following common problems and solutions:
| Problem | Possible Cause | Solution |
|---|---|---|
| Light does not turn on. | No power supply. Loose wiring connection. Faulty wall switch. | Check circuit breaker. Ensure all wiring connections are secure (consult electrician). Test the wall switch. |
| Light flickers. | Loose wiring. Incompatible dimmer switch (if applicable). | Check wiring connections (consult electrician). Ensure a compatible dimmer is used or remove dimmer if not needed. |
| Light output is weak or inconsistent. | Dust or debris on the light surface. Incorrect beam angle adjustment. | Clean the light surface. Adjust the internal flaps to the desired beam angle. |
If the problem persists after attempting these solutions, please contact Klighten customer support.
9. Warranty and Support
Klighten strives to offer the best products and services. Products purchased from the Klighten flagship store are warranted.
For any questions, concerns, or support inquiries regarding your Klighten LED Wall Light, please contact us:
- Email: Klighten@sina.com
- EU Representative Email: eu@eulinx.eu
We are always there for you.

Figure 9.1: Product information from packaging.
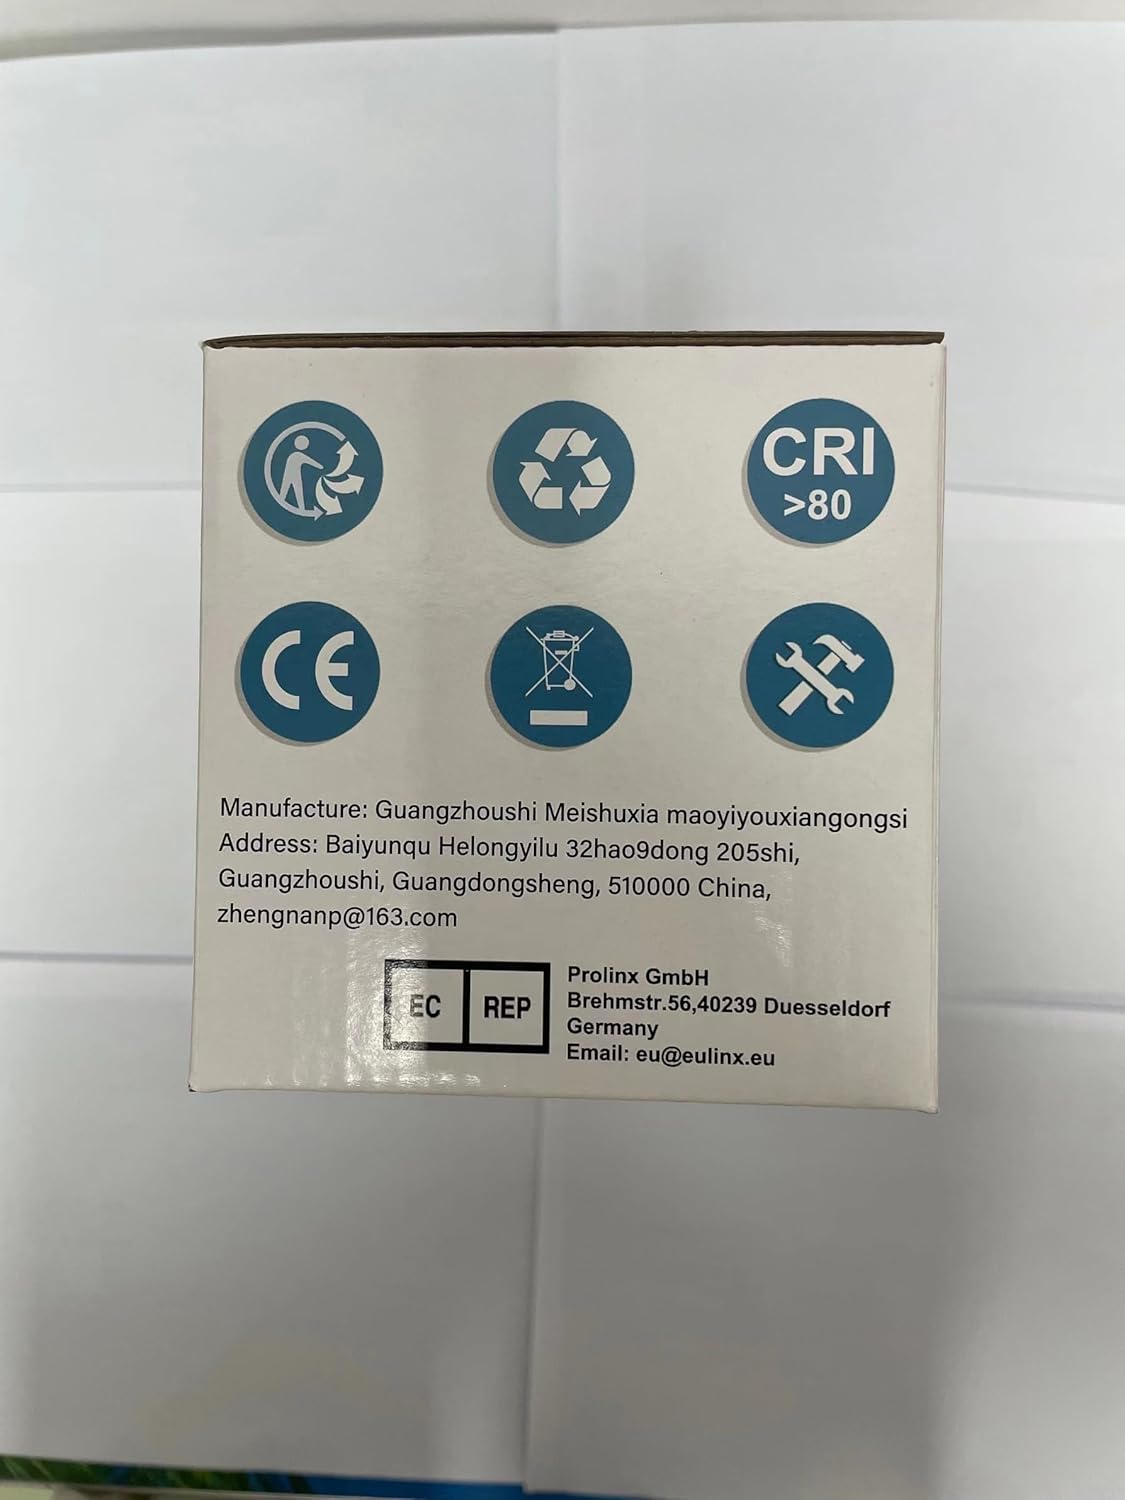
Figure 9.2: Manufacturer and EU Representative details.
Ask a question about this manual
Ask about setup, troubleshooting, compatibility, parts, safety, or missing instructions. Manuals+ will review the question and use this page’s manual context to help answer it.