Black Box Cameras Veiculares GP3
Black Box GP3 Triple Dash Cam User Manual
Model: GP3 | Brand: Black Box Cameras Veiculares
1. Introduction
This manual provides detailed instructions for the installation, operation, and maintenance of your Black Box GP3 Triple Dash Cam. Please read this manual thoroughly before using the device to ensure proper functionality and safety.
2. Safety Information
- Ensure the dash cam is securely mounted and does not obstruct the driver's view or interfere with vehicle controls.
- Do not operate the dash cam or adjust settings while driving. Perform all adjustments when the vehicle is safely parked.
- Use only the provided power adapter and cables to prevent damage to the device or vehicle.
- Avoid exposing the dash cam to extreme temperatures, direct sunlight for prolonged periods, or excessive moisture.
- Keep the lens clean for optimal recording quality.
3. Package Contents
Verify that all items are present in your Black Box GP3 package:
- Black Box GP3 Main Unit (Front and Internal Cameras)
- Rear Camera (VGA) with 6-meter cable
- Suction Cup Mount
- Dual USB Car Charger (Power Adapter)
- USB-Micro Cable (3.5 meters)
- USB Data Adapter
- 32GB Micro SD Card (Class 10)
- User Manual

Image: Contents of the Black Box GP3 Dash Cam package, showing the main unit, rear camera, suction cup mount, car charger, USB cables, and a 32GB microSD card.
4. Product Overview
The Black Box GP3 features a triple camera system for comprehensive vehicle surveillance.

Image: Detailed view of the Black Box GP3 main unit with its front (Full HD) and internal (HD) cameras, alongside the separate VGA rear camera. Dimensions are indicated.
Main Unit Features:
- Front Camera: Full HD resolution, 140-degree wide-angle lens.
- Internal Camera: HD resolution with infrared for enhanced night vision, capturing the vehicle's interior.
- Display Screen: For live view, playback, and menu navigation.
- Control Buttons: For menu access, recording control, and settings.
- Micro SD Card Slot: Supports up to 128GB Class 10 cards.
- Power Port: Micro USB for connecting to the car charger.
Rear Camera:
- Resolution: VGA.
- Connection: Connects to the main unit via a dedicated cable.
5. Setup and Installation
5.1. Micro SD Card Installation
- Ensure the dash cam is powered off.
- Locate the Micro SD card slot on the side of the main unit.
- Insert the provided 32GB Micro SD card (or another Class 10 card up to 128GB) into the slot until it clicks into place.
- Upon first use, it is recommended to format the card through the dash cam's menu settings to ensure compatibility and optimal performance.
5.2. Mounting the Dash Cam
- Clean the windshield area where you intend to mount the dash cam.
- Attach the suction cup mount to the main unit.
- Press the suction cup firmly against the windshield, ensuring it does not obstruct your view. Adjust the angle of the camera to capture the road ahead effectively.
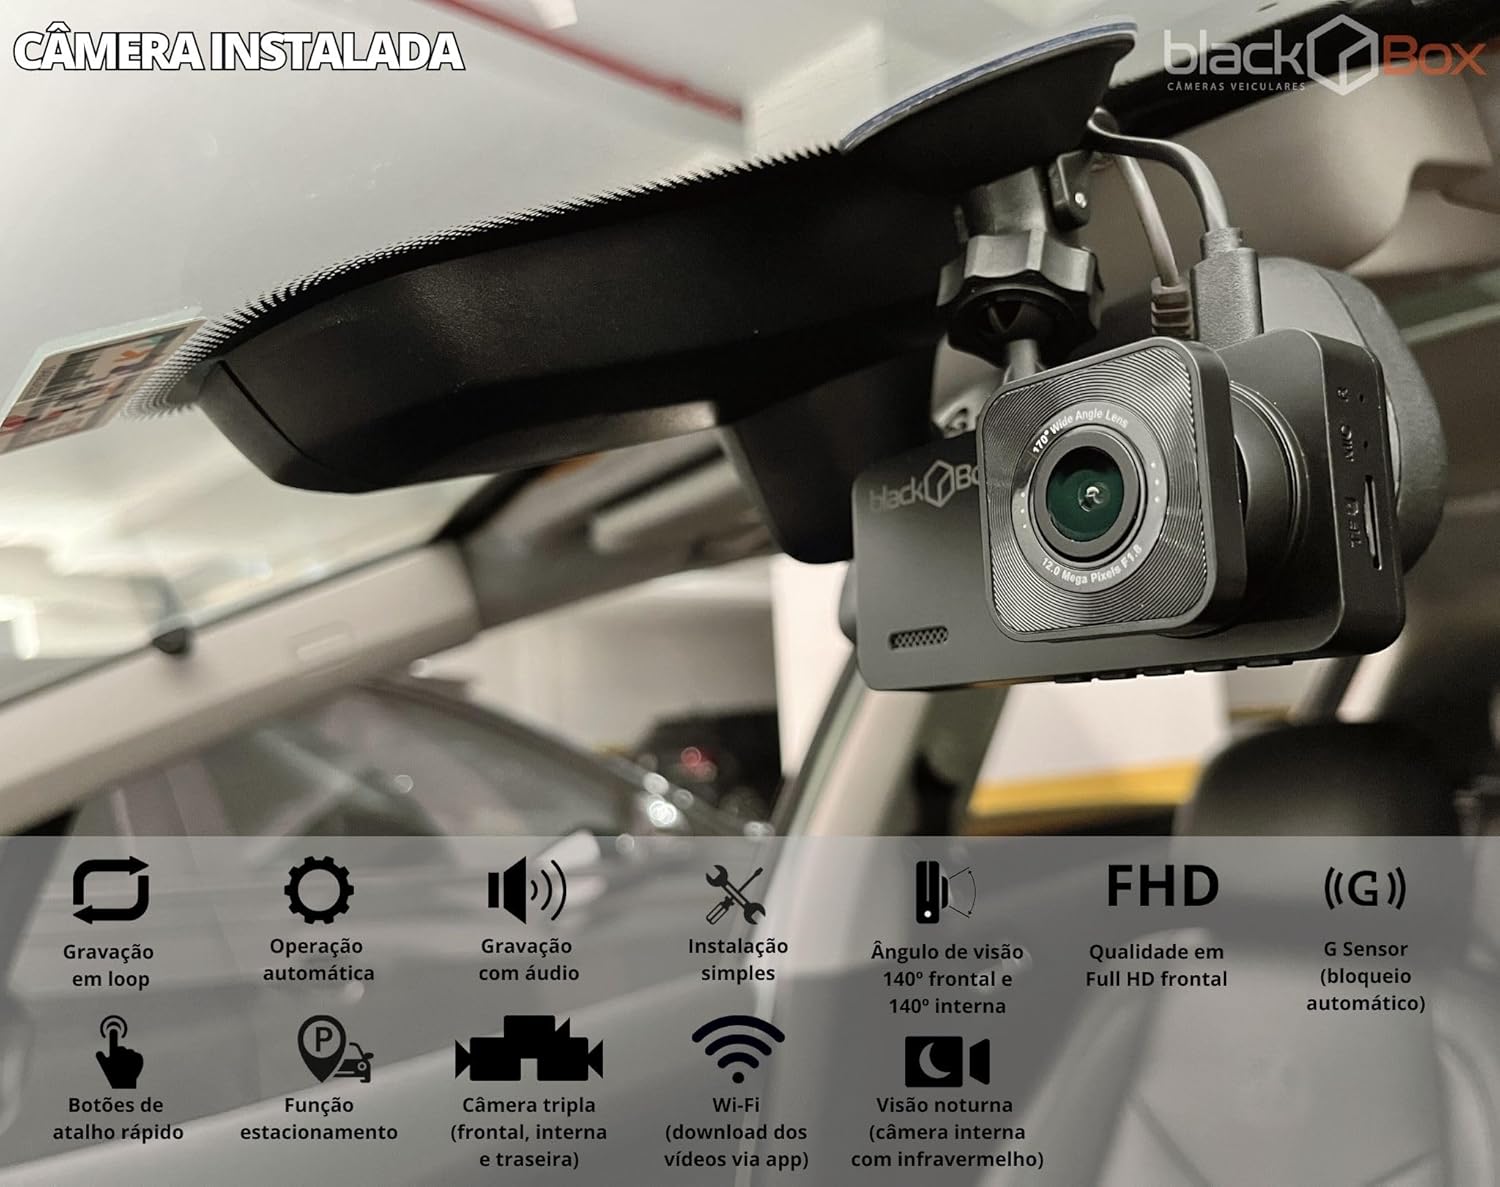
Image: The Black Box GP3 Dash Cam mounted on the interior windshield of a vehicle, showing its position and view.
5.3. Power Connection
- Connect the smaller end of the USB-Micro cable to the dash cam's power port.
- Connect the larger end of the USB-Micro cable to the provided dual USB car charger.
- Insert the car charger into your vehicle's cigarette lighter socket.
- Route the cable neatly along the windshield and dashboard to avoid interference with driving.
5.4. Rear Camera Connection
- Connect the rear camera cable to the designated port on the main dash cam unit.
- Route the rear camera cable to the back of your vehicle. The rear camera is typically mounted on the rear windshield or near the license plate.
- Secure the rear camera in a position that provides a clear view of the rear of the vehicle.
6. Operating Instructions
6.1. Automatic Recording
The Black Box GP3 is designed for automatic operation. Once connected to power and the vehicle's ignition is turned on, the dash cam will automatically power on and begin recording. When the ignition is turned off, the dash cam will save the current recording and power down.
6.2. Loop Recording
The dash cam continuously records video in short segments (e.g., 1, 3, or 5 minutes). When the Micro SD card is full, the oldest unlocked files will be overwritten by new recordings. This ensures continuous recording without manual intervention.
6.3. G-Sensor (Emergency Recording)
The built-in G-Sensor detects sudden impacts or rapid acceleration/deceleration. When triggered, the current video segment is automatically locked and protected from being overwritten by loop recording. This ensures critical event footage is preserved.

Image: Visual representation of the G-Sensor automatically locking footage during incidents and the loop recording function overwriting old files when the card is full.
6.4. Wi-Fi Connectivity and App Usage
The Black Box GP3 features built-in Wi-Fi for convenient access to your recordings via a smartphone application. This allows you to view, download, and manage video files directly on your phone.
- App Download: Search for the official Black Box Dash Cam app on the Google Play Store or Apple App Store.
- Connecting to Wi-Fi:
- Turn on the dash cam.
- Enable Wi-Fi on the dash cam (refer to the device menu for specific steps).
- On your smartphone, go to Wi-Fi settings and connect to the dash cam's Wi-Fi network (SSID and password will be displayed on the dash cam screen or in the app instructions).
- Accessing Files: Open the Black Box app. You can now browse recorded videos, view live footage, and download files to your phone. Note that Wi-Fi access is limited to proximity to the camera; remote access is not supported.

Image: A smartphone screen showing the Black Box dash cam application, displaying a gallery of recorded video files, indicating the ease of accessing footage via Wi-Fi.
6.5. Night Vision
The internal camera is equipped with infrared technology to provide improved recording quality in low-light conditions or at night, ensuring clear footage of the vehicle's interior.

Image: A collage of sample video frames from the Black Box GP3, demonstrating recordings from the front, internal, and rear cameras, including examples of night vision performance from the internal camera.
7. Maintenance
- Cleaning: Gently wipe the camera lenses and screen with a soft, lint-free cloth. Do not use abrasive cleaners or solvents.
- Micro SD Card: Regularly format the Micro SD card (at least once a month) through the dash cam's menu to maintain optimal performance and prevent data corruption. Back up important files before formatting.
- Firmware Updates: Check the Black Box website or app periodically for firmware updates to ensure your dash cam has the latest features and bug fixes.
8. Troubleshooting
- Dash Cam does not power on:
- Check if the car charger is properly inserted into the cigarette lighter socket and the vehicle's ignition is on.
- Ensure the USB cable is securely connected to both the dash cam and the charger.
- Test the car charger with another device to confirm it is functioning.
- Recording stops or files are missing:
- Ensure the Micro SD card is Class 10 or higher and formatted correctly.
- Format the Micro SD card through the dash cam's settings.
- Replace the Micro SD card if the issue persists, as it may be faulty.
- Check G-Sensor sensitivity settings; very high sensitivity might lock too many files, filling the card faster.
- Poor video quality:
- Clean the camera lenses and windshield.
- Ensure the protective film has been removed from the lenses.
- Check video resolution settings in the dash cam menu.
- Wi-Fi connection issues or slow download speeds:
- Ensure you are within close proximity to the dash cam for Wi-Fi connection.
- Restart both the dash cam and your smartphone.
- Verify that the correct Wi-Fi network is selected on your phone.
- Slow download speeds can be influenced by the Micro SD card's read speed. Using a higher-speed Class 10 U3 card might improve performance.
9. Specifications
| Model Name | GP3 |
| Brand | Black Box Cameras Veiculares |
| Front Camera Resolution | Full HD |
| Internal Camera Resolution | HD (with Infrared Night Vision) |
| Rear Camera Resolution | VGA |
| Front Camera Viewing Angle | 140 degrees |
| Storage | Micro SD Card, Class 10, up to 128GB (32GB included) |
| Special Features | Loop Recording, G-Sensor, Built-in Wi-Fi |
| Power Source | Vehicle cigarette lighter (12V) |
| Battery | 1 Lithium-ion battery (included) |
| Dimensions (Main Unit) | Approximately 7cm (L) x 3cm (W) x 4cm (H) |
| Weight | Approximately 250g |
10. Warranty and Support
Black Box Cameras Veiculares is committed to providing quality products and customer satisfaction. For any questions, technical assistance, or warranty claims, please contact our support team.
- After-Sales Support: Black Box offers humanized after-sales support to assist with any queries.
- Contact Information: Refer to the official Black Box Cameras Veiculares website or your purchase documentation for current contact details.
- Warranty: Specific warranty terms and conditions may apply. Please retain your proof of purchase for warranty service.
Ask a question about this manual
Ask about setup, troubleshooting, compatibility, parts, safety, or missing instructions. Manuals+ will review the question and use this page’s manual context to help answer it.