Onisamt RC-5T&RC-26SR
Onisamt Smart WiFi Universal Ceiling Fan Remote Control Kit User Manual
Model: RC-5T&RC-26SR
1. Product Overview
The Onisamt Smart WiFi Universal Ceiling Fan Remote Control Kit is designed to upgrade your existing 110V 3-speed AC ceiling fans with modern control capabilities. This kit allows you to control your ceiling fan and light functions via a dedicated remote control, a smartphone application, and voice commands through smart assistants like Amazon Alexa and Google Assistant.

Figure 1.1: The Onisamt Smart WiFi Universal Ceiling Fan Remote Control Kit, showing the receiver, remote, and integration with smart home devices and mobile app.
Key Features:
- Universal Compatibility: Works with most 110V 3-speed AC ceiling fans, including Hunter, Hampton Bay, Harbor Breeze, Litex, Home Decorators Collection, and Honeywell.
- Multiple Control Methods: Control via included remote, 'Smart Life' mobile app (iOS/Android), and voice commands (Amazon Alexa, Google Assistant).
- Fan Speed Control: Offers 3-speed settings (HI/MED/LOW) and OFF.
- Light Control: On/off/dimming functionality for compatible dimmable LED, dimmable CFL, and incandescent light bulbs.
- Timer Settings: Utilize the app for intelligent control with preset timers (2H, 4H, 8H).
- Easy Installation: Upgraded receiver designed for straightforward setup.
2. Safety Information
Please read all instructions carefully before installation and operation. Failure to follow these instructions may result in electric shock, fire, or other hazards.
- Always disconnect power at the circuit breaker before installing or servicing the fan control kit.
- Installation should be performed by a qualified electrician or a person with electrical knowledge.
- Ensure all wiring connections are secure and comply with local electrical codes.
- Do not use this product with solid-state speed controls.
- The receiver is rated at 240W. Do not exceed this wattage for lighting.
- The remote control uses a CR2032 battery (not included). Ensure correct polarity when inserting.
3. Package Contents
Verify that all items listed below are included in your package:

Figure 3.1: Packing List
- 1 x Instruction Manual
- 1 x Wall Holder for Remote
- 1 x Remote Control
- 1 x Controller (Receiver)
- 2 x Screws
- 6 x Wire Connectors
4. Setup and Installation
4.1. Installation Steps
Follow these steps to install the ceiling fan remote control kit:
- Disconnect Power: Before starting, ensure the power to the ceiling fan is turned off at the circuit breaker to prevent electric shock.
- Access Fan Wiring: Carefully remove the canopy or housing of your ceiling fan to expose the wiring connections.
- Disconnect Existing Wiring: Disconnect the existing wiring from the ceiling fan to the household electrical supply.
- Connect Receiver: Connect the wires from the receiver to the ceiling fan and household wiring according to the wiring diagram provided below. Use the included wire connectors to secure all connections.
- Secure Receiver: Carefully tuck the receiver into the fan's canopy or mounting bracket, ensuring it does not interfere with the fan's operation or wiring.
- Reassemble Fan: Reattach the fan canopy or housing.
- Restore Power: Turn the power back on at the circuit breaker.

Figure 4.1: Easy Installation and Connection Method
4.2. Wiring Diagram:
Refer to the diagram below for correct wiring connections:
| Receiver Wire Color | Connect To | Function |
|---|---|---|
| White (AC IN N) | Household Neutral Wire | Power Input (Neutral) |
| Red (AC IN L) | Household Live Wire | Power Input (Live) |
| Yellow | Fan Light Wire | Light Output |
| Blue | Fan Motor Wire (High Speed) | Fan Speed Output |
| Black | Fan Motor Wire (Medium Speed) | Fan Speed Output |
| White | Fan Motor Wire (Low Speed) | Fan Speed Output |
| ANT | Antenna (do not connect to power) | Signal Reception |
4.3. Remote Control Pairing (Learning Setting)
The remote control and receiver use a self-learning function for pairing. No need for complex code matching.

Figure 4.2: Remote Control Learning Setting
- Insert Battery: Open the battery slot on the remote control and insert one CR2032 battery (not included), ensuring correct polarity.
- Restore Power: After installing the receiver and reassembling the fan, restore power to the ceiling fan at the circuit breaker.
- Press Learn Key: Within 30 seconds of restoring power, press and hold the "LEARN" button (located inside the remote's battery compartment) for approximately 4 seconds until the fan light flashes. This indicates successful pairing.
If the pairing is unsuccessful, turn off the power, wait 10 seconds, and repeat the steps.
5. Operating Instructions
5.1. Remote Control Functions
The included remote control provides convenient access to your fan and light functions.

Figure 5.1: Remote Control Layout and Features
- Fan Speed Buttons (1, 2, 3): Press to select desired fan speed (1=Low, 2=Medium, 3=High).
- Fan OFF Button (0): Press to turn the fan off.
- Light Button (Bulb Icon): Press to turn the light on/off. Hold to dim the light (for compatible dimmable bulbs).
5.2. Smart Control (App & Voice)
The kit supports smart control via the 'Smart Life' app and voice assistants.
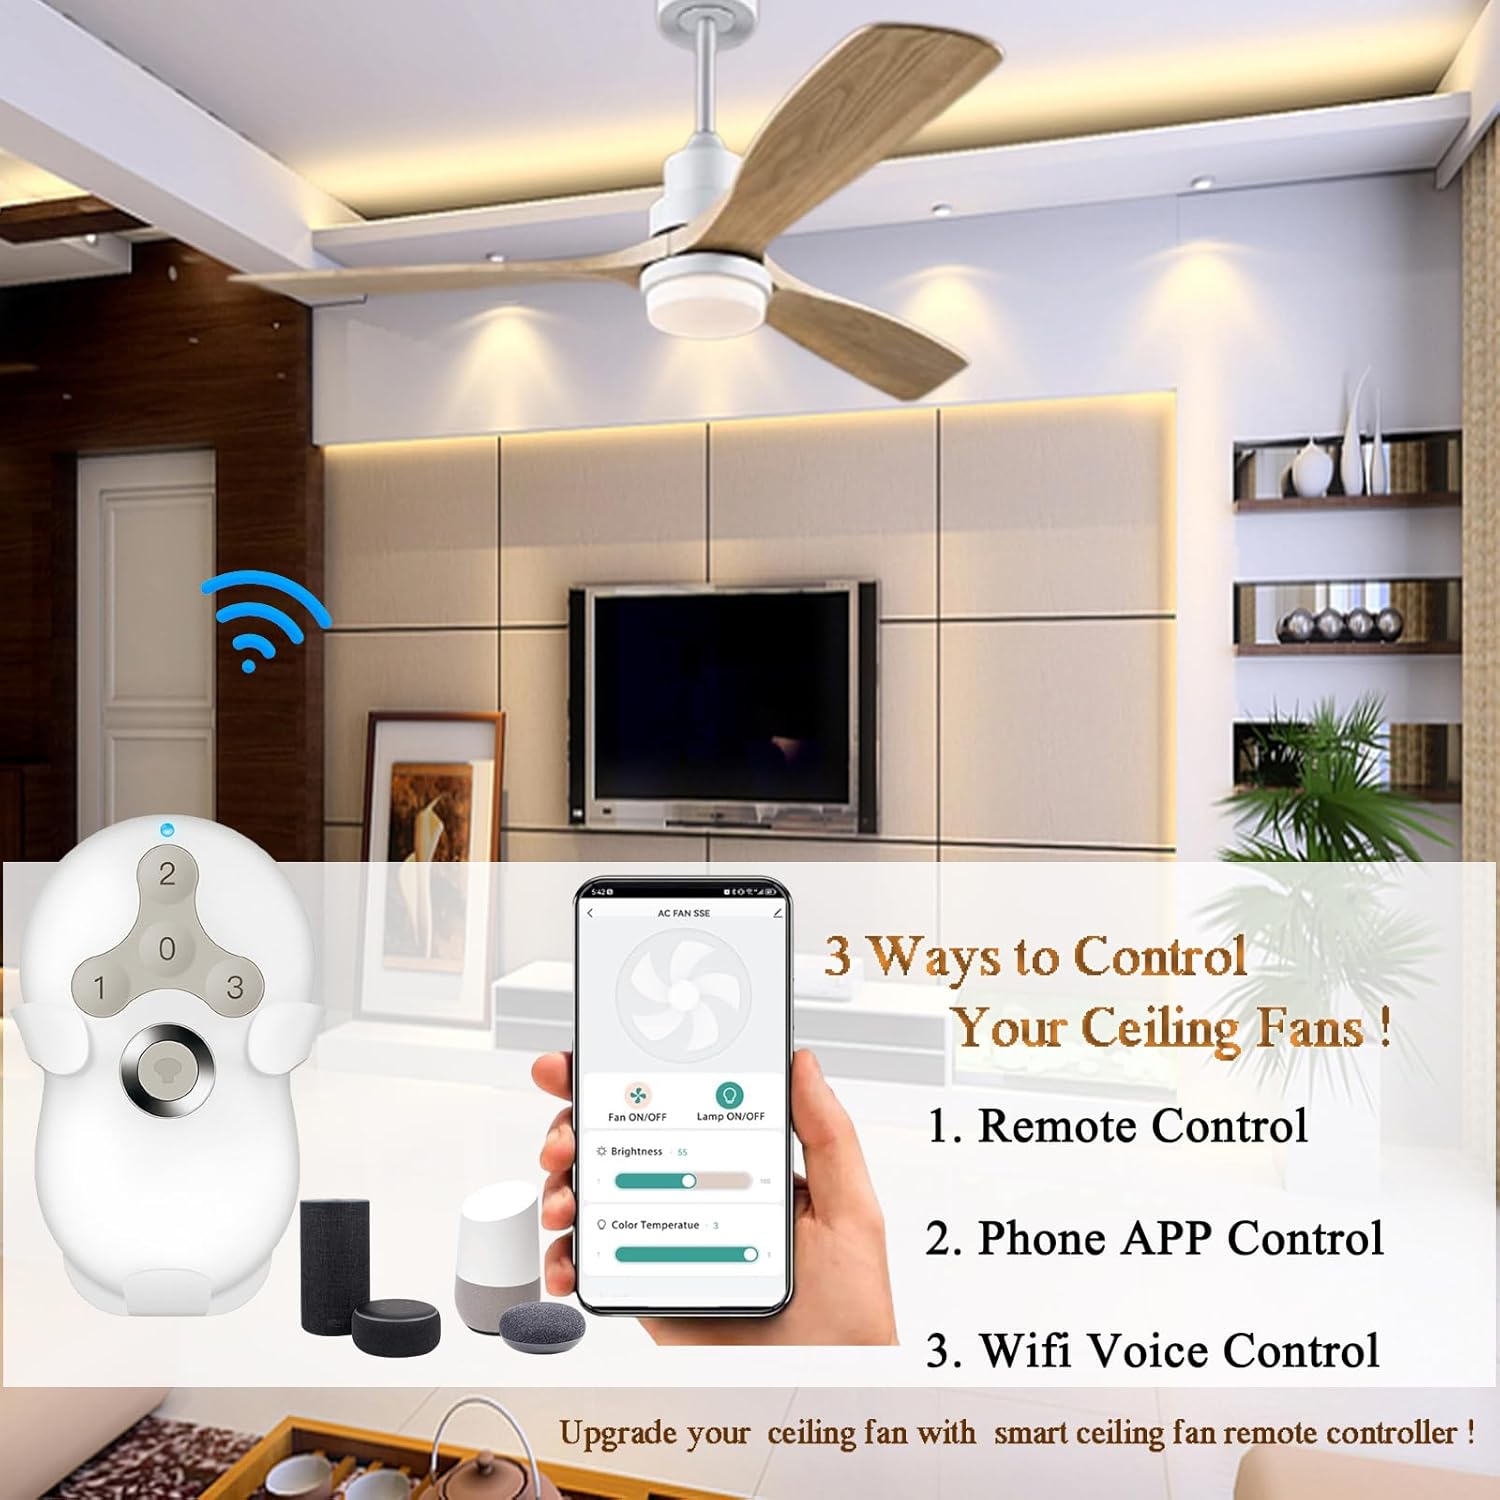
Figure 5.2: Three Ways to Control Your Ceiling Fan

Figure 5.3: Voice Control Integration
5.2.1. Smart Life App Control:
- Download App: Download the "Smart Life" app from the App Store (iOS) or Google Play Store (Android).
- Register/Login: Create an account or log in to your existing account.
- Add Device: Follow the in-app instructions to add your ceiling fan control kit. Ensure your Wi-Fi network is 2.4GHz, as the device only supports this frequency.
- Control: Once connected, you can control fan speed, light on/off/dimming, and set timers directly from the app.
5.2.2. Voice Control (Alexa/Google Assistant):
- Link Accounts: In the Smart Life app, navigate to the integration section (usually under 'Me' or 'Profile' -> 'More Services') and link your Smart Life account with your Amazon Alexa or Google Assistant account.
- Discover Devices: Ask your voice assistant to discover new devices (e.g., "Alexa, discover my devices" or "Hey Google, sync my devices").
- Voice Commands: Once discovered, you can use voice commands such as:
- "Alexa, turn on the fan."
- "Hey Google, set fan speed to medium."
- "Alexa, dim the light to 50%."
- "Hey Google, turn off the fan light."
5.3. Timer Settings (via App)
The Smart Life app allows you to set intelligent timers for your fan and light:
- Access the device settings in the Smart Life app.
- Select the 'Timer' option.
- Choose from preset timers (2H, 4H, 8H) to automatically turn off the fan or light after the specified duration.
6. Compatibility
This universal kit is designed for broad compatibility with various ceiling fan and lighting types.

Figure 6.1: Light Bulb Compatibility
- Ceiling Fans: Compatible with most 110V 3-speed AC ceiling fans, including popular brands like Hunter, Hampton Bay, Harbor Breeze, Litex, Home Decorators Collection, and Honeywell.
- Light Bulbs:
- Halogen & Incandescent lamps: Up to 4.2A / 500W Max.
- Dimmable CFL: Up to 1.5A / 150W Max.
- Dimmable LED: Up to 1.5A / 150W Max.
Note: Some LED and CFL lamps are not dimmable and will only support ON and OFF functions with this controller.
- Reverse Switch Fans: This remote does not have a reverse button, but it is suitable for ceiling fans that have a manual reverse switch on the fan body.
7. Maintenance
To ensure optimal performance and longevity of your Onisamt Smart WiFi Universal Ceiling Fan Remote Control Kit, follow these simple maintenance guidelines:
- Cleaning: Wipe the remote control and receiver with a soft, dry cloth. Do not use abrasive cleaners or solvents.
- Battery Replacement: When the remote control's range decreases or it becomes unresponsive, replace the CR2032 battery. Ensure correct polarity.
- Environmental Conditions: Avoid exposing the receiver or remote to excessive moisture, extreme temperatures, or direct sunlight.
8. Troubleshooting
If you encounter issues with your ceiling fan remote control kit, refer to the table below for common problems and solutions.
| Problem | Possible Cause | Solution |
|---|---|---|
| Fan/Light does not respond to remote. | No power to receiver. Remote battery is dead or inserted incorrectly. Remote and receiver are not paired. | Check circuit breaker. Replace CR2032 battery, ensure correct polarity. Perform the remote control pairing (learning setting) procedure. |
| Fan operates, but light does not. | Light bulb is faulty. Wiring issue to the light. Light bulb is not compatible. | Replace the light bulb. Check light wiring connection to the receiver. Ensure bulb type is compatible and within wattage limits. |
| Light does not dim. | Light bulb is not dimmable. | Replace with a dimmable LED, CFL, or incandescent bulb. |
| Fan speed control is erratic. | Interference. Wiring issue. | Ensure no other devices are causing interference. Check fan speed wiring connections. |
| Cannot connect to Smart Life App. | Incorrect Wi-Fi frequency. Incorrect Wi-Fi password. Device not in pairing mode. | Ensure your Wi-Fi is 2.4GHz. Double-check Wi-Fi password. Follow app instructions to put device in pairing mode (often involves power cycling). |
| Voice control not working. | Smart Life account not linked. Device not discovered by voice assistant. | Ensure Smart Life account is correctly linked to Alexa/Google Assistant. Ask voice assistant to discover devices. |
9. Specifications
Detailed technical specifications for the Onisamt Smart WiFi Universal Ceiling Fan Remote Control Kit:
| Feature | Detail |
|---|---|
| Model Number | RC-5T&RC-26SR |
| Product Dimensions | 0.78 x 2.6 x 4.7 inches (Receiver) |
| Item Weight | 7.8 ounces |
| Power Input | 110V AC |
| Max Receiver Load | 240W |
| Fan Speed Control | 3-Speed (HI/MED/LOW) + OFF |
| Light Control | On/Off/Dimming |
| Remote Battery | 1 x CR2032 (not included) |
| Wireless Connectivity | Wi-Fi (2.4GHz only) |
| Voice Control Compatibility | Amazon Alexa, Google Assistant |
| App Control | Smart Life App (iOS/Android) |
| Color | Black (Receiver), White (Remote) |
| Manufacturer | Onisamt |
| Country of Origin | China |
10. Warranty and Customer Support
Onisamt is committed to providing high-quality products and excellent customer service. This product comes with a standard manufacturer's warranty covering defects in materials and workmanship under normal use.
For warranty claims, technical assistance, or any questions regarding your Onisamt Smart WiFi Universal Ceiling Fan Remote Control Kit, please contact our customer support team through the retailer's platform or visit the official Onisamt brand store for contact information.
Please retain your proof of purchase for warranty purposes.