Introduction
Thank you for choosing the Kenowa 15.6-inch FHD IPS 1080P Touchscreen Portable Monitor. This device is designed to enhance your productivity and entertainment experience with its high-definition display, touchscreen capabilities, and versatile connectivity. This manual provides essential information for proper setup, operation, maintenance, and troubleshooting to ensure optimal performance and longevity of your monitor.
Package Contents
Please verify that all items are present in your package:
- Kenowa 15.6 Inch Touchscreen Portable Monitor
- Power Cable
- Full-function Type-C Cable
- HD to mini-HD Cable
- USB-A to C Touch Sync Cable
- User Manual (this document)
Product Overview
Familiarize yourself with the ports and buttons on your portable monitor.
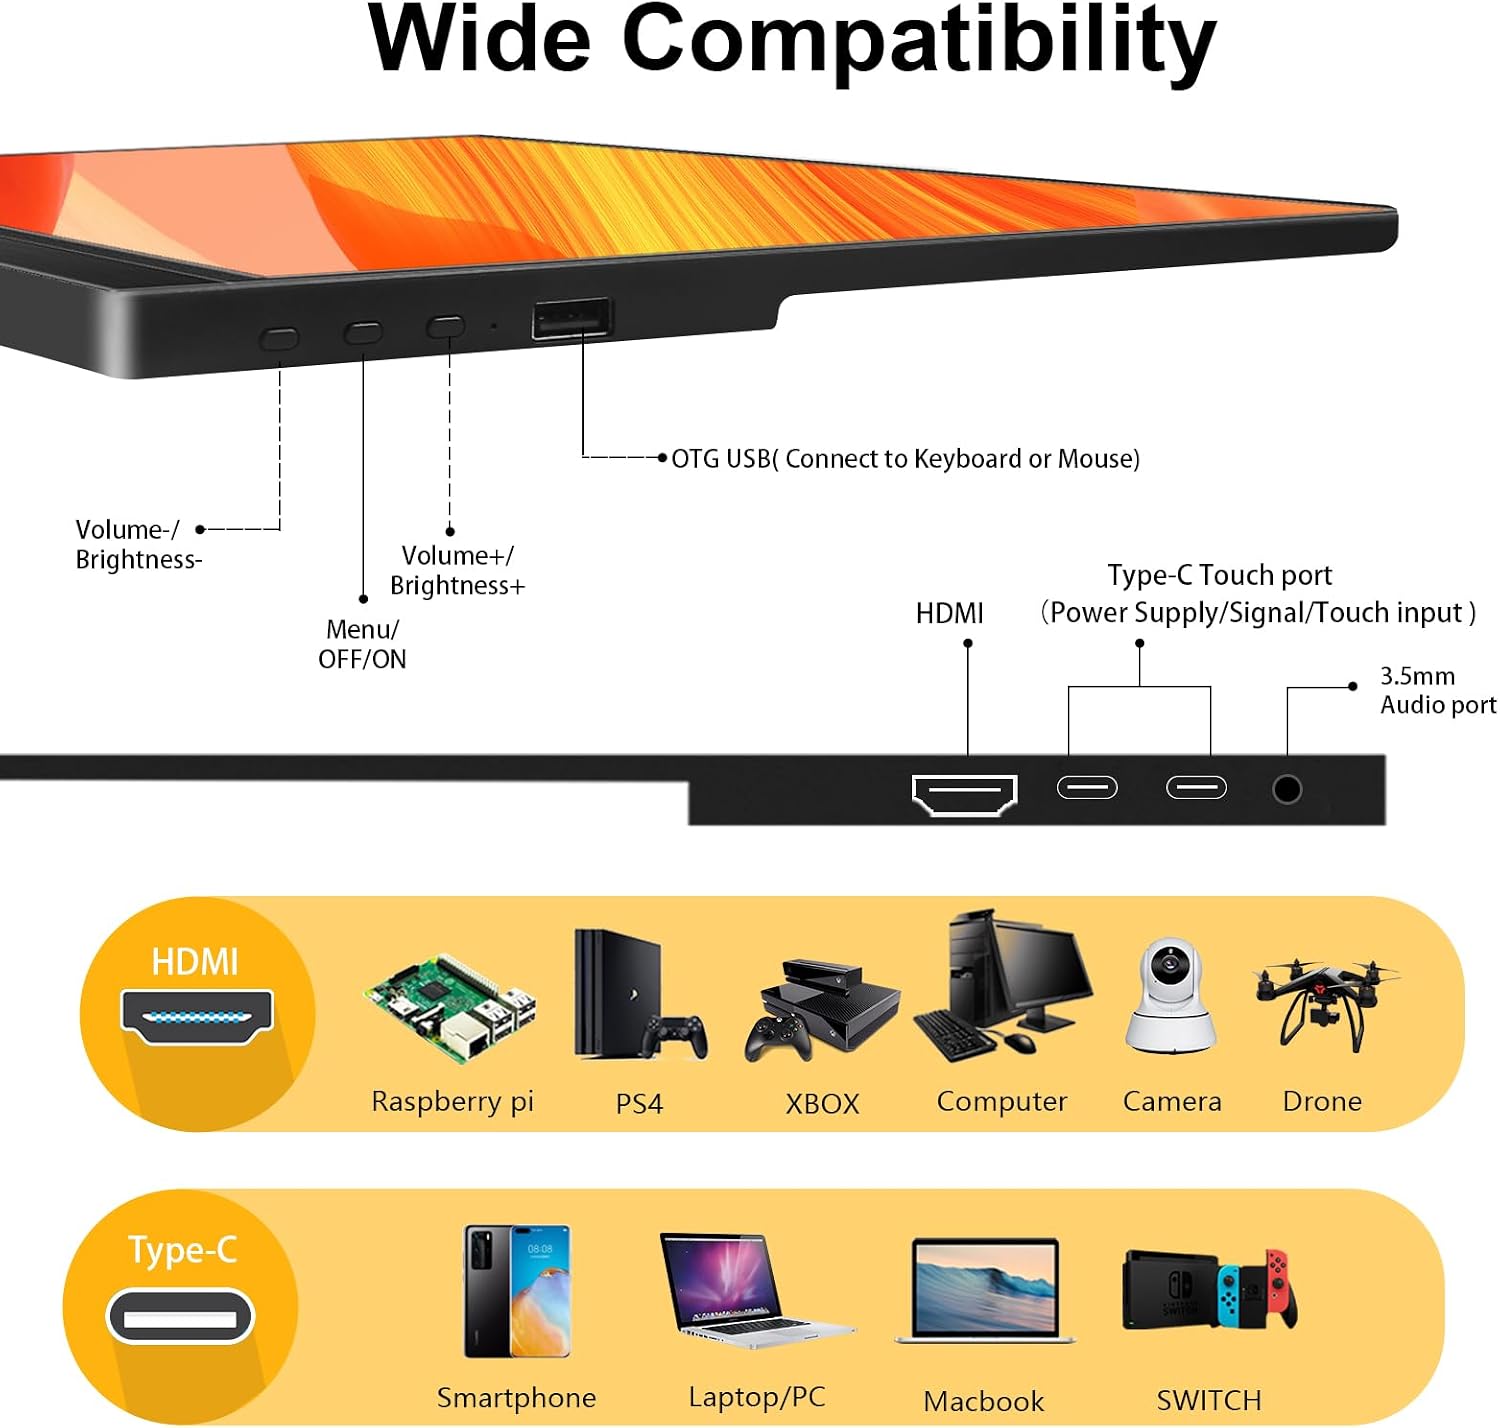
Image: Overview of the Kenowa portable monitor's ports and controls. This image displays the side profile of the monitor, highlighting the various input and control options. These include Volume-/Brightness-, Volume+/Brightness+, Menu/OFF/ON button, OTG USB port (for keyboard/mouse), HDMI port, Type-C Touch port (for power, signal, and touch input), and a 3.5mm Audio port.
Ports and Buttons:
- Volume -/Brightness-: Decreases volume or brightness.
- Volume +/Brightness+: Increases volume or brightness.
- Menu/OFF/ON Button: Powers the monitor on/off and accesses the On-Screen Display (OSD) menu.
- OTG USB Port: Connects to external USB devices like a keyboard or mouse.
- HDMI Port: Connects to devices via HDMI for video and audio transmission.
- Type-C Touch Port: A full-featured USB-C port for power, video signal, and touch input from compatible devices.
- 3.5mm Audio Port: Connects to external headphones or speakers.
Setup
Before connecting, ensure the portable monitor is powered on to prevent display flickering or blue screening.
1. Power Connection:
- Connect the power cable to a PD charger (not included) and plug it into a power outlet.
- Connect the other end of the power cable to the portable monitor's power port.
2. Device Connection Options:
Option 1: Full-featured Type-C Cable Connection (Single Cable Solution)
This method provides video, audio, and touch functionality with a single cable for compatible devices.
- Connect one end of the full-featured Type-C cable to your device's full-featured Type-C port (e.g., laptop, smartphone).
- Connect the other end of the full-featured Type-C cable to the portable monitor's Type-C Touch port.
Note on Touch Functionality:
- Windows System: Supports multi-touch input, providing stable and responsive recognition.
- macOS System: Due to its closed-source nature, macOS only supports single-point selection. Multi-touch gestures are not supported.
- iOS System (iPhone 15 Pro/Pro Max): Supports display output but does not support touch operations. Other iPhone series do not support direct connection.
- Android Smartphones: Supports display output and touch operations for compatible models.

Image: A smartphone connected to the Kenowa portable monitor using a Type-C cable, demonstrating display output and touch functionality for compatible devices.
Option 2: HDMI and USB-A to C Cable Connection (for Video and Touch)
This method is used when your device does not have a full-featured Type-C port or for dedicated video input.
- Connect one end of the HD to mini-HD cable to your device's HDMI port.
- Connect the other end of the HD to mini-HD cable to the portable monitor's mini-HD port. This provides video and audio.
- For touch functionality, connect the USB-A end of the USB-A to C touch sync cable to your device's USB-A port.
- Connect the USB-C end of the USB-A to C touch sync cable to the portable monitor's Type-C Touch port.
Note: Touch functionality limitations for macOS and iOS systems apply as described in Option 1.
Video Demonstration:
Video: This video demonstrates the two primary connection methods for the Kenowa portable monitor: using a full-featured Type-C cable for a single-cable solution and using separate HDMI and USB-A to C cables for video and touch input. It also illustrates the touch functionality with Windows, macOS, and iOS devices, highlighting system-specific limitations.
Operating Instructions
Power On/Off:
Press and hold the Menu/OFF/ON button for a few seconds to power the monitor on or off.
On-Screen Display (OSD) Menu:
Press the Menu/OFF/ON button briefly to access the OSD menu. Use the Volume -/Brightness- and Volume +/Brightness+ buttons to navigate and adjust settings such as brightness, contrast, color temperature, and input source.
Brightness and Volume Adjustment:
When the OSD menu is not active, briefly press the Volume -/Brightness- or Volume +/Brightness+ buttons to adjust brightness or volume directly.
Touchscreen Functionality:
The monitor features a 10-point capacitive touchscreen. For Windows systems, it supports multi-touch gestures like pinch-to-zoom, scrolling, and tapping. Refer to the "Setup" section for touch compatibility with different operating systems.

Image: This image illustrates the 10-point capacitive touch capabilities of the Kenowa portable monitor, showing various touch gestures such as single touch, enlarge, narrow, drag, and multi-touch.
Supported Devices:
The Kenowa portable monitor is compatible with a wide range of devices, including:
- Laptops (Windows, macOS)
- Desktop PCs
- Type-C Smartphones (Android, iPhone 15 Pro/Pro Max)
- Gaming Consoles (PS3/4/5, Xbox series, Nintendo Switch)
- Cameras and Drones (via HDMI)

Image: The Kenowa portable monitor connected to a Nintendo Switch for gaming and a laptop for extended display, showcasing its versatility with different devices.
Orientation:
The monitor supports both landscape and portrait modes. Adjust the display settings on your connected device to change the orientation.
Maintenance
Proper care ensures the longevity and performance of your monitor.
- Cleaning: Use a soft, lint-free cloth to gently wipe the screen. For stubborn smudges, slightly dampen the cloth with water or a screen-cleaning solution. Avoid harsh chemicals or abrasive materials.
- Storage: When not in use, store the monitor in a cool, dry place, away from direct sunlight and extreme temperatures.
- Handling: Handle the monitor with care. Avoid dropping it or applying excessive pressure to the screen.
- Ventilation: Ensure proper ventilation around the monitor to prevent overheating.
Troubleshooting
If you encounter issues, refer to the following common solutions:
| Problem | Possible Cause / Solution |
|---|---|
| No Display / Black Screen |
|
| No Touch Functionality |
|
| Flickering Display / Blue Screen |
|
| No Audio |
|
| Monitor Not Recognized by Device |
|
Specifications
Detailed technical specifications for your Kenowa portable monitor:
| Feature | Detail |
|---|---|
| Brand | Kenowa |
| Model Number | 372a6677-6ba4-4c43-9cdc-608be40325a2 |
| Model Name | Touchscreen Portable Monitor |
| Screen Size | 15.6 Inches |
| Display Technology | IPS, LED |
| Display Type | LED |
| Resolution | 1920 x 1080 Pixels (FHD 1080p) |
| Image Aspect Ratio | 16:9, 4:3 |
| Image Brightness | 300 cd/m² |
| Image Contrast Ratio | 1000:1 |
| Viewing Angle | 178 Degrees |
| Response Time | 3 Milliseconds |
| Refresh Rate | 60 Hz |
| Hardware Interface | 3.5mm Audio, HDMI, USB, USB Type C |
| Total USB Ports | 2 (Type-C) |
| Special Features | Built-In Speakers, Eye Care (flicker-free, low blue light), Portable, Tilt Adjustment, Touchscreen |
| Compatible Devices | Camera, Desktop, Gaming Console, Laptop, Smartphone |
| Mounting Type | Wall Mount (75x75mm VESA) |
| Product Dimensions | 1.5 x 35.99 x 22.48 cm; 616.89 g (1.36 lbs) |

Image: This image provides a visual representation of the Kenowa portable monitor's dimensions (360mm width, 225mm height, 15mm thickness) and its lightweight design (0.69kg / 1.5lb).

Image: The Kenowa portable monitor demonstrating its VESA mountable feature (75x75mm holes), allowing it to be attached to a monitor arm or wall mount for flexible use. Note that the stand is not included.
Warranty and Support
Your Kenowa portable monitor comes with a one-year warranty from the date of purchase.
For any questions, technical assistance, or warranty claims, please contact Kenowa customer service. We provide 24-hour professional after-sales service.
Contact Information: Please refer to the contact details provided with your product packaging or visit the official Kenowa website for support.