
1. Introduction
This manual provides detailed instructions for the installation, operation, and maintenance of your Biuone A20Pro Dash Cam. Please read this manual thoroughly before using the device to ensure proper function and safety. The Biuone A20Pro is a dual dash camera system featuring 2.5K front and 1080P rear recording, WiFi connectivity, app control, super night vision, loop recording, and G-sensor functions, designed to enhance your driving safety and record important events.
2. Product Overview
2.1 Package Contents
Verify that all items are present in the package:
- Biuone A20Pro Front Dash Cam (2.5K)
- Rear Camera (1080P)
- 64GB Micro SD Card
- Suction Cup Mounts (x2)
- Cigarette Lighter Charger
- USB Reader
- Card Needle
- Car Wire Trim Tool
- Lens Cleaning Cloth
- Rear Camera Install Tools (x2)
- Cable Hiding Clips (x10)
- User Manual
- Gift Box

Image: Contents of the Biuone A20Pro Dash Cam package, including the front camera, rear camera, 64GB SD card, mounts, cables, and tools.

Image: A detailed visual representation of all items included in the Biuone A20Pro Dash Cam package.
2.2 Key Features
- Dual Recording: 2.5K (Front) + 1080P (Rear) for comprehensive coverage.
- Wide Angle Lenses: 170° front and 140° rear to minimize blind spots.
- WiFi & App Control: Connect to iOS/Android devices for settings, viewing, playback, and sharing.
- Super Night Vision: High-resolution CMOS sensor, 6-layer optical lens with F1.8 aperture, HDR/WDR technology for clear night recordings.
- Loop Recording: Automatically overwrites oldest unlocked files when the memory card is full.
- G-Sensor: Detects sudden movements or collisions and locks the current video file to prevent overwriting.
- Parking Monitor: Provides 24-hour surveillance (requires optional hardwire kit).
- 3-inch IPS Screen: Compact display for real-time viewing and menu navigation.
- Included 64GB Card: Ready for immediate use.

Image: The Biuone A20Pro Dash Cam showing its front and rear cameras, along with a smartphone displaying the live feed via the app.

Image: Highlights the 2.5K front resolution, 1080P rear camera, 3-inch IPS screen, included card, advanced sensor, loop recording, G-sensor, night vision, WiFi, and parking monitor features.

Image: Illustrates the 170-degree front and 140-degree rear wide-angle coverage of the dash cam system.
3. Setup and Installation
3.1 Micro SD Card Installation
- Insert the provided 64GB Micro SD card into the dash cam's SD card slot until it clicks into place.
- Ensure the card is inserted correctly to avoid damage.
- It is recommended to format the SD card within the dash cam's settings before first use.

Image: The dash cam with a 64GB Micro SD card inserted, showing storage capacities for different card sizes.
3.2 Front Camera Installation
- Clean the windshield area where the dash cam will be mounted.
- Attach one of the suction cup mounts to the front dash cam.
- Press the suction cup firmly onto the windshield, ideally behind the rearview mirror, ensuring it does not obstruct your view.
- Adjust the camera angle to capture the road ahead clearly.
- Connect the power cable from the dash cam to the included cigarette lighter charger.
- Route the power cable neatly along the windshield edge and down to the cigarette lighter socket using the provided cable hiding clips and trim tool.

Image: Diagram showing the installation of the front dash cam on the windshield and routing of the power cable to the cigarette lighter.
3.3 Rear Camera Installation
The rear camera can be installed either on the rear windshield inside the vehicle or above the license plate outside the vehicle.
- Mounting: Choose a suitable location for the rear camera. Use the provided adhesive mount or screws for secure attachment.
- Cable Routing: Connect the rear camera cable to the front dash cam. Route the cable from the front dash cam to the rear camera, carefully tucking it along the vehicle's headliner and pillar trim.
- Reversing Guide Line (Optional): To enable the reversing guide line feature, connect the red wire from the rear camera cable to the positive lead of your car's reversing lamp. If this feature is not desired, this step can be skipped.

Image: Illustration of the rear camera installation, showing how to connect the red wire for the reversing guide line function.

Image: A wiring diagram showing the connections for the front dash cam, rear camera, and power source, including the optional reversing lamp connection.
4. Operating Instructions
4.1 Power On/Off and Basic Recording
- Once connected to the car's power supply, the dash cam will automatically power on and begin recording when the vehicle starts.
- It will automatically power off and save the recording when the vehicle is turned off.
- Manual power on/off can be done via the power button on the device.
4.2 WiFi and App Control
The Biuone A20Pro features built-in WiFi for seamless connection to your smartphone via a dedicated app.
- Download the "Biuone Dash Cam" app from the Apple App Store or Google Play Store.
- Turn on the dash cam's WiFi function through its menu settings.
- On your smartphone, connect to the dash cam's WiFi network (SSID and password will be displayed on the dash cam screen).
- Open the app to view live footage, adjust settings, playback recorded videos, and download files to your phone.
- The effective WiFi range is approximately 3-5 meters (9.84-16.4 feet). Remote connection is not supported.

Image: Demonstrates the WiFi and app control feature, showing a smartphone connected to the dash cam for live viewing and video download.

Image: Shows the WiFi connection feature, allowing users to download and share videos to social media platforms.

Image: Illustrates the 2.5K app control interface, enabling real-time footage preview, download, and sharing.
4.3 Loop Recording
The dash cam records video in continuous loops (e.g., 1, 3, or 5-minute segments). When the memory card is full, the oldest unlocked video files will be automatically overwritten by new recordings. This ensures continuous recording without manual intervention.

Image: Explains the loop recording function, where new recordings overwrite the oldest unlocked files in continuous segments.
4.4 G-Sensor (Emergency Lock)
The built-in G-sensor detects sudden impacts or rapid acceleration/deceleration. When triggered, it automatically locks the current video file, preventing it from being overwritten by loop recording. This ensures critical incident footage is preserved.
- Adjust the G-sensor sensitivity in the settings menu (Low, Medium, High, Off). A "Low" setting is often recommended to avoid excessive locked files from minor bumps.
- Regularly review and delete unnecessary locked files to free up space on the SD card.

Image: Illustrates the G-Sensor locking a file during a collision and the 24-hour parking monitor feature.

Image: Depicts the G-Sensor automatically locking video files during an emergency event to prevent overwriting.
4.5 Parking Monitor
With an optional hardwire kit (not included), the parking monitor feature allows the dash cam to continue recording for 24 hours, providing surveillance even when your vehicle is parked. If an impact is detected while parked, the dash cam will automatically record and lock the footage.

Image: Shows the 24-hour parking monitor feature, indicating that a hardwire kit is required for continuous recording while parked.
4.6 Super Night Vision
The Biuone A20Pro is equipped with a high-resolution CMOS sensor, a 6-layer optical lens with F1.8 large aperture, and HDR/WDR technology. These features work together to balance exposure and capture clear video footage in low-light conditions, enhancing visibility during night driving.

Image: Illustrates the super night vision capabilities, highlighting the F1.8 aperture and 6-glass lens for clear recording in various light conditions.
4.7 Display Screen Modes
The 3-inch IPS screen supports various display modes:
- Front Only: Displays footage from the front camera.
- Rear Only: Displays footage from the rear camera.
- Front: Rear (1:1): Displays both front and rear camera footage simultaneously in a split-screen view.

Image: Shows the different display modes available on the dash cam screen: front only, rear only, and front/rear split view.
5. Playback Options
Recorded videos can be played back using three methods:
- On the Dash Camera: Use the device's screen and navigation buttons to review recordings directly.
- On a Smartphone (via App): Connect your phone to the dash cam's WiFi and use the app to view and download videos.
- On a PC (via Card Reader): Remove the Micro SD card from the dash cam, insert it into the provided USB card reader, and connect it to a computer to access and play video files.

Image: Illustrates the three methods for playing back recorded videos: directly on the dash cam, on a smartphone via the app, and on a PC using a card reader.

Image: A visual guide to playing back videos on the dash camera itself, on a smartphone, and on a personal computer using a card reader.
6. Specifications
| Feature | Specification |
|---|---|
| Model Name | A20Pro |
| Front Camera Resolution | 2.5K QHD |
| Rear Camera Resolution | 1080P FHD |
| Front Camera Angle | 170° |
| Rear Camera Angle | 140° |
| Display Screen | 3-inch IPS |
| Connectivity | Wi-Fi, App Control |
| Special Features | Super Night Vision (HDR/WDR, F1.8 aperture, 6-layer lens), Loop Recording, G-Sensor, Parking Monitor (requires hardwire kit) |
| Included Memory Card | 64GB Micro SD Card |
| Max SD Card Support | 512GB C10 U3 |
| Power Source | Cigarette Lighter Charger (12V car power) |
| Product Dimensions | 3.31 x 1.38 x 2.09 inches |
| Item Weight | 2.26 ounces |
7. Troubleshooting
- Dash Cam Not Powering On:
- Ensure the cigarette lighter charger is securely plugged into both the dash cam and the car's power socket.
- Check if the car's cigarette lighter socket is receiving power.
- Verify the power cable is not damaged.
- Recording Stops or Freezes:
- Format the Micro SD card regularly (at least once a month) within the dash cam's settings.
- Ensure the SD card is a high-speed Class 10 U3 card.
- Reduce G-sensor sensitivity to prevent too many locked files from filling the card.
- Check for firmware updates.
- Poor Video Quality:
- Clean the camera lenses with the provided cleaning cloth.
- Ensure the protective film is removed from the lenses.
- Check video resolution settings in the menu.
- WiFi Connection Issues:
- Ensure WiFi is enabled on the dash cam.
- Confirm you are within the effective range (3-5 meters).
- Restart both the dash cam and your smartphone.
- Re-enter the WiFi password if necessary.
- Parking Monitor Not Working:
- Verify that an optional hardwire kit is installed correctly and providing continuous power.
- Check parking monitor settings in the dash cam menu.
8. Maintenance
- Clean Lenses: Regularly clean the front and rear camera lenses with a soft, dry cloth to ensure clear recordings.
- Format SD Card: Format the Micro SD card monthly to maintain optimal performance and prevent data corruption.
- Firmware Updates: Check the Biuone official website or app for any available firmware updates to improve performance and add features.
- Cable Management: Ensure all cables are securely routed and not interfering with driving controls or vision.
9. Warranty and Support
Biuone provides comprehensive customer support for its products.
- Warranty: The product typically includes a 1-year quality protection warranty.
- Returns: A 30-day return policy for refund or replacement is usually available.
- Lifetime After-Sales Support: Biuone offers lifetime technical support for its dash cameras.
- Contact Support: For any issues, missing parts, or technical assistance, please contact Biuone customer service. Refer to the contact information provided in the product packaging or on the official Biuone website.
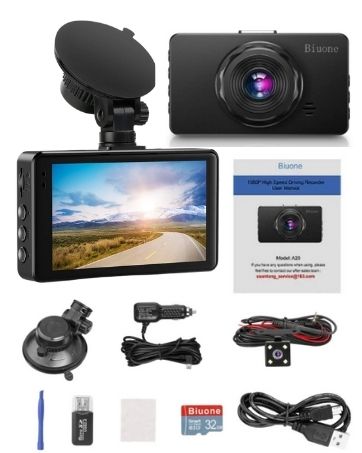
Image: Information regarding Biuone's 7/24H support, 30-day return policy, 1-year quality protection, and lifetime after-sales support.
