
1. Introduction
This manual provides detailed instructions for the installation, operation, maintenance, and troubleshooting of your Pioowirk LF12E93CIC-128G 12.3-inch Android Car Head Unit. This unit is designed specifically for BMW 3 Series E90, E91, E92, E93 models manufactured between 2009 and 2012, equipped with the CIC system. Ensure your vehicle has a 4-Pin LVDS port at the rear of the original unit.
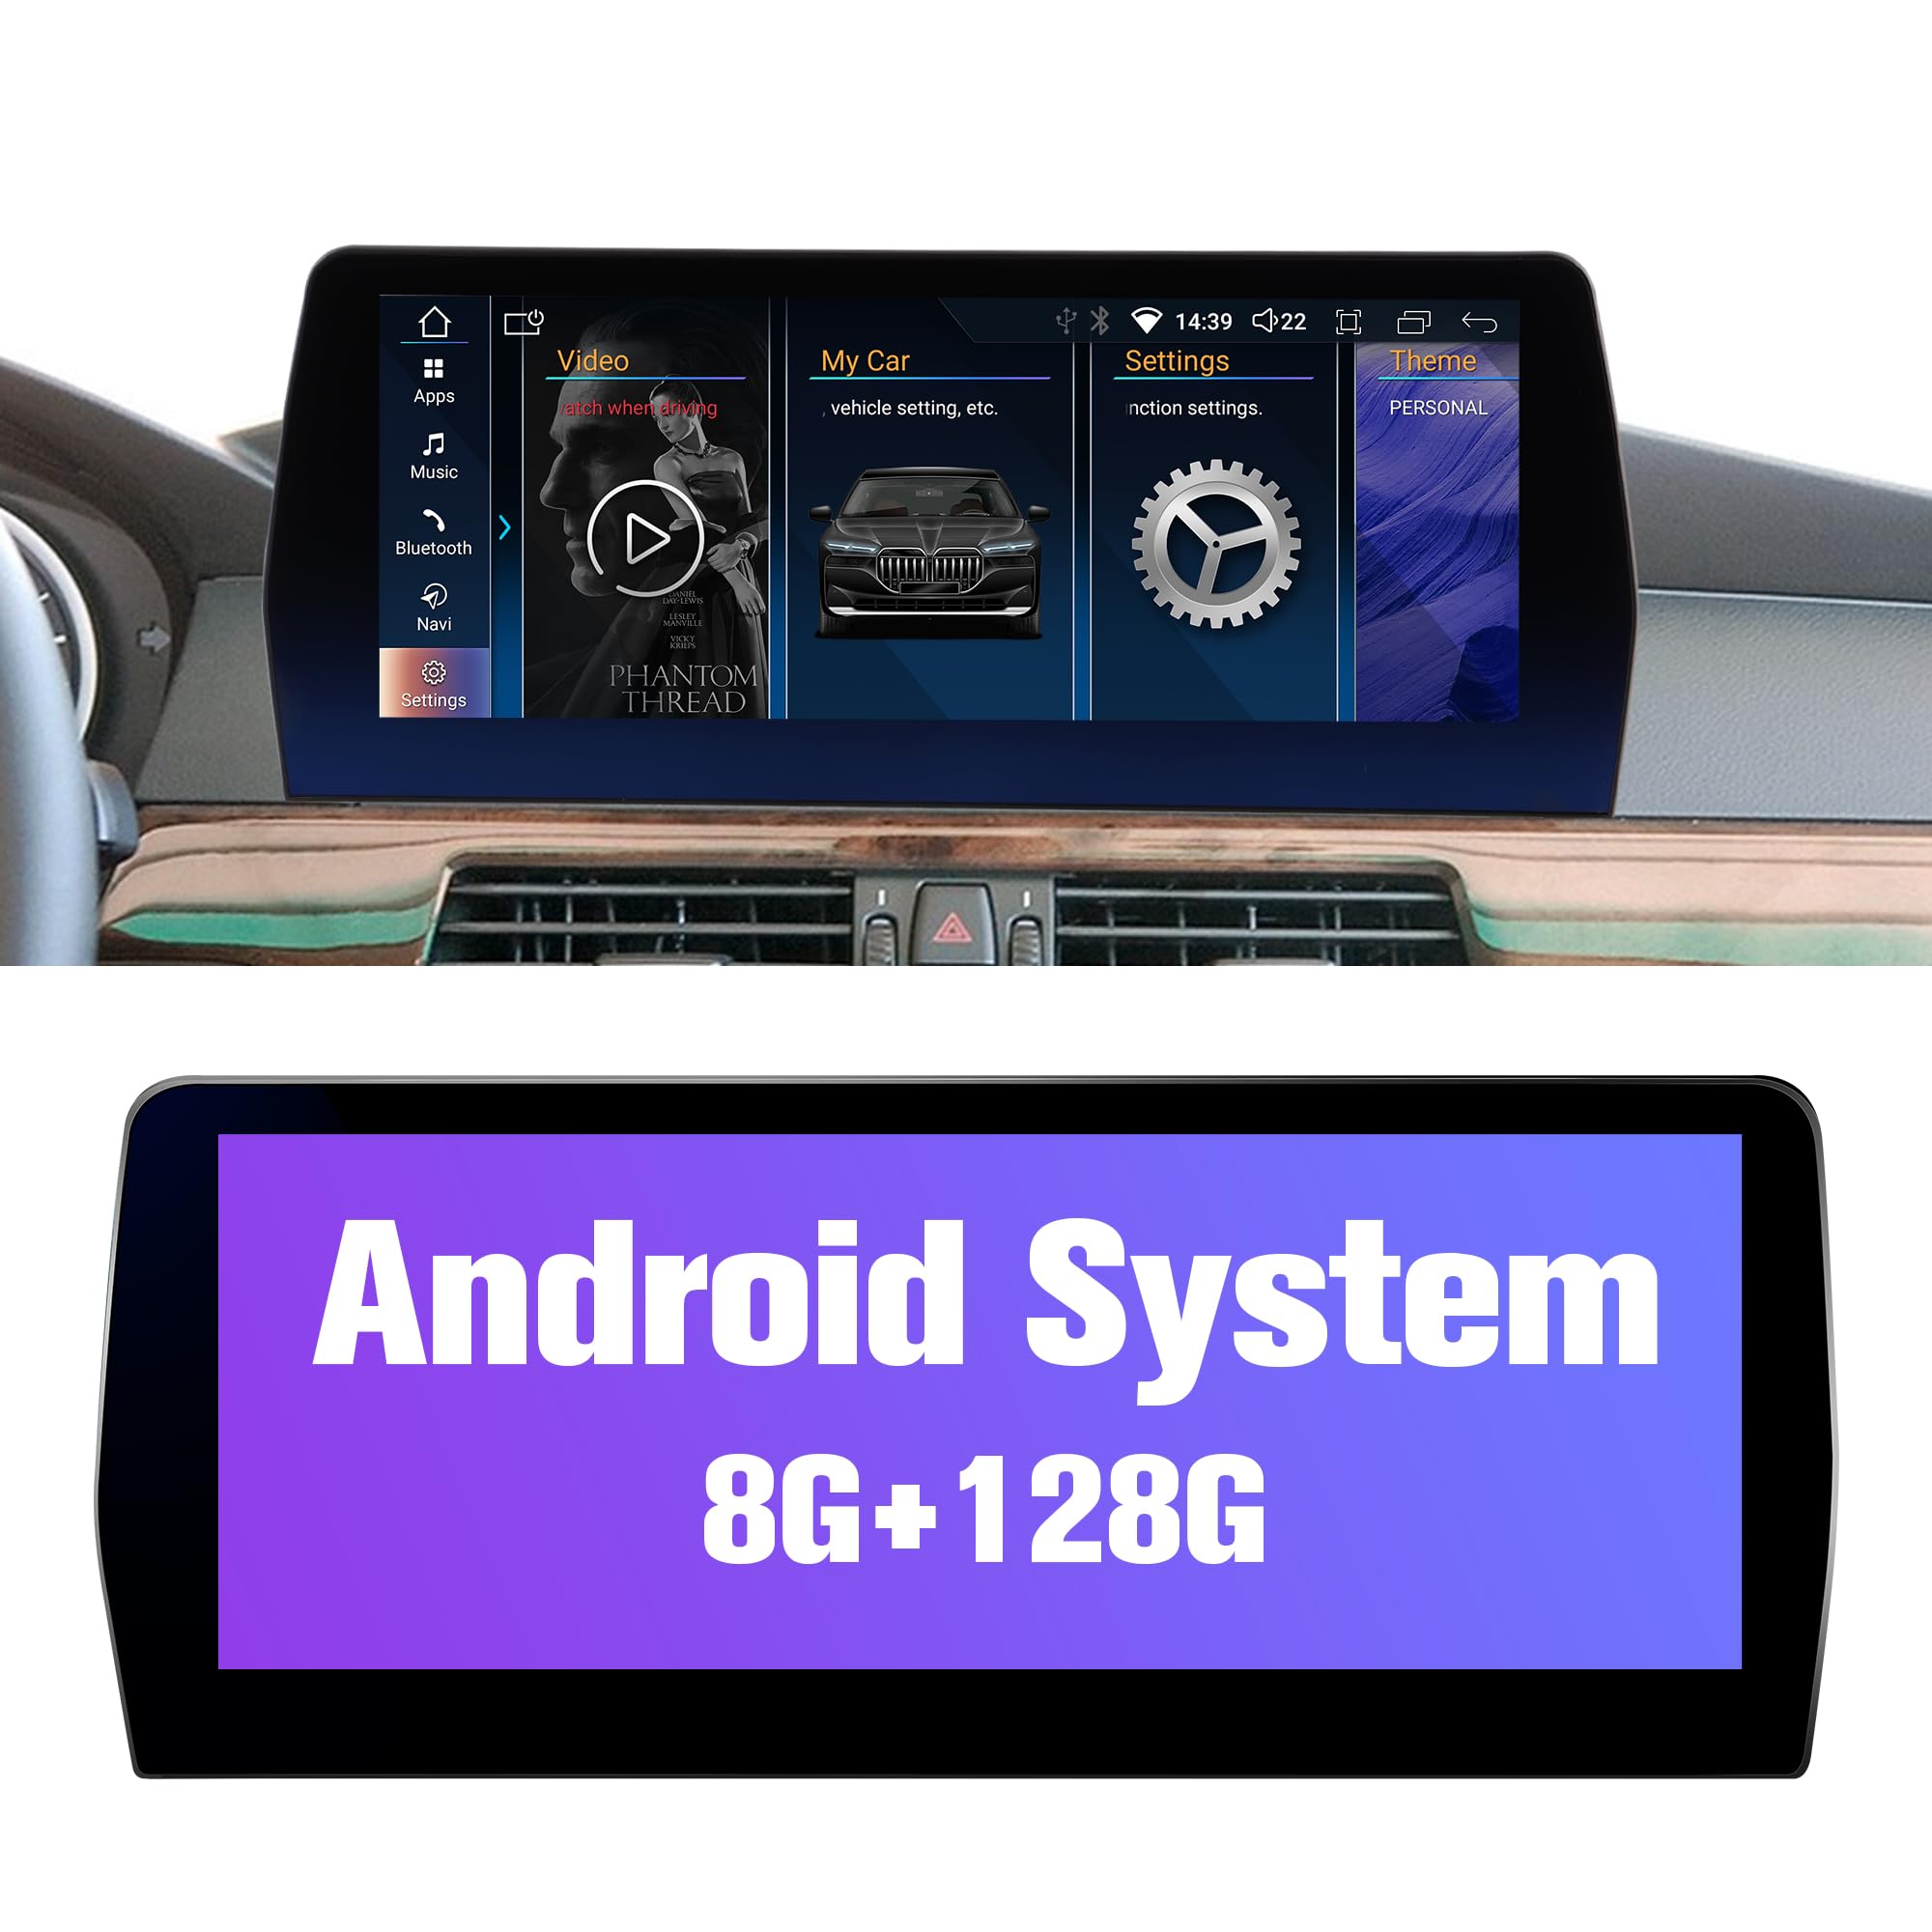
Figure 1: Pioowirk LF12E93CIC-128G 12.3" Car Head Unit.
2. Setup and Installation
Careful installation is crucial for optimal performance. It is recommended that installation be performed by a qualified professional.
2.1 Pre-Installation Check
- Verify your BMW 3 Series model (E90, E91, E92, E93) and year (2009-2012).
- Confirm your vehicle has the CIC system with a 4-Pin LVDS port.
- Ensure all components listed in the 'What's in the Box' section are present.
2.2 Installation Steps
- Remove Original Screen: Carefully pry and remove the original car screen from the dashboard. Disconnect its power supply and any other connected cables.
- Connect Wiring Harness: Connect the provided ISO wiring harness to the vehicle's existing wiring. Refer to the wiring diagram for correct connections.
- Connect Peripherals: Connect the GPS antenna, USB cables, microphone, and reversing camera (if applicable) to the new head unit.
- Mount New Head Unit: Securely mount the new 12.3-inch Android head unit into the dashboard opening.
- Initial Power On: Turn on the vehicle's ignition to test the unit.

Figure 2: Comparison of dashboard before and after head unit installation.

Figure 3: Installed car radio in a BMW E90 series vehicle.
2.3 Wiring Diagram
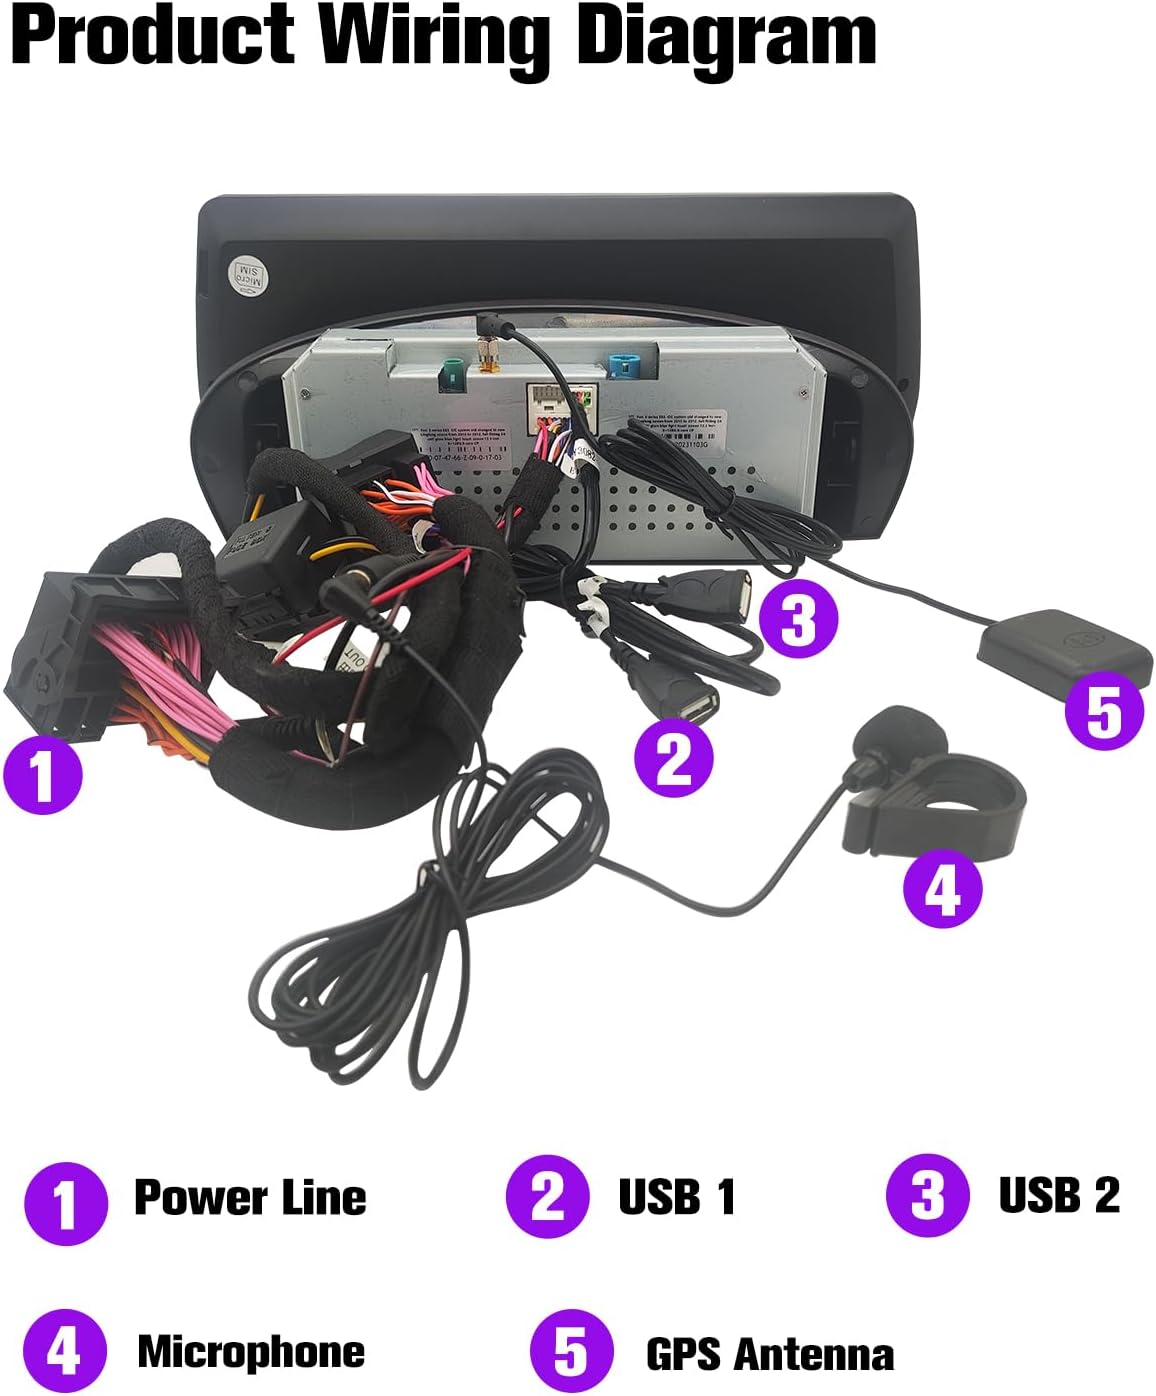
Figure 4: Product Wiring Diagram. 1: Power Line, 2: USB 1, 3: USB 2, 4: Microphone, 5: GPS Antenna.
2.4 Initial Configuration
2.4.1 Screen Resolution Settings
After installation, you may need to adjust the screen resolution to match your vehicle's original iDrive display for optimal clarity and to prevent flickering. Navigate to Setup > Car Settings > Original Car's Screen Resolution and select the appropriate resolution, typically 1280*480 CIC for your model.
Video 1: Demonstrates how to adjust the screen resolution settings on the head unit.
2.4.2 Activating AUX for Sound Output
The head unit transmits audio via the original car's AUX input. You must activate the original car's AUX function for sound to be heard. Connect the provided 3.5mm DC Plug Audio Adapter to the Android unit's AUX audio out and your car's AUX port. Then, on your original car's OEM Radio/CD Player display, use the iDrive knob to navigate to CD/Multimedia > External device > Aux front. Press the number 8 button on the OEM Radio/CD Player to enable AUX.

Figure 5: Steps to connect the audio adapter and activate AUX for sound output.
3. Operating Instructions
Your new head unit features an Octa-Core CPU with 8GB RAM and 128GB ROM, running on an Android system, offering a responsive and flexible user experience.
3.1 Wireless CarPlay and Android Auto
The unit supports wireless CarPlay and Android Auto, allowing seamless integration with your smartphone for navigation, music, calls, and more.
- For Wireless Connection: Turn on your mobile's WLAN (Wi-Fi) and Bluetooth. Search for the unit's Bluetooth name (e.g., "CarBT-C0BC") and pair. Confirm the authorization request on your phone. The connection should be automatic after initial pairing.

Figure 6: Displaying Wireless CarPlay and Android Auto functionality.
Video 2: Instructions on how to connect Android Auto wirelessly.
Video 3: Instructions on how to connect CarPlay wirelessly.
3.2 Bluetooth Connectivity
Connect your phone via Bluetooth for hands-free calling and audio streaming.

Figure 7: Bluetooth interface for phone pairing and contact search.
3.3 GPS Navigation
The unit includes built-in GPS functionality for navigation. You can use online or offline maps.

Figure 8: GPS Navigation display with route information.
3.4 Rear Camera Support
The unit supports a backup camera, providing a clear view when reversing, enhancing safety.

Figure 9: Example of backup camera display on the head unit.
3.5 Split-Screen Mode
Utilize the split-screen feature to run two applications simultaneously, such as navigation and music playback.
3.6 Steering Wheel Control
The unit retains original steering wheel control functionality, allowing you to manage audio and calls without taking your hands off the wheel.
3.7 Original Car System Integration
The new Android multimedia player integrates with your original radio, iDrive system, and amplifier system, preserving existing car functions.

Figure 10: Display of original car information and retained functions.
4. Maintenance
To ensure the longevity and optimal performance of your head unit, follow these maintenance guidelines:
- Screen Cleaning: Use a soft, lint-free cloth to gently wipe the screen. Avoid abrasive cleaners or harsh chemicals.
- Software Updates: Periodically check for and install software updates to ensure the system runs efficiently and has the latest features.
- Avoid Extreme Temperatures: Do not expose the unit to extreme heat or cold for extended periods.
- Cable Connections: Ensure all cables are securely connected. Loose connections can lead to intermittent issues.
5. Troubleshooting
This section addresses common issues you might encounter with your head unit.
5.1 No Sound from Head Unit
- Check AUX Activation: Ensure the original car's AUX function is activated as described in Section 2.4.2. The head unit relies on the car's AUX input for audio output.
- Audio Cable Connection: Verify that the 3.5mm audio adapter cable is correctly connected between the head unit and the car's AUX port.
- Volume Levels: Check both the head unit's volume and the original car's volume settings.
5.2 Screen Flickering
- Adjust Screen Resolution: Navigate to Setup > Car Settings > Original Car's Screen Resolution and select the correct resolution for your vehicle model (e.g., 1280*480 CIC). Incorrect resolution settings are a common cause of flickering.
- Cable Check: Ensure the LVDS cable connecting the head unit to the car's display system is securely seated.
5.3 Wireless CarPlay/Android Auto Connectivity Issues
- Bluetooth and Wi-Fi: Ensure both Bluetooth and Wi-Fi are enabled on your smartphone and the head unit.
- Re-pair Device: Try deleting the paired device from both your phone and the head unit, then re-pair them.
- Software Updates: Ensure both your phone's operating system and the head unit's software are up to date.
5.4 Unit Not Powering On
- Power Connections: Verify all power cables are correctly and securely connected to the vehicle's power source and the head unit.
- Vehicle Fuse: Check the relevant fuse in your vehicle's fuse box that supplies power to the car stereo system.
6. Specifications
| Brand | Pioowirk |
| Model Name | LF12E93CIC-128G |
| Screen Size | 12.3 Inches |
| Operating System | Android |
| Memory Storage Capacity | 128 GB |
| RAM | 8 GB |
| CPU | Octa Core |
| Display Type | IPS |
| Touch Screen Type | Capacitive |
| Connectivity Technology | USB, Bluetooth, WiFi, 4G |
| Supported Navigation System | GPS |
| Compatible Flash Memory Type | SD |
| Special Features | Wireless CarPlay, Android Auto, 4K Video, Screen Mirroring, Backup Camera, DVR, OBD, TPMS, DAB, Steering Wheel Control, Microphone, Phone book search, Split-Screen Mode |
| Item Weight | 1 Kilogram |
7. What's in the Box
The package includes the following components:
- Pioowirk 12.3" Android Car Head Unit
- ISO Wiring Harness
- Audio Cable (3.5mm DC Plug Audio Adapter)
- USB Cables (2)
- GPS Antenna
- Microphone
- Reversing Camera (if included in package variant)
- Removal Tools
- Vehicle Mount
- 4G Antenna
- User Manual

Figure 11: Overview of included accessories.
8. Warranty and Support
8.1 Warranty Information
This Pioowirk head unit comes with a 1-year manufacturer's warranty for the screen. Please retain your proof of purchase for warranty claims.
8.2 Customer Support
For technical assistance, troubleshooting beyond this manual, or warranty inquiries, please contact Pioowirk customer support through the retailer where the product was purchased. Provide your model number (LF12E93CIC-128G) and purchase date for faster service.