1. Introduction
Thank you for purchasing the Retro GamePro RG353PS Handheld Game Console. This device is designed to provide a portable gaming experience with a wide range of supported game formats. This manual will guide you through the setup, operation, and maintenance of your new console to ensure optimal performance and enjoyment.
2. Package Contents
Please check the box for the following items:
- 1 x RG353PS Game Console
- 1 x 64GB SD Card (pre-installed with games)
- 1 x USB Charging Cable
- 1 x User Manual (this document)
- 1 x Screen Protector
- 1 x Wipes
3. Product Overview
The RG353PS features a compact design with a 3.5-inch IPS screen, dual analog sticks, a D-pad, and standard gaming buttons. It runs on a Linux 64-bit system and supports various connectivity options.

Figure 3.1: The Retro GamePro RG353PS handheld game console, showcasing its compact design and control layout.

Figure 3.2: Three Retro GamePro RG353PS consoles in different color variants: gray, white, and purple transparent.
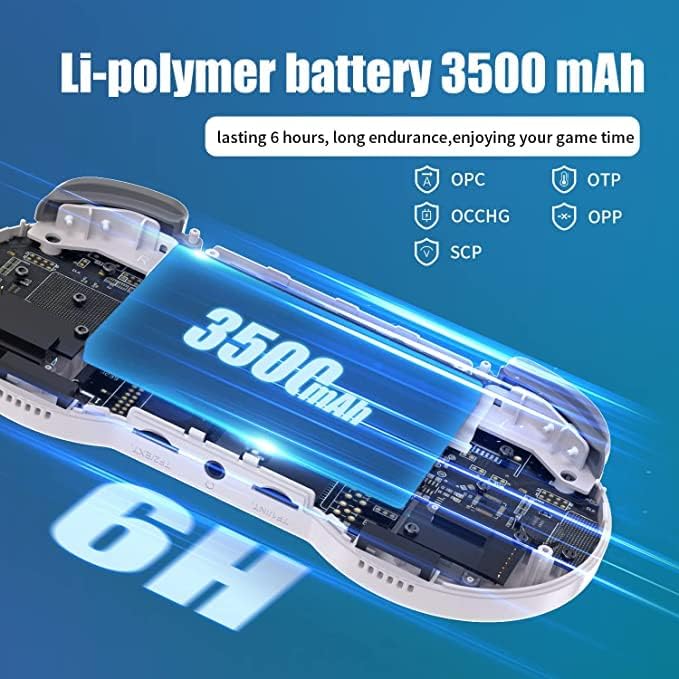
Figure 3.3: Various views of the RG353PS console, highlighting its top, bottom, front, back, and side profiles, detailing button placement, ports, and overall ergonomic design.
4. Setup
4.1 Charging the Console
Before first use, fully charge the console. Connect the included USB charging cable to the console's charging port and a compatible USB power adapter (not included). A full charge takes approximately 4 hours and provides up to 6 hours of gameplay.
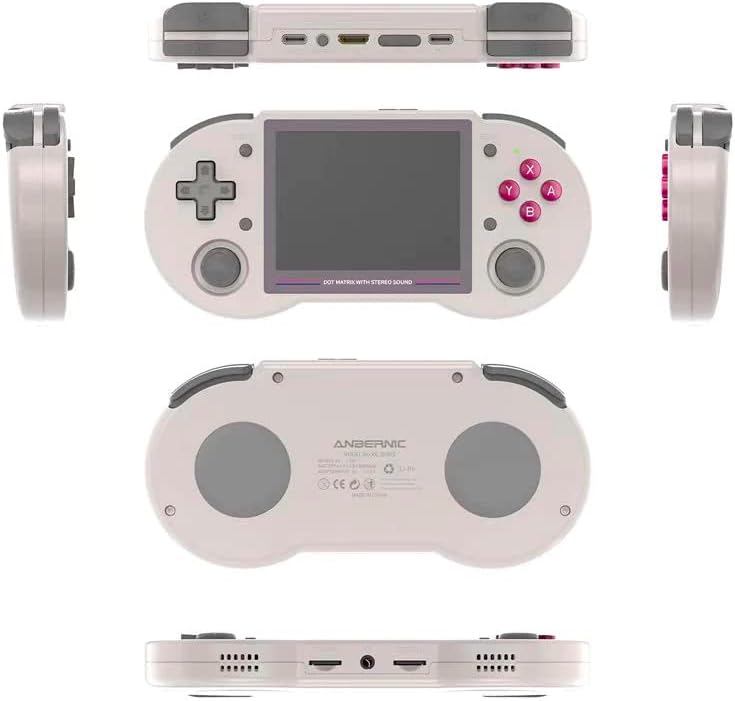
Figure 4.1: An internal diagram of the RG353PS console, emphasizing its 3500 mAh Li-polymer battery, which provides up to 6 hours of gameplay.
4.2 Inserting TF Cards
The RG353PS has two TF card slots. One 16GB TF card for the Linux system and one 128GB TF card for games are typically included. You can expand game storage up to 512GB by replacing the game TF card. Ensure the console is powered off before inserting or removing TF cards.
4.3 Powering On/Off
To power on, press and hold the power button located on the side of the console until the screen illuminates. To power off, press and hold the power button until a shutdown menu appears, then select 'Shutdown'. A quick press of the power button will put the console into sleep mode.
5. Operating Instructions
5.1 System Navigation
The console runs on a Linux 64-bit system. Use the D-pad or left analog stick to navigate through menus and select options. The 'A' button typically confirms selections, and the 'B' button returns to the previous screen.
5.2 Language Settings
The system interface supports multiple languages, including English, Spanish, French, and German. To change the system language, navigate to the system settings menu. Note that while the system interface can be localized, game content is primarily available in Chinese or English.
5.3 Game Selection and Launch
Games are organized by console type. Navigate to the desired console emulator, then select a game from the list. Press the 'A' button to launch the game. To exit a game, refer to the specific emulator's hotkey combination (often a combination of Function + Start or Select buttons).
6. Connecting to External Devices
6.1 HDMI Output
The RG353PS supports HDMI output, allowing you to connect the console to a larger screen like a TV or monitor. Use a mini-HDMI to HDMI cable (not included) to connect the console to your display. The console will automatically switch to external display mode.

Figure 6.1: The RG353PS console connected to a television screen via HDMI, demonstrating its capability to output video to a larger display. A Bluetooth gamepad is also shown, indicating support for external controllers.
6.2 Bluetooth Gamepad Connection
The console supports Bluetooth gamepads for wireless control, enabling multiplayer gaming when connected to an external display. To pair a Bluetooth gamepad, navigate to the Bluetooth settings in the system menu and follow the on-screen instructions to discover and connect your device.
6.3 Wi-Fi Connectivity
The RG353PS supports external network card Wi-Fi for online play and system updates. Connect a compatible Wi-Fi dongle to one of the console's USB ports. Access Wi-Fi settings in the system menu to connect to your wireless network.

Figure 6.2: Two RG353PS consoles displaying the same game, illustrating the 5G WiFi online play feature for multiplayer gaming.
7. Game Management
7.1 Supported Game Formats
The RG353PS supports a wide array of game formats, including but not limited to: PSP, DC, SS, PS1, NDS, N64, CPS1, CPS2, FBA, NEOGEO, GBA, GBC, GB, SFC, FC, MD, SMS, GG, MSX, PCE, WSC, WIN, NGG. Users can download games in these relevant formats.
7.2 Adding Games
To add more games, transfer compatible game ROMs to the game TF card. It is recommended to organize games into folders corresponding to their respective console systems for easier navigation within the console's interface.
8. Maintenance
8.1 Cleaning
Use a soft, dry cloth to clean the console's exterior. For the screen, use the included wipes or a microfiber cloth specifically designed for electronics. Avoid using harsh chemicals or abrasive materials.
8.2 Battery Care
To prolong battery life, avoid fully discharging the battery frequently. If storing the console for an extended period, charge it to approximately 50% and store it in a cool, dry place.
8.3 Screen Protection
Apply the included screen protector to prevent scratches and damage to the display. Follow the instructions provided with the screen protector for proper application.
9. Troubleshooting
9.1 Console Does Not Power On
- Ensure the battery is charged. Connect the console to a power source and allow it to charge for at least 30 minutes before attempting to power it on again.
- Verify that the power button is being pressed and held correctly.
9.2 Games Are Not Loading or Missing
- Check if the game TF card is properly inserted into its slot.
- Ensure the game files are in a supported format and correctly placed in the appropriate directories on the TF card.
- Some games may require specific emulator settings; consult online resources for advanced configurations if necessary.
9.3 Display Issues
- If the screen is blank or flickering, try restarting the console.
- Ensure the screen protector is applied smoothly without air bubbles or debris.
10. Specifications
| Feature | Detail |
|---|---|
| System | Linux 64-bit |
| CPU | RK3566 Quad-Core 64-bit Cortex-A55, up to 1.8GHz |
| RAM | LPDDR4 1GB |
| Screen | 3.5-inch IPS full viewing angle, OCA full fit, 640x480 resolution |
| Storage | Dual TF card slots, supports up to 512GB (16GB for system, 128GB for games included) |
| Battery | Li-polymer 3500 mAh, 6 hours battery life |
| Charging | 1.3A charging, 4 hours for full charge |
| Connectivity | HDMI output, Bluetooth, external network card Wi-Fi, Double OTG, 3.5mm stereo earphones |
| Dimensions | 6.85 x 3.19 x 0.79 inches |
| Weight | 15 ounces |
| Supported Languages | System interface supports English, Spanish, French, German, and more than 20 others. Game content primarily Chinese or English. |
11. Warranty and Support
For warranty information and technical support, please refer to the documentation provided at the time of purchase or contact your retailer. Keep your purchase receipt as proof of purchase.