Miuzei Program A17
Miuzei Ultimate Arduino Starter Kit Instruction Manual
Model: Program A17
1. Introduction
This manual provides comprehensive instructions for setting up, operating, and maintaining your Miuzei Ultimate Arduino Starter Kit. This kit is designed for beginners and enthusiasts interested in electronic programming projects compatible with Arduino R3 Uno.
The Miuzei Ultimate Arduino Starter Kit includes over 240 pieces, offering a wide range of components for various projects. It is an excellent resource for learning Arduino-compatible programming.
2. Kit Contents
Before you begin, please verify that all components listed below are present in your kit. The kit is organized in a good quality storage box with plate divisions to prevent clutter.

Figure 2.1: Overview of all components included in the Miuzei Ultimate Arduino Starter Kit.
The kit typically includes (but is not limited to):
- Arduino-compatible main control board
- Breadboard
- Stepper Motor
- Power Supply Module
- Transistors
- LEDs (various colors)
- Resistors
- Capacitors
- Sensors (e.g., ultrasonic distance sensor, touch sensor)
- Servo Motor
- LCD Display
- Keypad Module
- Jumper Wires
- USB Cable
- 9V 1A Power Adapter
- RFID Module with tags
- Joystick Module
- IR Remote Control and Receiver
- And many more electronic components.
Many components, such as the ultrasonic distance sensor and touch sensor modules, come with pre-soldered pin headers, eliminating the need for self-soldering.
3. Setup and Initial Connection
This section guides you through the basic setup of your Arduino-compatible board and connecting it to your computer.
3.1 Understanding the Arduino-Compatible Board
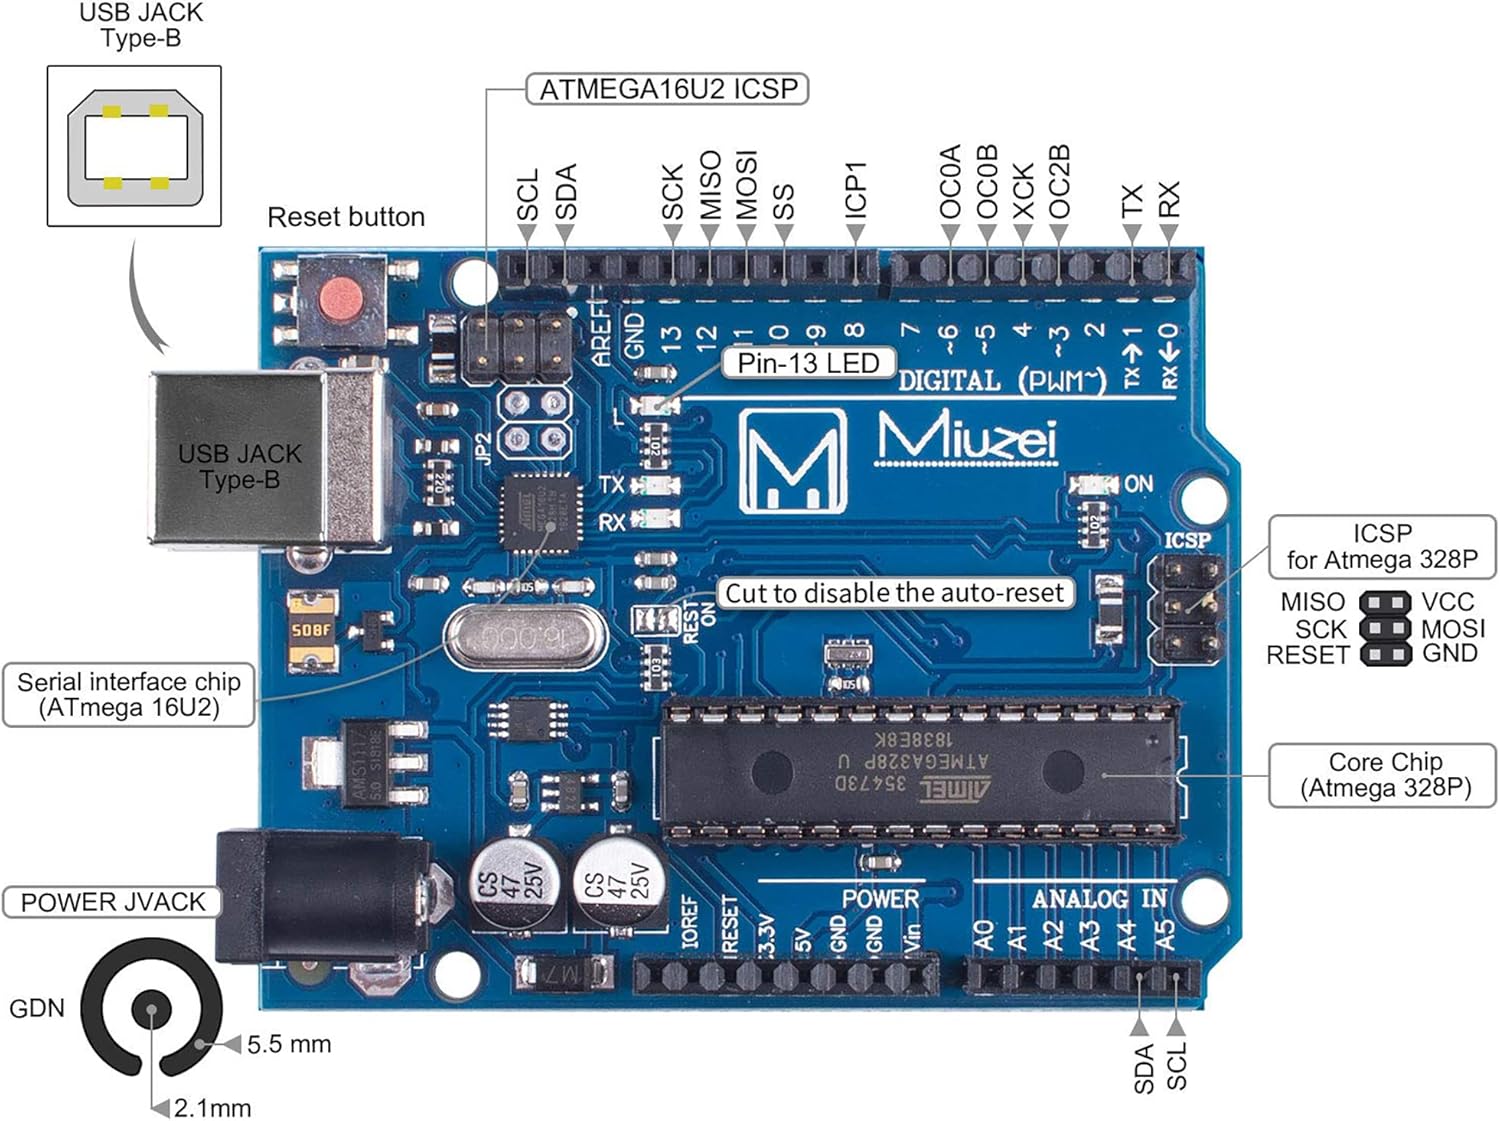
Figure 3.1: Key components and ports of the Miuzei Arduino-compatible board.
Familiarize yourself with the board's layout, including the USB Type-B port for computer connection, the power jack, digital and analog pins, and the main microcontroller chip.
3.2 Software Installation
- Download and install the Arduino IDE (Integrated Development Environment) from the official Arduino website (www.arduino.cc/en/software).
- Install the necessary drivers for your Arduino-compatible board. These are usually included with the Arduino IDE installation or can be found on the Miuzei support page.
3.3 Connecting the Board
- Connect one end of the provided USB cable to the USB Type-B port on your Arduino-compatible board.
- Connect the other end of the USB cable to an available USB port on your computer.
- The power LED on the board should illuminate, indicating it is receiving power.
- Open the Arduino IDE. Go to Tools > Board and select the appropriate board (e.g., "Arduino Uno").
- Go to Tools > Port and select the serial port corresponding to your connected Arduino board.
Your board is now ready for programming.
4. Operating and Programming
The Miuzei Starter Kit is designed to facilitate learning and experimentation with electronics and programming. It comes with extensive tutorial resources.
4.1 Accessing Tutorials and Lessons
A comprehensive tutorial in English with over 28 lessons is available online. This resource provides clear guidance for various projects.

Figure 4.1: Instructions for downloading the tutorial, code lessons, libraries, and datasheets.
To download the tutorial and associated files (code, libraries, datasheets), please refer to the website address provided in the product manual or packaging. Follow the on-screen instructions to download the ZIP data containing all resources.
4.2 Building Projects
The kit allows you to build numerous projects. Here are some examples of circuit diagrams and applications you can explore:

Figure 4.2: Examples of project setups and circuit diagrams.
Each lesson in the tutorial will guide you through connecting components on the breadboard and writing the necessary code in the Arduino IDE. Ensure all connections are secure and correct before uploading code to the board.
4.3 Powering Your Projects
The kit includes a 9V 1A power supply. All projects can be powered via the USB connection from your computer or using the included power adapter connected to the board's power jack.
4.4 Component Quality and Features
Miuzei emphasizes quality and ease of use. For instance, the kit includes:
- Soldered Components: Ultrasonic distance sensor and touch sensor modules come with pre-soldered pin headers, simplifying assembly.
- Durable Servos: Servos feature metal gears for enhanced stability and longevity compared to plastic alternatives.
- User-Friendly Sensors: Sensors like the DHT11 (temperature and humidity) are provided with cables for easy connection.
- Reliable Power Supply: The power supply is CE-certified for safety and reliability.

Figure 4.3: Comparison illustrating the quality and convenience features of Miuzei components.
5. Maintenance and Storage
Proper maintenance and storage will extend the lifespan of your Miuzei Ultimate Arduino Starter Kit components.
- Storage: Always store components in the provided storage box with divisions. This prevents components from getting lost or damaged and keeps your workspace tidy.
- Handling: Handle electronic components with care. Avoid bending pins excessively or applying undue force.
- Cleanliness: Keep components free from dust and moisture. Use a soft, dry cloth for cleaning if necessary.
- Power Off: Disconnect power from your Arduino board and projects when not in use to prevent accidental short circuits or component damage.
6. Troubleshooting
If you encounter issues while using your Miuzei Ultimate Arduino Starter Kit, consider the following common troubleshooting steps:
- Board Not Detected:
- Ensure the USB cable is securely connected to both the board and your computer.
- Verify that the correct board type and serial port are selected in the Arduino IDE (Tools > Board and Tools > Port).
- Reinstall Arduino IDE drivers if necessary.
- Code Upload Errors:
- Check for syntax errors in your code. The Arduino IDE will highlight these.
- Ensure the board is correctly connected and the right port is selected.
- Disconnect any components that might interfere with the upload process (e.g., certain sensors or modules connected to pins 0 and 1).
- Project Not Working as Expected:
- Double-check all wiring connections against the circuit diagram in the tutorial. Loose or incorrect connections are common issues.
- Verify component polarity (e.g., LEDs, diodes, electrolytic capacitors).
- Ensure components are correctly inserted into the breadboard.
- Review your code logic. Use the Serial Monitor in the Arduino IDE to debug your program.
- Consult the online tutorials and community forums for specific project issues.
- Power Issues:
- Ensure the power supply module is correctly connected and providing the correct voltage.
- If using the external power adapter, ensure it is securely plugged into the board's power jack and a working power outlet.
For more detailed troubleshooting, refer to the specific lesson in the online tutorial that corresponds to your project.
7. Specifications
Key technical specifications for the Miuzei Ultimate Arduino Starter Kit:
| Feature | Specification |
|---|---|
| Brand | Miuzei |
| Model Name | Kit Starter compatibile con Arduino |
| Manufacturer Reference | Program A17 |
| Package Dimensions | 32.7 x 23.9 x 6.7 cm |
| Product Weight | 930 g |
| Compatible Devices | Electronic components, Microcontroller (Arduino), Sensors |
| Included Components | Control board, Breadboard, Stepper Motor, Power Supply Module, Transistor, LED, etc. |
| RAM Memory Technology | DDR3L |
| Operating System (compatible) | Linux |
| Processor Manufacturer | Atmel |
| Number of USB Ports | 2 |
8. Warranty and Support
Miuzei is committed to providing high-quality electronic components. For any questions, technical assistance, or support regarding your Miuzei Ultimate Arduino Starter Kit, please refer to the official Miuzei website or contact their customer service directly.
Please retain your purchase receipt for any warranty claims.
Ask a question about this manual
Ask about setup, troubleshooting, compatibility, parts, safety, or missing instructions. Manuals+ will review the question and use this page’s manual context to help answer it.