1. Introduction
This manual provides essential information for the safe and efficient operation of your DIANQI 12V DC 70W Sprayer Pump. Please read these instructions carefully before installation and use, and retain them for future reference.
The DIANQI 12V DC 70W Sprayer Pump is a self-priming diaphragm pump designed for various applications including home boosting, garden sprinklers, car washing, and use in boats or RVs. It features a robust ABS and soft rubber construction for vibration isolation and includes overload and overheat protection for enhanced safety.
2. Safety Instructions
- Ensure the power supply matches the pump's voltage (DC 12V).
- Do not run the pump continuously for more than 6 hours to prevent overheating.
- Always disconnect power before performing any maintenance or installation.
- Ensure all connections are secure and watertight to prevent leaks and electrical hazards.
- Install a filter on the inlet side to prevent debris from entering and damaging the pump.
- Keep the pump body sealed to prevent moisture and dust ingress.
- This pump is designed for water transfer; do not use it with flammable or corrosive liquids.
3. Product Overview
3.1 Key Features
- Constructed with solid ABS and soft rubber for vibration isolation.
- Self-priming function, allowing mounting above the water tank.
- Sealed pump body to prevent moisture and dust.
- Overload and overheat protection for safe operation.
- Adjustable pressure setting.
3.2 Specifications
| Parameter | Value |
|---|---|
| Rated Power | 72W |
| Voltage | DC 12V (9-14.4V) |
| Current | 6A |
| Maximum Flow Rate | 6 L/Min |
| Pressure Setting | 0.9 MPA (130 PSI) |
| Vertical Suction Lift | 2 meters (6.6 feet) |
| Self-priming Height | 9.8 feet |
| Dimensions (L x W x H) | 6.3" x 3.8" x 3.8" (160mm x 97mm x 97mm) |
| Material | ABS and Soft Rubber |
| Weight | 907 Grams (2 pounds) |

Figure 1: Pump Dimensions and Specifications
4. Setup and Installation
- Identify Inlet and Outlet: Clearly distinguish the water inlet and outlet ports on the pump. The inlet typically has a filter recommendation.

Figure 2: Inlet and Outlet Identification
- Connect Pipes: Connect your water pipes to the inlet and outlet ports. Ensure all connections are tight and leak-free. The pump is designed for 20.6mm (0.81 inch) pipes. It is highly recommended to install a filter on the inlet pipe to prevent debris from entering the pump.

Figure 3: Typical Connection Diagram
- Mounting: The pump can be mounted above the water tank due to its self-priming capability. Use the integrated mounting feet to secure the pump to a stable surface.

Figure 4: Mounting Hole Detail
- Electrical Connection: Connect the pump to a DC 12V power source. Ensure the red wire is connected to the positive (+) terminal and the black wire to the negative (-) terminal.
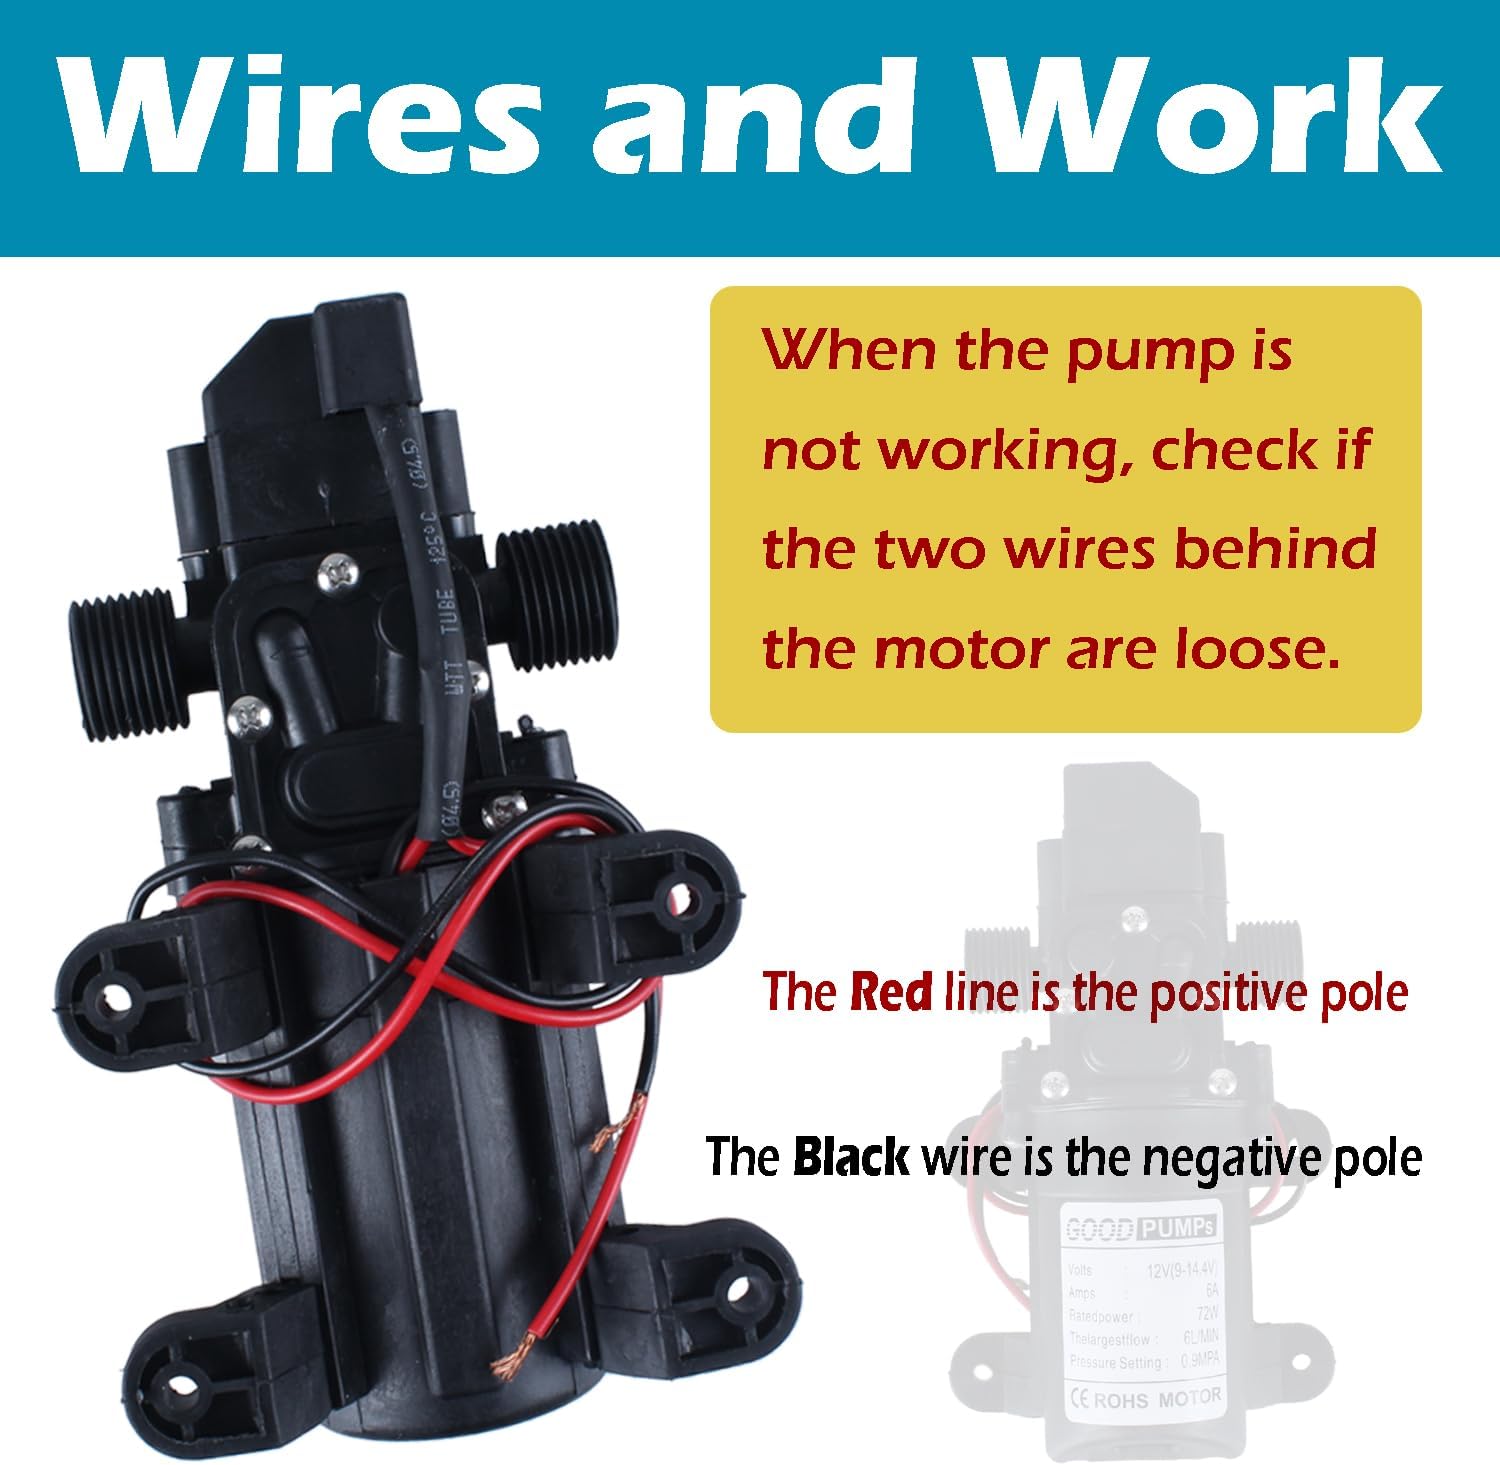
Figure 5: Electrical Wiring
5. Operating Instructions
- Initial Start-up: Once all connections are secure and the pump is properly positioned, apply power. The pump will self-prime and begin to draw water.
- Continuous Operation: The pump is designed for intermittent use. Do not operate the pump continuously for more than 6 hours to prevent motor damage from overheating.
- Adjusting Pressure: The pump's pressure can be slightly adjusted.
- To increase pressure, tighten the adjustment screw clockwise.
- To decrease pressure, loosen the adjustment screw counter-clockwise.

Figure 6: Pressure Adjustment
6. Maintenance
- Regular Inspection: Periodically check all pipe connections for leaks and ensure electrical wires are securely attached.
- Filter Cleaning: If an inlet filter is installed, clean it regularly to prevent clogging and maintain optimal pump performance.
- Wire Check: If the pump is not working, first check if the two wires behind the motor are loose. Re-secure them if necessary.
- Storage: If storing the pump for an extended period, especially in freezing conditions, drain all water from the pump and pipes to prevent damage.
7. Troubleshooting
| Problem | Possible Cause | Solution |
|---|---|---|
| Pump does not start or run. | No power, loose electrical connections, faulty power adapter. | Check power supply. Ensure red wire is positive and black is negative. Verify wires behind the motor are secure. Test power adapter. |
| Low flow or pressure. | Clogged inlet filter, air in the system, kinked hose, low voltage. | Clean inlet filter. Bleed air from the system. Check hoses for obstructions. Ensure stable 12V power supply. Adjust pressure screw. |
| Pump runs but no water flows. | No water in source, air lock, inlet pipe not submerged, faulty self-priming. | Ensure water source is available. Check for air leaks in inlet line. Ensure inlet pipe is fully submerged. |
| Excessive noise or vibration. | Loose mounting, air in pump, debris in pump. | Securely mount the pump. Check for air leaks. Inspect for debris (disconnect power first). |
| Pump overheats and shuts off. | Continuous operation for too long, restricted flow, high ambient temperature. | Allow pump to cool down. Do not run continuously for more than 6 hours. Check for blockages in pipes. Ensure adequate ventilation. |
8. Warranty Information
Warranty information for this product is not explicitly provided in the available documentation. Please refer to the retailer or manufacturer's official website for specific warranty terms and conditions, or contact their customer service directly.
9. Customer Support
For technical assistance, spare parts, or further inquiries, please contact DIANQI customer support through their official channels or the retailer from whom the product was purchased. Please have your model number (GMShuiBeng-12V-4FWS) and purchase date ready when contacting support.