
Introduction
This manual provides detailed instructions for the installation, operation, and maintenance of your Doraimy Lighting 1 Light Hanging Indoor Kitchen Island Pendant Light. Please read thoroughly before beginning installation or use.
Safety Information
- Always turn off the main power supply at the circuit breaker before beginning any electrical installation.
- Consult a qualified electrician if you are unsure about the installation process.
- Ensure all electrical connections are secure and comply with local electrical codes.
- Do not exceed the maximum wattage specified for the light bulb (60W).
- Handle glass components with care to prevent breakage.
- This fixture is intended for indoor use only.
What's in the Box
Verify that all components are present before beginning installation:
- Shade (Glass)
- Mounting Hardware (including wire nuts)
- Canopy/Ceiling Plate
- Lamp Holder with Adjustable Cord

Image: All components included in the product package.
Specifications
| Feature | Detail |
|---|---|
| Brand | Doraimy Lighting |
| Model Number | 3555-3799 |
| Dimensions | 6.25"L x 6.25"W x 50"H (Adjustable) |
| Glass Shade Size | 6.22"L x 5.32"W |
| Canopy Size | 4.75"L x 0.79"W |
| Material | Glass, Metal |
| Color | Smokey Glass, Black Finish |
| Bulb Base | E26 (Bulb Not Included) |
| Max Wattage | 60 Watts (LED 10W, Fluorescent 60W, Incandescent 60W) |
| Voltage | 110 Volts (AC) |
| Installation Type | Hardwired, Semi Flush Mount |
| Compatibility | Flat, Sloped, Slanted, and Vaulted Ceilings |
| Certification | UL Certified |
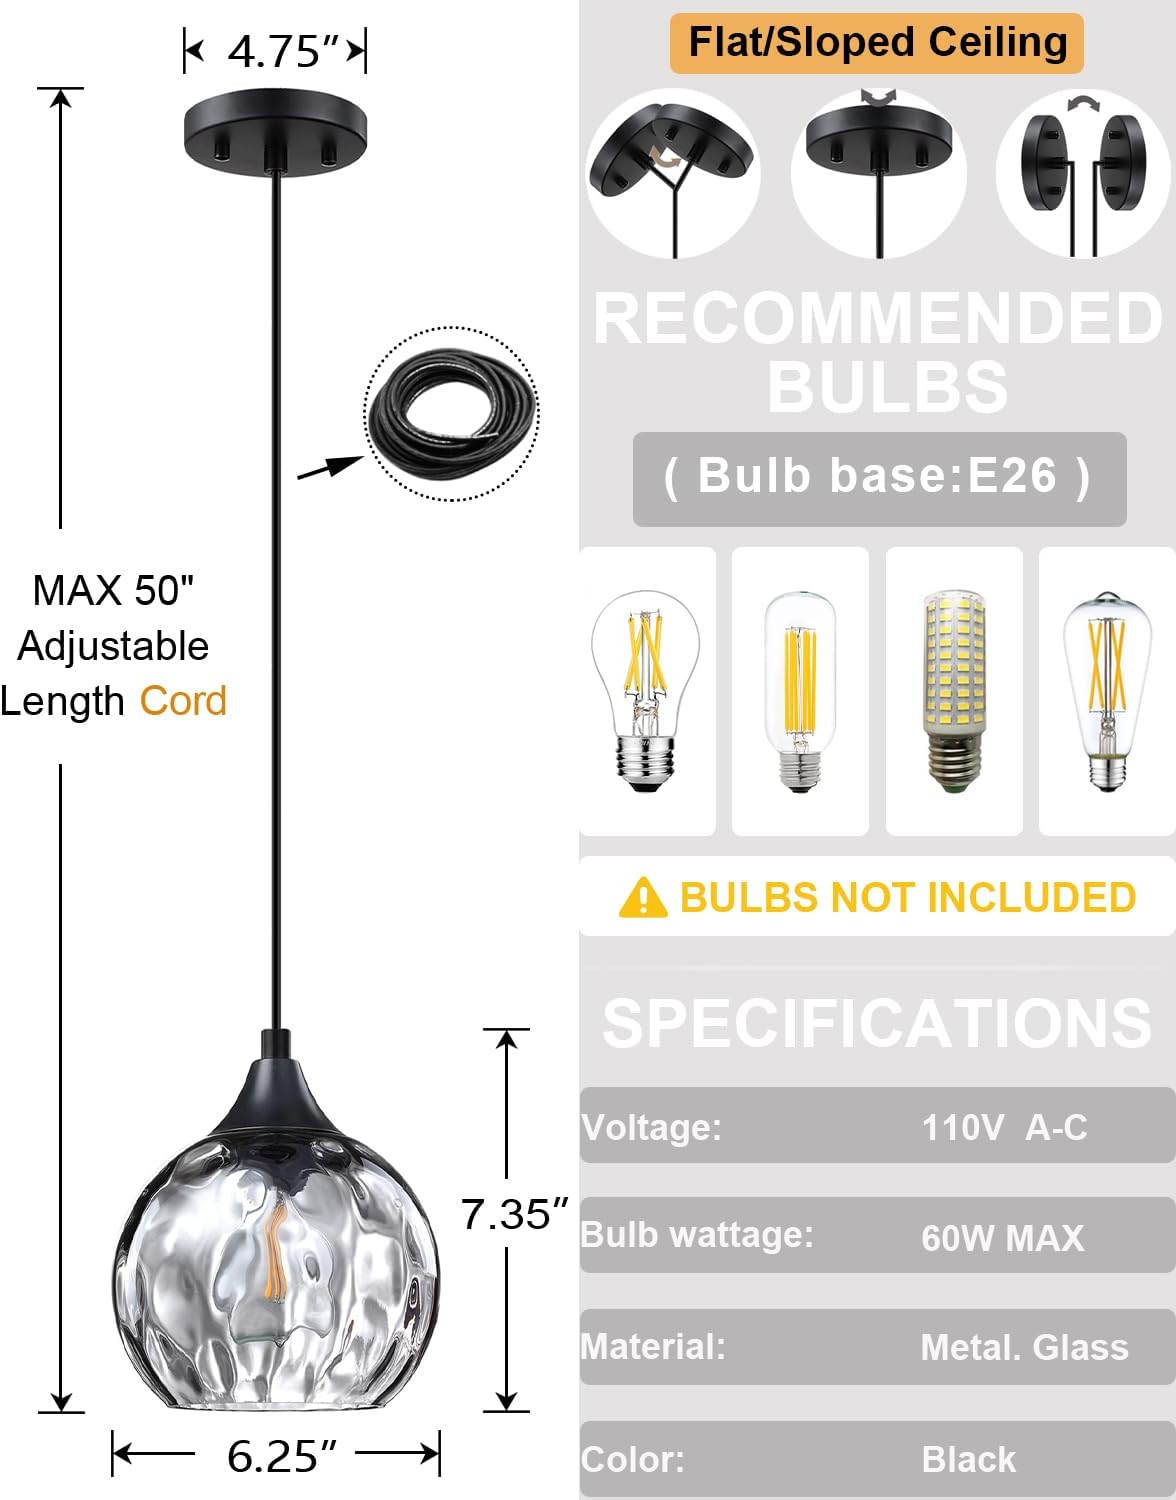
Image: Detailed dimensions and electrical specifications of the pendant light.
Setup and Installation
Follow these steps for proper installation. It is recommended to have a second person assist during installation.
- Prepare for Installation: Turn off power at the circuit breaker. Ensure the mounting surface is secure and can support the fixture's weight.
- Attach Mounting Bracket: Secure the mounting bracket to the junction box in the ceiling using the provided screws.
- Adjust Cord Length: The pendant light comes with a 50-inch adjustable cord. Determine the desired hanging length and adjust the cord by pushing it through the canopy. Secure the cord with the provided strain relief.

Image: Illustration of the adjustable cord feature, allowing customization of hanging length.
- Wire Connections: Connect the fixture's wires to the house wires using the provided wire nuts. Connect the black wire from the fixture to the black (live) wire from the ceiling, the white wire from the fixture to the white (neutral) wire from the ceiling, and the green (ground) wire from the fixture to the bare copper (ground) wire from the ceiling. Ensure all connections are tight and secure.

Image: Close-up view of wire nuts used for secure electrical connections.
- Mount the Canopy: Carefully push the wired canopy up to the ceiling, aligning the holes with the mounting bracket. Secure the canopy with the decorative nuts or screws.
- Install the Bulb: Screw an E26 base bulb (not included, max 60W) into the lamp holder.
- Attach the Glass Shade: Carefully screw the glass shade onto the lamp holder until secure.
Video: An official installation guide demonstrating the assembly and mounting process for the pendant light.
Operating Instructions
Once installed, restore power at the circuit breaker. The light fixture operates via a standard wall switch (not included). This fixture is fully dimmable when used with a compatible dimmer switch and dimmable E26 bulbs (both sold separately).

Image: Visual representation of the light fixture in an on and off state within a kitchen environment.
Maintenance
- Cleaning: To clean the fixture, turn off the power and allow it to cool. Wipe with a soft, dry cloth. Do not use abrasive cleaners or solvents as they may damage the finish or glass.
- Bulb Replacement: Ensure power is off before replacing the bulb. Allow the old bulb to cool completely before removing. Screw in the new E26 bulb firmly.
- Inspection: Periodically check all connections and mounting hardware to ensure they remain secure.
Troubleshooting
| Problem | Possible Cause | Solution |
|---|---|---|
| Light does not turn on. | No power to the fixture. Loose wire connections. Faulty bulb. | Check circuit breaker. Ensure all wire connections are secure. Replace bulb. |
| Light flickers. | Loose bulb. Incompatible dimmer switch/bulb. | Tighten bulb. Ensure dimmer and bulb are compatible and rated for dimming. |
| Glass shade is loose. | Shade not screwed on tightly. | Carefully tighten the glass shade onto the lamp holder. |
Warranty and Support
This product comes with a limited warranty. For any questions, concerns, or assistance, please contact us through the Amazon message box. We are committed to providing a friendly purchase experience and will respond as soon as possible.
Manufacturer: leading lighting

