1. Introduction
Thank you for choosing the ALLYOUGER Hot & Cold Top Loading Water Dispenser. This manual provides important information regarding the safe operation, installation, maintenance, and troubleshooting of your new appliance. Please read this manual thoroughly before using the water dispenser and retain it for future reference.
This water dispenser is designed to provide both hot and cold water on demand, suitable for home, office, or cafe environments. It accommodates 2-gallon and 5-gallon water bottles (not included).
2. Important Safety Information
To reduce the risk of injury or property damage, please adhere to the following safety precautions:
- Electrical Safety: Ensure the voltage matches your power supply (110V, 60HZ). Do not operate with a damaged power cord or plug.
- Initial Setup: Keep the water dispenser standing vertically for at least 24 hours before its first use to allow the refrigerant to settle.
- Water Loading: Always load the water bottle first and ensure water flows from the taps before plugging in the unit or turning it on. Operating the heating element without water can cause damage.
- Child Safety: The hot water faucet is equipped with a child safety lock. Always engage this lock to prevent accidental burns, especially if children are present.
- Unplug When Not in Use: Always unplug the power cord or turn off the water dispenser when the water bottle is not loaded or is empty.
- Ventilation: Ensure adequate space around the unit for proper heat dissipation. Do not block the heat dissipation exhaust hole.
- Indoor Use Only: This appliance is intended for indoor use only.
3. Product Overview & Features

Front view of the ALLYOUGER Top Loading Water Dispenser, showing a 5-gallon water bottle installed on top and a glass being filled with water from the dispenser.
The ALLYOUGER water dispenser is designed for convenience and safety, offering both hot and cold water options. Key features include:
- Water Heating and Cooling System: Independent switches for heating and cooling. LED indicator lights show operational status.
- Hot Water Temperature: Approximately 194°F (90°C) to 203°F (95°C).
- Cold Water Temperature: Approximately 46.4°F (8°C).
- Kid-Safe Water Dispenser: A safety lock on the hot water faucet prevents accidental dispensing of hot water.
- Integrated Storage Cabinet: A small cabinet at the bottom provides space for storing cups, coffee, or sugar.
- Top Mount Design: Allows clear visibility of the water level in the bottle. Compatible with 2 and 5-gallon water bottles.
- Durable Construction: Features a 304 stainless steel heating tank for healthy water and a press-type water outlet designed for durability.

Diagram illustrating the hot water (194-212°F) and cold water (47-54°F) capabilities of the water dispenser.

Illustration highlighting the child safety lock mechanism on the hot water faucet, designed to prevent accidental burns.

View of the integrated storage cabinet located at the bottom of the water dispenser, suitable for storing cups or other small items.
4. Components & Parts
Familiarize yourself with the main components of your water dispenser:
- Water Bottle Support: Top-mounted area for placing the water bottle.
- Hot Water Faucet: Dispenses hot water, equipped with a safety lock.
- Cold Water Faucet: Dispenses cold water.
- Drip Tray: Removable tray below the faucets to catch spills.
- Storage Cabinet: Bottom compartment for storage.
- Power Switches: Located at the back for heating and cooling functions.
- Power Cord: For connecting to an electrical outlet.
- Heat Dissipation Exhaust Hole: Located at the back for cooling fan operation.
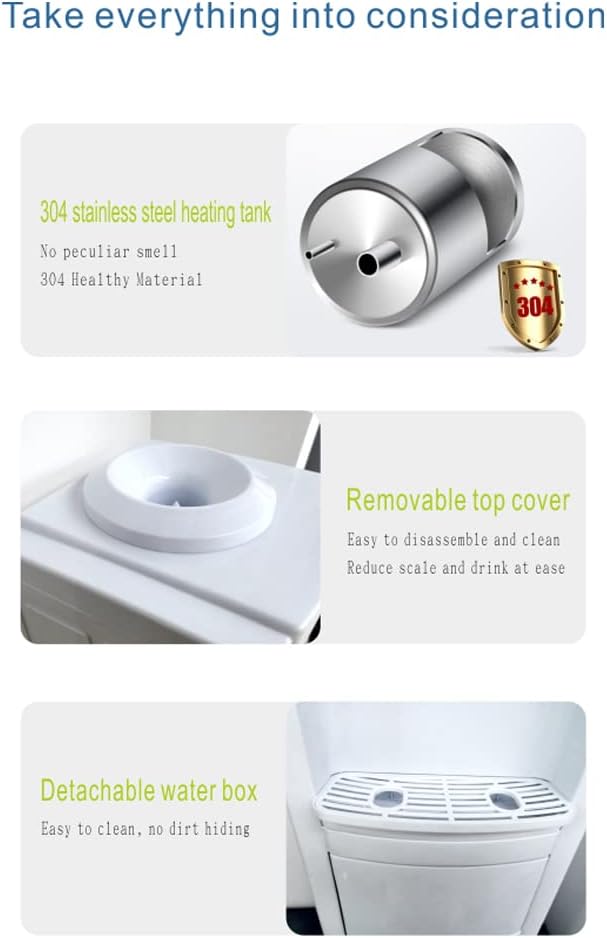
Detailed view of key internal and removable components: the 304 stainless steel heating tank, the removable top cover for easy cleaning, and the detachable water box.

Close-up views of functional elements: the durable press-type water outlet, the heat dissipation exhaust hole with cooling fan, and the standard power cord.
5. Specifications
| Attribute | Value |
|---|---|
| Model Number | HUBSE |
| Color | White |
| Material | Acrylonitrile Butadiene Styrene (ABS), Polypropylene (PP) |
| Overall Dimensions (D x W x H) | 10.31" x 11.76" x 35.68" (approx. 260mm x 300mm x 900mm) |
| Item Weight | 9.4 lbs (approx. 4.3 kg) |
| Voltage | 110V |
| Frequency | 60HZ |
| Heating Power | 500W |
| Cooling Power | 80W |
| Hot Water Temperature | 90°C (194°F) ~ 95°C (203°F) |
| Cool Water Temperature | 8°C (46.4°F) |
| Bottle Compatibility | 2-5 Gallon Water Bottles |
| Installation Type | Freestanding |
| Access Location | Top |
| UPC | 768469884059 |

Dimensional drawing of the water dispenser, indicating its overall size as approximately 300mm (width) x 260mm (depth) x 900mm (height).
6. Installation & Setup
- Unpacking: Carefully remove the water dispenser from its packaging. Retain packaging materials for future transport if needed.
- Placement: Place the dispenser on a flat, stable surface in a cool, dry location away from direct sunlight and heat sources. Ensure there is adequate ventilation around the unit, especially at the back where the heat dissipation exhaust hole is located.
- Allow to Settle: After unpacking, let the water dispenser stand upright for at least 24 hours before plugging it in. This allows the compressor's lubricant and refrigerant to settle.
- Install Water Bottle: Remove the cap from a 2-gallon or 5-gallon water bottle. Invert the bottle and carefully place it onto the water bottle support on top of the dispenser. Ensure it is seated firmly and water begins to flow into the dispenser's reservoir.
- Prime the System: Before plugging in, press both the hot and cold water faucets until water flows out steadily. This ensures the internal tanks are filled and prevents dry heating.
- Connect Power: Once water flows from both faucets, plug the power cord into a grounded 110V, 60Hz electrical outlet.
7. Operating Instructions
- Power On: Locate the red (heating) and green (cooling) switches on the back of the unit. Turn them ON according to your preference. The corresponding LED indicator lights on the front will illuminate.
- Hot Water Dispensing: To dispense hot water, first push the child safety lock button on the hot water faucet, then press the faucet lever. Release the lever to stop the flow. Always ensure the safety lock is engaged after use.
- Cold Water Dispensing: To dispense cold water, simply press the cold water faucet lever. Release the lever to stop the flow.
- Water Bottle Replacement: When the water bottle is empty, turn off the heating and cooling switches, then unplug the unit. Carefully lift the empty bottle off the dispenser. Install a new full bottle following the steps in Section 6. Prime the system again before turning the power back on.
8. Maintenance & Cleaning
Regular cleaning and maintenance will ensure optimal performance and longevity of your water dispenser.
- External Cleaning: Wipe the exterior of the dispenser with a soft, damp cloth. Do not use abrasive cleaners or solvents.
- Drip Tray: The drip tray is removable for easy cleaning. Empty and clean it regularly to prevent overflow and bacterial growth.
- Removable Top Cover & Water Box: The top cover and internal water box are designed to be detachable for thorough cleaning. Refer to the image in Section 4 for visual guidance. Clean these parts with mild soap and water, then rinse thoroughly before reassembling.
- Descaling (Internal Cleaning): Over time, mineral deposits may accumulate in the hot water tank. For descaling, it is recommended to consult a qualified technician or follow specific descaling instructions provided by the manufacturer if available. Always unplug the unit and drain all water before attempting internal cleaning.
- Air Filter (if applicable): Some models may have an air filter near the compressor. Check and clean this filter periodically if present.
9. Troubleshooting
If you encounter issues with your water dispenser, refer to the following common problems and solutions:
| Problem | Possible Cause | Solution |
|---|---|---|
| No hot water | Hot water switch is OFF No water in hot tank Heating element malfunction | Turn ON hot water switch Ensure water bottle is full and water has flowed from faucet Contact customer support |
| No cold water | Cold water switch is OFF No water in cold tank Cooling system malfunction | Turn ON cold water switch Ensure water bottle is full and water has flowed from faucet Contact customer support |
| Water not dispensing | Water bottle empty Bottle not seated correctly Air lock in system | Replace water bottle Re-seat bottle firmly Press faucets until water flows steadily |
| Water leakage | Drip tray full Water bottle cracked or damaged Loose connections | Empty drip tray Replace water bottle Check connections, contact support if persistent |
| Unusual noise | Unit not level Compressor cycling (normal) Fan obstruction | Ensure unit is on a flat, stable surface This is normal operation Check for obstructions near exhaust hole |
If the problem persists after attempting these solutions, please contact customer support.
10. Warranty & Support
For information regarding warranty coverage, technical support, or replacement parts, please contact ALLYOUGER customer service. Details for contacting support are typically found on the product packaging or the manufacturer's official website.
Please have your model number (HUBSE) and purchase date available when contacting support.